|
|
||
|
|
||
|
|
||
SQL Server Surface Area Configuration is a tool that helps you enable, disable, start, or stop the features and services of your local and remote SQL Server 2005 installations. Surface area refers to the memory and other system resources required to run a program. Stopping and disabling unused services allows you to reduce the surface area and makes your system more secure. The tool uses the WMI provider to access the server configuration. To start SQL Server Surface Area Configuration, from the Start Menu, choose All Programs Microsoft SQL Server 2005 Configuration Tools SQL Server Surface Area Configuration. You will see the initial screen shown in Figure 3-10.
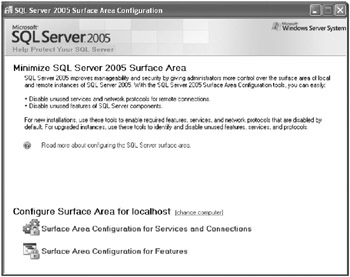
Figure 3-10:
Initial screen of SQL Server Surface Area Configuration.
Surface Area Configuration For Services And Connections allows you to configure the state of SQL Server services. You can stop, pause, resume, and start the SQL Server instance services. Moreover, you are able to configure whether the SQL Server instance will allow remote connections and, if so, which protocols to use. Refer to Figure 3-11.
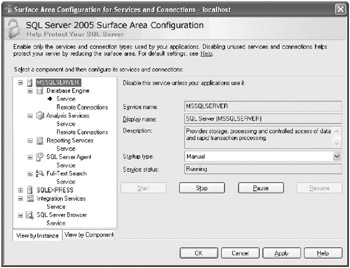
Figure 3-11:
SQL Server Configuration For Services And Connections dialog box.
Surface Area Configuration For Features allows you to enable features on your server. For example, you can enable or disable features such as CLR Integration, Database Mail, Service Broker, or Native XML Web Services, as shown in Figure 3-12.
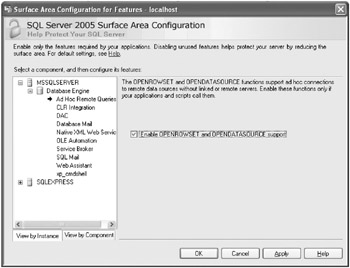
Figure 3-12:
SQL Server Configuration For Features dialog box.
Most of these features can also be configured by using system stored procedures, such as sp_configure. For example, if you want to enable CLR Integration, you could run the following script on the SQL Server instance.
EXEC sys.sp_configure N'clr enabled', N'1'; RECONFIGURE WITH OVERRIDE;
| Note |
Surface Area Configuration For Features executes the sys.sp_configure system stored procedure behind the scenes to configure most of the features. You could easily verify this by running a SQL Server Profiler trace while running the Surface Area Configuration For Features utility. |
The Sac utility is a command-line tool that helps you configure the surface area in local machines and applies the same setting to remote machines. The tool helps you to easily export the surface area settings in a machine to a configuration file and then use the file for other purposes, such as documenting the servers configuration. In the example below, the following code generates the file config.xml with the surface area setting of the local machine.
sac out c:\config.xml
The generated file is an xml-type document that can be used to import the surface area settings into a different machine. For example, to apply the configuration in a server named Server2, you would execute the following command-line batch.
sac in c:\config.xml S Server2
The Sac utility is located in the Program Files\Microsoft SQL Server\90\Shared directory, and you customize the execution by using the different command line arguments that can be seen by using the argument ?.
|
|
||
|
|
||
|
|
||
|
|
||
|
|
||
|
|
||
SQL Server Management Studio is a new graphical tool within SQL Server 2005 that combines and extends the features introduced by Enterprise Manager, Analysis Manager, and Query Analyzer in SQL Server 2000. The tool is built on top of a new integrated development environment (IDE), which is shared by Visual Studio 2005 Development Studio, SQL Server Management Studio, and SQL Server Business Intelligence Development Studio.
By using SQL Server Management Studios you can connect to any existing SQL Server system in your network for which you have the appropriate credentials (depending, of course, on the remote connections configured on the servers).
Start SQL Server Management Studio from the Start menu by choosing All Programs Microsoft SQL Server 2005 SQL Server Management Studio. The application will request the name of the server to which you would like to connect. Select a server from the Server
Once you are working within SQL Server Management Studio, you can connect to another server by clicking the Connect toolbar button at the top of the left tree.
Select the type of server you want to connect to and enter the appropriate information.
If you typically work with more than one server, it is useful to register them in SQL Server Management Studio.
From the View menu, choose Registered Servers, or press Ctrl+Alt+G.
Right-click Database Engine and select New Server Registration from the context menu.
Expand the Server Name drop-down list and select <Browse For More >.
Select local or network servers as needed.
Expand the Database Engine node and select the server you want to register. Click the OK button.
If you would like to connect to a named instance, add a backslash (\) followed by the name of the instance in the Server Name drop-down listbox.
Select the Connection Properties tab to define any special connection attribute that you need.
You can use Object Explorer to manage any of the SQL Server objects. Object Explorer
Figure 3-13:
Object Explorer pane in SQL Server Management Studio.
You will find all of your databases under the Database node. Databases are divided into three groups:
System databases, which are those that SQL Server uses internally
Database snapshots
If you expand one of the User Database nodes, you will obtain a set of Grouping nodes, as shown in Figure 3-14.
Figure 3-14:
Grouping nodes within a User Database node in Object Explorer.
From within a Grouping node, you can access database objects. For example, if you expand the Tables node, you will see all of the tables in the database. You will notice one node that groups the system tables, which are those that SQL Server 2005 uses internally to manage database-
Figure 3-15:
Table actions in Object Explorer.
When you select the Modify option from the context menu, you can alter the table structure; add, remove, or rename
Figure 3-16:
Table modification and script generation in Object Explorer.
Another important task that you can perform with tables is to
Right-click a table and select Open Table from the context menu to view the contents of the entire table.
Use the four toolbar
You can right-click the Diagram pane to add more tables or views to your query or to define the grouping mode for the query.
Select the checkbox to the left of a column name in the Diagram pane to add that column to your query.
| Important |
By default, the asterisk (*) column (which means all columns) appears in the Criteria pane. Using the all columns indicator is not a good practice. Right-click the asterisk column in the Criteria pane and choose Delete from the context menu to delete it. You can then choose exactly the columns that you need. |
Once you have added a column, you can assign a filter to it by adding the condition in the Filter column.
Select the Sort Type and Sort Order values for a column to assign the order that you want for your data.
It is possible to perform complex query operations by using the Open Table context menu.
Open SQL Server Management Studio by clicking Start All Programs Microsoft SQL Server 2005 SQL Server Management Studio.
Connect to your local server.
| Note |
The way that you specify your local server may
|
In Object Explorer, expand the Server node, the Database node, the AdventureWorks database, and the Tables node.
Locate the Production.Product table. Right-click the table and select Open Table from the context menu.
Click the Show Diagram Pane toolbar button, the Show Criteria Pane toolbar button, and the Show SQL Pane toolbar button.
Right-click the asterisk (*) in the Criteria pane and choose Delete from the context menu.
Right-click the blank surface of the Diagram pane and select Add Table from the context menu.
In the Add Table dialog box, scroll through the list of tables to find the ProductCategory (Production) table. Select the table and click the Add button.
Repeat this step to add the ProductSubcategory (Production) table.
Click the Close button to close the Add Table dialog box.
| Tip |
Because the last two tables added to the diagram are both related to the Production table, between them you will see pipes demonstrating these relationships. You will learn more about relationships in Chapter 5, Designing a Database to Solve Business Needs, and Chapter 7, Selecting the Data You Need. |
In the Diagram pane, check the Name column in both the ProductCategory table and the ProductSubcategory table. Check the Name, ProductNumber, ListPrice, and
In the Criteria pane, change the alias for the Name column of the ProductCategory table to Category Name, the alias for the Name column of the ProductSubcategory table to Subcategory Name, and the alias for the Name column of the Product table to Name.
In the Sort Type column, select Ascending for the Category Name, Subcategory Name, and Name columns in that order. Notice that the Sort Order column is updated automatically as you set the Sort Type column.
In the Filter column for the ListPrice row, type >10 to display only those rows that contain a price greater than 10.
Right-click the Diagram pane and select Execute SQL to see the results.
Each object under the Database node has different options in the context menu. The options for stored procedures are shown in Figure 3-17.
Figure 3-17:
Stored procedure actions in Object Explorer.
| Note |
SQL Server Management Studio is a very complex application to explain in just one chapter. You will learn more about this application throughout the rest of this book. |
Another feature included with Object Explorer is the Database Diagrams node. In this node, you can add diagrams representing your tables and their relationships, modify or create table structures, and manage other table-related definitions, such as indexes and triggers. You can use database diagrams to better understand your database implementation and alter it if necessary.
Right-click the Database Diagram node and choose New Database Diagram from the context menu.
If this is the first time you have accessed this node, it is possible that SQL Server Management Studio will ask you to add the support objects for the diagrams, as shown in the figure below. Click the Yes button to add the necessary objects.
In the Add Table dialog box, select all of the tables you want to analyze. For this example, select only the Product (Production) table, click Add, and then click the Close button.
Right-click the Title bar, click the Table View context menu, and select another view, which will give you a different perspective. You can experiment here with various views.
Right-click the Title bar again and choose Add Related Tables from the context menu. This will add all of the tables related to the Product table, of which there are many.
The Arrange Tables toolbar button is located to the left of the Zoom drop-down list. Click it to arrange the tables in the diagram surface.
You can zoom in or out of the view by selecting another percentage value in the Zoom drop-down list.
As mentioned earlier, you can create SELECT queries by using the Open Table option in the Table context menu. However, you can create many other T-SQL sentences in SQL Server Management Studio. To facilitate this task, SQL Server Management Studio contains a Query Editor.
Open SQL Server Management Studio from the Start menu by choosing All Programs Microsoft SQL Server 2005 SQL Server Management Studio.
Connect to your local server.
Click the New Query button in the first toolbar at the left of the screen.
In the second toolbar that now appears, expand the Database drop-down list and select the database against which you want to execute the query. Begin to write your query in the New Query window to the right of the Object Explorer pane.
| Caution |
Make sure you select the appropriate database when creating a query. Since your default database is specified in your user profile, it is a common mistake to execute a query in the default database. If you are working as the admin user or as the sa user, your default database is the master database. |
An alternative method of creating a new query is to create it from the Database context menu.
In Object Explorer, right-click your destination database and select New Query from the context menu.
When the Editor window appears, begin to write your query.
Your query may contain as much T-SQL language as necessary. As you enter your query in the New Query window, your T-SQL syntax will be examined by SQL Server Management Studio and various syntax elements will be appropriately colored on the screen.
| Tip |
After creating a query, you may want to use the same query script in the future. To ensure that the query is always executed in the proper database, start your query with USE <databaseName>; GO; to establish a connection to your database. |
You can obtain information about your queries other than simply receiving the results, such as query statistics and the way in which SQL Server 2005
In the New Query window, write the following T-SQL code (included in the sample files as \Ch03\SQLQuery1.sql).
USE AdventureWorks
GO
SELECT
Production.ProductCategory.Name AS [Category Name],
Production.ProductSubcategory.Name AS [SubCategory Name],
Production.Product.Name,
Production.Product.ListPrice,
Production.Product.Size
FROM
Production.Product
INNER JOIN
Production.ProductSubcategory
ON
Production.Product.ProductSubcategoryID = Production.ProductSubcategory.ProductSub
categoryID
INNER JOIN
Production.ProductCategory
ON Production.ProductSubcategory.ProductCategoryID = Production.ProductCategor
y.ProductCategoryID
WHERE
(Production.Product.ListPrice > 10)
GO
Click the Execute button. You will receive the results in the lower pane.
Click the Display Estimated Execution Plan button, which is the third button to the right of the Execute button, as shown below.
In the Display pane, you will receive a graphical representation of how SQL Server 2005 decides to execute the query. Each step will be described, and the proportional cost of each task will be listed.
|
More
|
Estimated execution plans are discussed fully in Chapter 5, Computing Aggregates, in Microsoft SQL Server 2005: Applied Techniques Step by Step . |
By clicking the Include Client Statistics button shown in Figure 3-18 and re-executing the query, you will obtain another tab in the Results pane that contains statistical information about times and resources utilized.
Figure 3-18:
Include Client Statistics button in Object Explorer.
You may need to create a
Open SQL Server Management Studio from the Start menu by choosing All Programs Microsoft SQL Server 2005 SQL Server Management Studio.
When SQL Server Management Studio prompts you for a connection, click Cancel.
From the File menu, choose New Project. A dialog box will appear like that shown in the following figure, where you can create several types of projects.
Select the SQL Server Scripts template and type a name for the solution in the Name textbox.
From the View menu, choose Solution Explorer, or press Ctrl+Alt+L to display Solution Explorer.
In the Server Explorer pane, right-click the Connections folder and choose New Connection from the context menu.
Accept the default values for your local server, or choose another server if desired.
In the Server Explorer pane, right-click the Queries folder and select New Query.
Click the Connect button in the Connect To Database Engine dialog box.
Write your desired query and close the window. When prompted, click Yes to save the query.
In the Server Explorer pane, right-click
SQLQuery1.sql
and select Rename to type a clearer name for the query.
Repeat Steps 811 to add additional queries.
Close SQL Server Management Studio. When you do so, you will be asked to save the project. You will be prompted to save the project file (with the . ssmssqlproj extension) and the solution file (with the . ssmssln extension).
Another available feature in SQL Server Management Studio is the Template Explorer. By using templates, you can accelerate many standard tasks within your databases.
From the View menu, choose Template Explorer, or press Ctrl+Alt+T.
Expand the folder of the particular template that you want to use. For example, expand the Database folder.
Right-click the desired template (e.g., Create Database), and choose Open from the context menu. Click the Connect button in the Connect To Database Engine dialog box.
Click the Specify Values For Template Parameters button or, from the Query menu, choose Specify Values For Template Parameters. Alternatively, you can press Ctrl+Shift+M.
In the Specify Values For Template Parameters dialog box, complete the values to fill in the template and click OK.
You will receive something similar to the following script.
-- =============================================
-- Create database template
-- =============================================
USE master
GO
-- Drop the database if it already exists
IF EXISTS (SELECT name
FROM sys.databases
WHERE name = N'MyNewDatabase')
DROP DATABASE MyNewDatabase
GO
CREATE DATABASE MyNewDatabase
GO
|
|
SQL Server Management Studio Express is a reduced version of SQL Server Management Studio that can be obtained as a free download with the SQL Server 2005 Express Edition, Service Pack 1. It allows you to manage the Express version of SQL Server 2005 just as you would using SQL Server Management Studio, but it has disabled all of the actions and operations that the SQL Server Express Edition does not support. If you are already familiar with SQL Server Management Studio, then you are already acquainted with SQL Server Management Studio Express as well.
|
|
|
|
||
|
|
||
|
|
||