| The control flow commands alter the order of execution of commands within a shell script. The TC Shell uses a different syntax for these commands (page 368) than the Bourne Again Shell does. Control structures include the if...then, for...in, while, until, and case statements. In addition, the break and continue statements work in conjunction with the control structures to alter the order of execution of commands within a script. if...then The if...then control structure has the following syntax: if test-command then commands fi
The bold words in the syntax description are the items you supply to cause the structure to have the desired effect. The nonbold words are the keywords the shell uses to identify the control structure. test builtin Figure 11-1 shows that the if statement tests the status returned by the test-command and transfers control based on this status. The end of the if structure is marked by a fi statement, (if spelled backward). The following script prompts for two words, reads them, and then uses an if structure to execute commands based on the result returned by the test builtin (tcsh uses the test utility) when it compares the two words. (See page 794 for information on the test utility, which is similar to the test builtin.) The test builtin returns a status of true if the two words are the same and false if they are not. Double quotation marks around $word1 and $word2 make sure that test works properly if you enter a string that contains a SPACE or other special character: $ cat if1 echo -n "word 1: " read word1 echo -n "word 2: " read word2 if test "$word1" = "$word2" then echo "Match" fi echo "End of program." $ if1 word 1: peach word 2: peach Match End of program.
Figure 11-1. An if...then flowchart 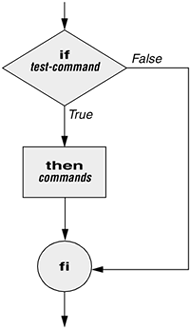
In the preceding example the test-command is test "$word1" = "$word2". The test builtin returns a true status if its first and third arguments have the relationship specified by its second argument. If this command returns a true status (= 0), the shell executes the commands between the then and fi statements. If the command returns a false status (not = 0), the shell passes control to the statement following fi without executing the statements between then and fi. The effect of this if statement is to display Match if the two words are the same. The script always displays End of program. Builtins In the Bourne Again Shell, test is a builtin part of the shell. It is also a stand-alone utility kept in /usr/bin/test. This chapter discusses and demonstrates many Bourne Again Shell builtins. Each bash builtin may or may not be a builtin in tcsh. You usually use the builtin version if it is available and the utility if it is not. Each version of a command may vary slightly from one shell to the next and from the utility to any of the shell builtins. See page 487 for more information on shell builtins. Checking arguments The next program uses an if structure at the beginning of a script to check that you have supplied at least one argument on the command line. The eq test operator compares two integers, where the $# special parameter (page 480) takes on the value of the number of command line arguments. This structure displays a message and exits from the script with an exit status of 1 if you do not supply at least one argument: $ cat chkargs if test $# -eq 0 then echo "You must supply at least one argument." exit 1 fi echo "Program running." $ chkargs You must supply at least one argument. $ chkargs abc Program running.
A test like the one shown in chkargs is a key component of any script that requires arguments. To prevent the user from receiving meaningless or confusing information from the script, the script needs to check whether the user has supplied the appropriate arguments. Sometimes the script simply tests whether arguments exist (as in chkargs). Other scripts test for a specific number or specific kinds of arguments. You can use test to ask a question about the status of a file argument or the relationship between two file arguments. After verifying that at least one argument has been given on the command line, the following script tests whether the argument is the name of a regular file (not a directory or other type of file) in the working directory. The test builtin with the f option and the first command line argument ($1) check the file: $ cat is_regfile if test $# -eq 0 then echo "You must supply at least one argument." exit 1 fi if test -f "$1" then echo "$1 is a regular file in the working directory" else echo "$1 is NOT a regular file in the working directory" fi
You can test many other characteristics of a file with test and various options. Table 11-1 lists some of these options. Table 11-1. Options to the test builtinOption | Tests file to see if it |
|---|
d | Exists and is a directory file | e | Exists | f | Exists and is a regular file (not a directory) | r | Exists and is readable | s | Exists and has a size greater than 0 bytes | w | Exists and is writable | x | Exists and is executable |
Other test options provide ways to test relationships between two files, such as whether one file is newer than another. Refer to later examples in this chapter and to test on page 794 for more detailed information. tip: Always test the arguments To keep the examples in this book short and focused on specific concepts, the code to verify arguments is often omitted or abbreviated. It is a good practice to test arguments in shell programs that other people will use. Doing so results in scripts that are easier to run and debug.
[] is a synonym for test The following example another version of chkargs checks for arguments in a way that is more traditional for Linux shell scripts. The example uses the bracket ([ ]) synonym for test. Rather than using the word test in scripts, you can surround the arguments to test with brackets. The brackets must be surrounded by whitespace (SPACEs or TABs). $ cat chkargs2 if [ $# -eq 0 ] then echo "Usage: chkargs2 argument..." 1>&2 exit 1 fi echo "Program running." exit 0 $ chkargs2 Usage: chkargs2 arguments $ chkargs2 abc Program running.
Usage message The error message that chkargs2 displays is called a usage message and uses the 1>&2 notation to redirect its output to standard error (page 260). After issuing the usage message, chkargs2 exits with an exit status of 1, indicating that an error has occurred. The exit 0 command at the end of the script causes chkargs2 to exit with a 0 status after the program runs without an error. The Bourne Again Shell returns a 0 status if you omit the status code. The usage message is commonly employed to specify the type and number of arguments the script takes. Many Linux utilities provide usage messages similar to the one in chkargs2. If you call a utility or other program with the wrong number or kind of arguments, you will often see a usage message. Following is the usage message that cp displays when you call it without any arguments: $ cp cp: missing file argument Try 'cp --help' for more information.
if...then...else The introduction of an else statement turns the if structure into the two-way branch shown in Figure 11-2. The if...then...else control structure (available in tcsh with a slightly different syntax) has the following syntax: if test-command then commands else commands fi
Figure 11-2. An if ... then ... else flowchart 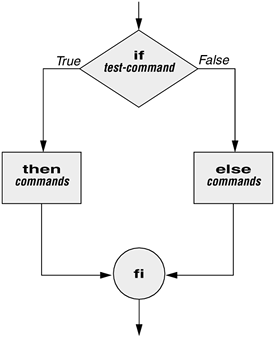
Because a semicolon (;) ends a command just as a NEWLINE does, you can place then on the same line as if by preceding it with a semicolon. (Because if and then are separate builtins, they require a command separator between them; a semicolon and NEWLINE work equally well.) Some people prefer this notation for aesthetic reasons, while others like it because it saves space: if test-command; then commands else commands fi
If the test-command returns a true status, the if structure executes the commands between the then and else statements and then diverts control to the statement following fi. If the test-command returns a false status, the if structure executes the commands following the else statement. When you run the next script, named out, with arguments that are filenames, it displays the files on the terminal. If the first argument is v (called an option in this case), out uses less (page 45) to display the files one page at a time. After determining that it was called with at least one argument, out tests its first argument to see whether it is v. If the result of the test is true (if the first argument is v), out uses the shift builtin to shift the arguments to get rid of the v and displays the files using less. If the result of the test is false (if the first argument is not v), the script uses cat to display the files: $ cat out if [ $# -eq 0 ] then echo "Usage: out [-v] filenames..." 1>&2 exit 1 fi if [ "$1" = "-v" ] then shift less -- "$@" else cat -- "$@" fi
optional In out the argument to cat and less tells these utilities that no more options follow on the command line and not to consider leading hyphens ( ) in the following list as indicating options. Thus allows you to view a file with a name that starts with a hyphen. Although not common, filenames beginning with a hyphen do occasionally occur. (You can create such a file by using the command cat > fname.) The argument works with all Linux utilities that use the getopts builtin (page 497) to parse their options; it does not work with more and a few other utilities. This argument is particularly useful when used in conjunction with rm to remove a file whose name starts with a hyphen (rm fname), including any that you create while experimenting with the argument. |
if...then...elif The if...then...elif control structure (Figure 11-3; not available in tcsh) has the following syntax: if test-command then commands elif test-command then commands ... else commands fi
Figure 11-3. An if ... then ... elif flowchart 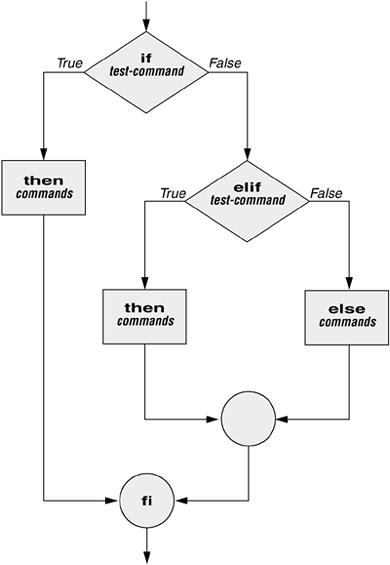
The elif statement combines the else statement and the if statement and allows you to construct a nested set of if...then...else structures (Figure 11-3). The difference between the else statement and the elif statement is that each else statement must be paired with a fi statement, whereas multiple nested elif statements require only a single closing fi statement. The following example shows an if...then...elif control structure. This shell script compares three words that the user enters. The first if statement uses the Boolean operator AND ( a) as an argument to test. The test builtin returns a true status only if the first and second logical comparisons are true (that is, if word1 matches word2 and word2 matches word3). If test returns a true status, the script executes the command following the next then statement, passes control to the statement following fi, and terminates: $ cat if3 echo -n "word 1: " read word1 echo -n "word 2: " read word2 echo -n "word 3: " read word3 if [ "$word1" = "$word2" -a "$word2" = "$word3" ] then echo "Match: words 1, 2, & 3" elif [ "$word1" = "$word2" ] then echo "Match: words 1 & 2" elif [ "$word1" = "$word3" ] then echo "Match: words 1 & 3" elif [ "$word2" = "$word3" ] then echo "Match: words 2 & 3" else echo "No match" fi $ if3 word 1: apple word 2: orange word 3: pear No match $ if3 word 1: apple word 2: orange word 3: apple Match: words 1 & 3 $ if3 word 1: apple word 2: apple word 3: apple Match: words 1, 2, & 3
If the three words are not the same, the structure passes control to the first elif, which begins a series of tests to see if any pair of words is the same. As the nesting continues, if any one of the if statements is satisfied, the structure passes control to the next then statement and subsequently to the statement following fi. Each time an elif statement is not satisfied, the structure passes control to the next elif statement. The double quotation marks around the arguments to echo that contain ampersands (&) prevent the shell from interpreting the ampersands as special characters. optional: The lnks Script The following script, named lnks, demonstrates the if...then and if...then...elif control structures. This script finds hard links to its first argument, a filename. If you provide the name of a directory as the second argument, lnks searches for links in that directory and all subdirectories. If you do not specify a directory, lnks searches the working directory and its subdirectories. This script does not locate symbolic links. $ cat lnks #!/bin/bash # Identify links to a file # Usage: lnks file [directory] if [ $# -eq 0 -o $# -gt 2 ]; then echo "Usage: lnks file [directory]" 1>&2 exit 1 fi if [ -d "$1" ]; then echo "First argument cannot be a directory." 1>&2 echo "Usage: lnks file [directory]" 1>&2 exit 1 else file="$1" fi if [ $# -eq 1 ]; then directory="." elif [ -d "$2" ]; then directory="$2" else echo "Optional second argument must be a directory." 1>&2 echo "Usage: lnks file [directory]" 1>&2 exit 1 fi # Check that file exists and is a regular file: if [ ! -f "$file" ]; then echo "lnks: $file not found or special file" 1>&2 exit 1 fi # Check link count on file set -- $(ls -l "$file") linkcnt=$2 if [ "$linkcnt" -eq 1 ]; then echo "lnks: no other hard links to $file" 1>&2 exit 0 fi # Get the inode of the given file set $(ls -i "$file") inode=$1 # Find and print the files with that inode number echo "lnks: using find to search for links..." 1>&2 find "$directory" -xdev -inum $inode -print
Alex has a file named letter in his home directory. He wants to find links to this file in his and other users' home directory file trees. In the following example, Alex calls lnks from his home directory to perform the search. The second argument to lnks, /home, is the pathname of the directory he wants to start the search in. The lnks script reports that /home/alex/letter and /home/jenny/draft are links to the same file: $ lnks letter /home lnks: using find to search for links... /home/alex/letter /home/jenny/draft
In addition to the if...then...elif control structure, lnks introduces other features that are commonly used in shell programs. The following discussion describes lnks section by section. Specify the shell The first line of the lnks script uses #! (page 265) to specify the shell that will execute the script: #!/bin/bash
In this chapter the #! notation appears only in more complex examples. It ensures that the proper shell executes the script, even when the user is running a different shell or the script is called from another shell script. Comments The second and third lines of lnks are comments; the shell ignores the text that follows a pound sign up to the next NEWLINE character. These comments in lnks briefly identify what the file does and how to use it: # Identify links to a file # Usage: lnks file [directory]
Usage messages The first if statement tests whether lnks was called with zero arguments or more than two arguments: if [ $# -eq 0 -o $# -gt 2 ]; then echo "Usage: lnks file [directory]" 1>&2 exit 1 fi
If either of these conditions is true, lnks sends a usage message to standard error and exits with a status of 1. The double quotation marks around the usage message prevent the shell from interpreting the brackets as special characters. The brackets in the usage message indicate that the directory argument is optional. The second if statement tests whether the first command line argument ($1) is a directory (the d argument to test returns a true value if the file exists and is a directory): if [ -d "$1" ]; then echo "First argument cannot be a directory." 1>&2 echo "Usage: lnks file [directory]" 1>&2 exit 1 else file="$1" fi
If the first argument is a directory, lnks displays a usage message and exits. If it is not a directory, lnks saves the value of $1 in the file variable because later in the script set resets the command line arguments. If the value of $1 is not saved before the set command is issued, its value will be lost. Test the arguments The next section of lnks is an if...then...elif statement: if [ $# -eq 1 ]; then directory="." elif [ -d "$2" ]; then directory="$2" else echo "Optional second argument must be a directory." 1>&2 echo "Usage: lnks file [directory]" 1>&2 exit 1 fi
The first test-command determines whether the user specified a single argument on the command line. If the test-command returns 0 (true), the user-created variable named directory is assigned the value of the working directory (.). If the test-command returns false, the elif statement tests whether the second argument is a directory. If it is a directory, the directory variable is set equal to the second command line argument, $2. If $2 is not a directory, lnks sends a usage message to standard error and exits with a status of 1. The next if statement in lnks tests whether $file does not exist. This test keeps lnks from wasting time looking for links to a nonexistent file. The test builtin with the three arguments !, f, and $file evaluates to true if the file $file does not exist: [ ! -f "$file" ]
The ! operator preceding the f argument to test negates its result, yielding false if the file $file does exist and is a regular file. Next lnks uses set and ls l to check the number of links $file has: # Check link count on file set -- $(ls -l "$file") linkcnt=$2 if [ "$linkcnt" -eq 1 ]; then echo "lnks: no other hard links to $file" 1>&2 exit 0 fi
The set builtin uses command substitution (page 329) to set the positional parameters to the output of ls l. The second field in this output is the link count, so the user-created variable linkcnt is set equal to $2. The used with set prevents set from interpreting as an option the first argument produced by ls l (the first argument is the access permissions for the file and typically begins with ). The if statement checks whether $linkcnt is equal to 1; if it is, lnks displays a message and exits. Although this message is not truly an error message, it is redirected to standard error. The way lnks has been written, all informational messages are sent to standard error. Only the final product of lnks the pathnames of links to the specified file is sent to standard output, so you can redirect the output as you please. If the link count is greater than one, lnks goes on to identify the inode (page 880) for $file. As explained on page 99, comparing the inodes associated with filenames is a good way to determine whether the filenames are links to the same file. The lnks script uses set to set the positional parameters to the output of ls i. The first argument to set is the inode number for the file, so the user-created variable named inode is assigned the value of $1: # Get the inode of the given file set $(ls -i "$file") inode=$1
Finally lnks uses the find utility (page 655) to search for files having inode numbers that match $inode: # Find and print the files with that inode number echo "lnks: using find to search for links..." 1>&2 find "$directory" -xdev -inum $inode -print
The find utility searches for files that meet the criteria specified by its arguments, beginning its search with the directory specified by its first argument ($directory) and searching all subdirectories. The remaining arguments specify that the filenames of files having inodes matching $inode should be sent to standard output. Because files in different filesystems can have the same inode number and not be linked, find must search only directories in the same filesystem as $directory. The xdev argument prevents find from searching directories on other filesystems. Refer to page 96 for more information about filesystems and links. The echo command preceding the find command in lnks, which tells the user that find is running, is included because find frequently takes a long time to run. Because lnks does not include a final exit statement, the exit status of lnks is that of the last command it runs, find. DEBUGGING SHELL SCRIPTS When you are writing a script such as lnks, it is easy to make mistakes. You can use the shell's x option to help debug a script. This option causes the shell to display each command before it runs the command. Tracing a script's execution in this way can give you information about where a problem lies. You can run lnks as in the previous example and cause the shell to display each command before it is executed. Either set the x option for the current shell (set x) so that all scripts display commands as they are run or use the x option to affect only the shell that is running the script called by the command line. $ bash -x lnks letter /home + '[' 2 -eq 0 -o 2 -gt 2 ']' + '[' -d letter ']' + file=letter + '[' 2 -eq 1 ']' + '[' -d /home ']' + directory=/home + '[' '!' -f letter ']' ...
PS4 Each command that the script executes is preceded by the value of the PS4 variable a plus sign (+) by default, so you can distinguish debugging output from script-produced output. You must export PS4 if you set it in the shell that calls the script. The next command sets PS4 to >>>> followed by a SPACE and exports it: $ export PS4='>>>> '
You can also set the x option of the shell running the script by putting the following set command at the top of the script: set -x
Put set x anywhere in the script you want to turn debugging on. Turn the debugging option off with a plus sign. set +x
The set o xtrace and set +o xtrace commands do the same things as set x and set +x, respectively. |
for...in The for...in control structure (tcsh uses foreach) has the following syntax: for loop-index in argument-list do commands done
The for...in structure (Figure 11-4) assigns the value of the first argument in the argument-list to the loop-index and executes the commands between the do and done statements. The do and done statements mark the beginning and end of the for loop. Figure 11-4. A for ... in flowchart 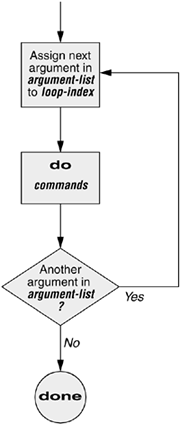
After it passes control to the done statement, the structure assigns the value of the second argument in the argument-list to the loop-index and repeats the commands. The structure repeats the commands between the do and done statements one time for each argument in the argument-list. When the structure exhausts the argument-list, it passes control to the statement following done. The following for...in structure assigns apples to the user-created variable fruit and then displays the value of fruit, which is apples. Next the structure assigns oranges to fruit and repeats the process. When it exhausts the argument list, the structure transfers control to the statement following done, which displays a message. $ cat fruit for fruit in apples oranges pears bananas do echo "$fruit" done echo "Task complete." $ fruit apples oranges pears bananas Task complete.
The next script lists the names of the directory files in the working directory by looping over all the files, using test to determine which files are directories: $ cat dirfiles for i in * do if [ -d "$i" ] then echo "$i" fi done
The ambiguous file reference character * matches the names of all files (except invisible files) in the working directory. Prior to executing the for loop, the shell expands the * and uses the resulting list to assign successive values to the index variable i. for The for control structure (not available in tcsh) has the following syntax: for loop-index do commands done
In the for structure the loop-index takes on the value of each of the command line arguments, one at a time. It is the same as the for...in structure (Figure 11-4) except for where it gets values for the loop-index. The for structure performs a sequence of commands, usually involving each argument in turn. The following shell script shows a for structure displaying each command line argument. The first line of the script, for arg, implies for arg in "$@", where the shell expands "$@" into a list of quoted command line arguments "$1" "$2" "$3" and so on. The balance of the script corresponds to the for...in structure. $ cat for_test for arg do echo "$arg" done $ for_test candy gum chocolate candy gum chocolate
optional: The whos Script The following script, named whos, demonstrates the usefulness of the implied "$@" in the for structure. You give whos one or more user or login names as arguments, and whos displays information about the users. The whos script gets the information it displays from the first and fifth fields in the /etc/passwd file. The first field always contains a username, and the fifth field typically contains the user's full name. You can provide a login name as an argument to whos to identify the user's name or provide a name as an argument to identify the username. The whos script is similar to the finger utility, although whos delivers less information. $ cat whos #!/bin/bash # adapted from finger.sh by Lee Sailer # UNIX/WORLD, III:11, p. 67, Fig. 2 if [ $# -eq 0 ] then echo "Usage: whos id..." 1>&2 exit 1 fi for id do gawk -F: '{print $1, $5}' /etc/passwd | grep -i "$id" done
Below whos identifies the user whose username is chas and the user whose name is Marilou Smith: $ whos chas "Marilou Smith" chas Charles Casey msmith Marilou Smith
Use of "$@" The whos script uses a for statement to loop through the command line arguments. In this script the implied use of "$@" in the for loop is particularly beneficial because it causes the for loop to treat an argument that contains a SPACE as a single argument. This example quotes Marilou Smith, which causes the shell to pass it to the script as a single argument. Then the implied "$@" in the for statement causes the shell to regenerate the quoted argument Marilou Smith so that it is again treated as a single argument. gawk For each command line argument, whos searches the /etc/passwd file. Inside the for loop the gawk utility (Chapter 12) extracts the first ($1) and fifth ($5) fields from the lines in /etc/passwd. The F: option causes gawk to use a colon (:) as a field separator when it reads /etc/passwd, allowing it to break each line into fields. The gawk command sets and uses the $1 and $5 arguments; they are included within single quotation marks and are not interpreted by the shell. Do not confuse these arguments with positional parameters, which correspond to command line arguments. The first and fifth fields are sent to grep (page 683) via a pipe. The grep utility searches for $id (which has taken on the value of a command line argument) in its input. The i option causes grep to ignore case as it searches; grep displays each line in its input that contains $id. | at the end of a line An interesting syntactical exception that bash gives the pipe symbol (|) appears on the line with the gawk command: You do not have to quote a NEWLINE that immediately follows a pipe symbol (that is, a pipe symbol that is the last thing on a line) to keep the NEWLINE from executing a command. Try giving the command who | and pressing RETURN. The shell (not tcsh) displays a secondary prompt. If you then enter sort followed by another RETURN, you see a sorted who list. The pipe works even though a NEWLINE follows the pipe symbol. |
while The while control structure (not available in tcsh) has the following syntax: while test-command do commands done
As long as the test-command (Figure 11-5) returns a true exit status, the while structure continues to execute the series of commands delimited by the do and done statements. Before each loop through the commands, the structure executes the test-command. When the exit status of the test-command is false, the structure passes control to the statement after the done statement. Figure 11-5. A while flowchart 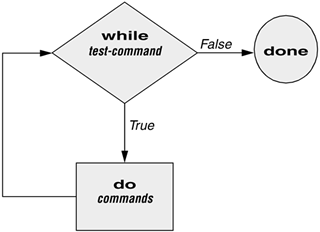
test builtin The following shell script first initializes the number variable to zero. The test builtin then determines whether number is less than 10. The script uses test with the lt argument to perform a numerical test. For numerical comparisons, you must use ne (not equal), eq (equal), gt (greater than), ge (greater than or equal to), lt (less than), or le (less than or equal to). For string comparisons use = (equal) or != (not equal) when you are working with test. In this example, test has an exit status of 0 (true) as long as number is less than 10. As long as test returns true, the structure executes the commands between the do and done statements. See page 794 for information on the test utility, which is very similar to the test builtin. $ cat count #!/bin/bash number=0 while [ "$number" -lt 10 ] do echo -n "$number" ((number +=1)) done echo $ count 0123456789 $
The echo command following do displays number. The n prevents echo from issuing a NEWLINE following its output. The next command uses arithmetic evaluation [((...)); page 501] to increment the value of number by 1. The done statement terminates the loop and returns control to the while statement to start the loop over again. The final echo causes count to send a NEWLINE character to standard output, so that the next prompt occurs in the leftmost column on the display (rather than immediately following 9). optional: The spell_check Script The aspell utility checks the words in a file against a dictionary of correctly spelled words. With the l option, aspell runs in list mode: Input comes from standard input and aspell sends each potentially misspelled word to standard output. The following command produces a list of possible misspellings in the file letter.txt: $ aspell -l < letter.txt quikly portible frendly
The next shell script, named spell_check, shows another use of a while structure. To find the incorrect spellings in a file, you can use spell_check, which calls aspell to check a file against a system dictionary but goes a step further: It enables you to specify a list of correctly spelled words and removes these words from the output of aspell. This script is useful for removing words that you use frequently, such as names and technical terms, that are not in a standard dictionary. Although you can duplicate the functionality of spell_check by using additional aspell dictionaries, the script is included here for its instructive value. The spell_check script requires two filename arguments: a file containing the list of correctly spelled words and a file that you want to check. The first if statement verifies that the user specified two arguments. The next two if statements verify that both arguments are readable files. (The exclamation point negates the sense of the following operator; the r operator causes test to determine whether a file is readable. The result is a test that determines whether a file is not readable.) $ cat spell_check #!/bin/bash # remove correct spellings from aspell output if [ $# -ne 2 ] then echo "Usage: spell_check file1 file2" 1>&2 echo "file1: list of correct spellings" 1>&2 echo "file2: file to be checked" 1>&2 exit 1 fi if [ ! -r "$1" ] then echo "spell_check: $1 is not readable" 1>&2 exit 1 fi if [ ! -r "$2" ] then echo "spell_check: $2 is not readable" 1>&2 exit 1 fi aspell -l < "$2" | while read line do if ! grep "^$line$" "$1" > /dev/null then echo $line fi done
The spell_check script sends the output from aspell (with the l option so that it produces a list of misspelled words on standard output) through a pipe to standard input of a while structure, which reads one line at a time (each line has one word on it) from standard input. The test-command (that is, read line) returns a true exit status as long as it receives a line from standard input. Inside the while loop an if statement[1] monitors the return value of grep, which determines whether the line that was read is in the user's list of correctly spelled words. The pattern that grep searches for (the value of $line) is preceded and followed by special characters that specify the beginning and end of a line (^ and $, respectively). These special characters ensure that grep finds a match only if the $line variable matches an entire line in the file of correctly spelled words. (Otherwise, grep would match a string, such as paul, in the output of aspell if the file of correctly spelled words contained the word paulson.) These special characters, together with the value of the $line variable, form a regular expression (Appendix A). The output of grep is redirected to /dev/null (page 122) because the output is not needed; only the exit code is important. The if statement checks the negated exit status of grep (the leading exclamation point negates or changes the sense of the exit status true becomes false, and vice versa), which is 0 or true (false when negated) when a matching line is found. If the exit status is not 0 or false (true when negated), the word was not in the file of correctly spelled words. The echo builtin sends a list of words that are not in the file of correctly spelled words to standard output. Once it detects the EOF (end of file), the read builtin returns a false exit status. Control then passes out of the while structure, and the script terminates. Before you use spell_check, create a file of correct spellings containing words that you use frequently but that are not in a standard dictionary. For example, if you work for a company named Blinkenship and Klimowski, Attorneys, you would put Blinkenship and Klimowski into the file. The following example shows how spell_check checks the spelling in a file named memo and removes Blinkenship and Klimowski from the output list of incorrectly spelled words: $ aspell -l < memo Blinkenship Klimowski targat hte $ cat word_list Blinkenship Klimowski $ spell_check word_list memo targat hte
Refer to page 589 for more information on aspell. |
[1] This if statement can also be written as
if ! grep -qw "$line" "$1"
The q option suppresses the output from grep so that only an exit code is returned. The w option causes grep to match only a whole word.
until The until (not available in tcsh) and while (available in tcsh with a slightly different syntax) structures are very similar, differing only in the sense of the test performed at the top of the loop. Figure 11-6 shows that until continues to loop until the test-command returns a true exit status. The while structure loops while the test-command continues to return a true or nonerror condition. The until control structure has the following syntax: until test-command do commands done
Figure 11-6. An until flowchart 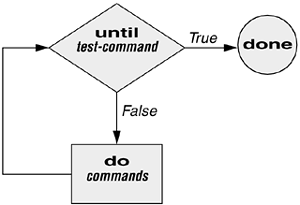
The following script demonstrates an until structure that includes read. When the user enters the correct string of characters, the test-command is satisfied and the structure passes control out of the loop. $ cat until1 secretname=jenny name=noname echo "Try to guess the secret name!" echo until [ "$name" = "$secretname" ] do echo -n "Your guess: " read name done echo "Very good." $ until1 Try to guess the secret name! Your guess: helen Your guess: barbara Your guess: rachael Your guess: jenny Very good
The following locktty script is similar to the lock command on Berkeley UNIX and the Lock Screen menu selection in GNOME. The script prompts you for a key (password) and uses an until control structure to lock the terminal. The until statement causes the system to ignore any characters typed at the keyboard until the user types in the key on a line by itself, which unlocks the terminal. The locktty script can keep people from using your terminal while you are away from it for short periods of time. It saves you from having to log out if you are concerned about other users using your login. $ cat locktty #! /bin/bash # UNIX/WORLD, III:4 trap '' 1 2 3 18 stty -echo echo -n "Key: " read key_1 echo echo -n "Again: " read key_2 echo key_3= if [ "$key_1" = "$key_2" ] then tput clear until [ "$key_3" = "$key_2" ] do read key_3 done else echo "locktty: keys do not match" 1>&2 fi stty echo
tip: Forget your password for locktty? If you forget your key (password), you will need to log in from another (virtual) terminal and kill the process running locktty.
trap builtin The trap builtin (page 493; not available in tcsh) at the beginning of the locktty script stops a user from being able to terminate the script by sending it a signal (for example, by pressing the interrupt key). Trapping signal 18 means that no one can use CONTROL-Z (job control, a stop from a tty) to defeat the lock. (See Table 11-5 on page 494 for a list of signals.) The stty echo command (page 778) causes the terminal not to display characters typed at the keyboard, thereby preventing the key that the user enters from appearing on the screen. After turning off keyboard echo, the script prompts the user for a key, reads it into the user-created variable key_1, prompts the user to enter the same key again, and saves it in key_2. The statement key_3= creates a variable with a NULL value. If key_1 and key_2 match, locktty clears the screen (with the tput command) and starts an until loop. The until loop keeps attempting to read from the terminal and assigning the input to the key_3 variable. Once the user types in a string that matches one of the original keys (key_2), the until loop terminates and keyboard echo is turned on again. Table 11-5. SignalsType | Name | Number | Generating condition |
|---|
Not a real signal | EXIT | 0 | Exit because of exit command or reaching the end of the program (not an actual signal but useful in trap) | Hang up | SIGHUP or HUP | 1 | Disconnect the line | Terminal interrupt | SIGINT or INT | 2 | Press the interrupt key (usually CONTROL-C) | Quit | SIGQUIT or QUIT | 3 | Press the quit key (usually CONTROL-SHIFT-| or CONTROL-SHIFT-\ ) | Kill | SIGKILL or KILL | 9 | The kill command with the 9 option (cannot be trapped; use only as a last resort) | Software termination | SIGTERM or TERM | 15 | Default of the kill command | Stop | SIGTSTP or TSTP | 20 | Press the suspend key (usually CONTROL-Z) | Debug | DEBUG | | Executes commands specified in the TRap statement after each command (not an actual signal but useful in trap) | Error | ERR | | Executes commands specified in the TRap statement after each command that returns a nonzero exit status (not an actual signal but useful in TRap) |
break AND continue You can interrupt a for, while, or until loop by using a break or continue statement. The break statement transfers control to the statement after the done statement, which terminates execution of the loop. The continue command transfers control to the done statement, which continues execution of the loop. The following script demonstrates the use of these two statements. The for...in structure loops through the values 1 10. The first if statement executes its commands when the value of the index is less than or equal to 3 ($index le 3). The second if statement executes its commands when the value of the index is greater than or equal to 8 ($index ge 8). In between the two ifs, echo displays the value of the index. For all values up to and including 3, the first if statement displays continue and executes a continue statement that skips echo $index and the second if statement and continues with the next for statement. For the value of 8, the second if statement displays break and executes a break statement that exits from the for loop: $ cat brk for index in 1 2 3 4 5 6 7 8 9 10 do if [ $index -le 3 ] ; then echo "continue" continue fi # echo $index # if [ $index -ge 8 ] ; then echo "break" break fi done $ brk continue continue continue 4 5 6 7 8 break
case The case structure (Figure 11-7, page 461) is a multiple-branch decision mechanism. The path taken through the structure depends on a match or lack of a match between the test-string and one of the patterns. The case control structure (tcsh uses switch) has the following syntax: case test-string in pattern-1) commands-1 ;; pattern-2) commands-2 ;; pattern-3) commands-3 ;; . . . esac
Figure 11-7. A case flowchart 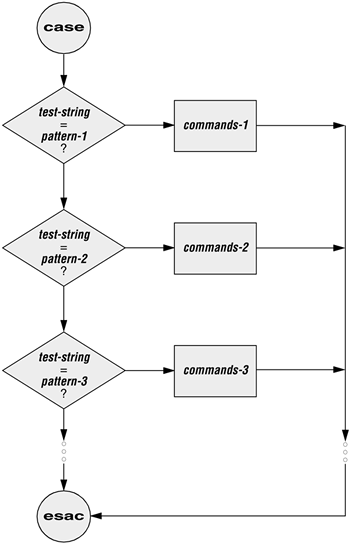
The following case structure examines the character that the user enters as the test-string. This value is held in the variable letter. If the test-string has a value of A, the structure executes the command following the pattern A. The right parenthesis is part of the case control structure, not part of the pattern. If the test-string has a value of B or C, the structure executes the command following the matching pattern. The asterisk (*) indicates any string of characters and serves as a catchall in case there is no match. If no pattern matches the test-string and if there is no catchall (*) pattern, control passes to the command following the esac statement, without the case structure taking any action. $ cat case1 echo -n "Enter A, B, or C: " read letter case "$letter" in A) echo "You entered A" ;; B) echo "You entered B" ;; C) echo "You entered C" ;; *) echo "You did not enter A, B, or C" ;; esac $ case1 Enter A, B, or C: B You entered B
The next execution of case1 shows the user entering a lowercase b. Because the test-string b does not match the uppercase B pattern (or any other pattern in the case statement), the program executes the commands following the catchall pattern and displays a message: $ case1 Enter A, B, or C: b You did not enter A, B, or C
The pattern in the case structure is analogous to an ambiguous file reference. It can include any of the special characters and strings shown in Table 11-2. Table 11-2. PatternsPattern | Function |
|---|
* | Matches any string of characters. Use for the default case. | ? | Matches any single character. | [...] | Defines a character class. Any characters enclosed within brackets are tried, one at a time, in an attempt to match a single character. A hyphen between two characters specifies a range of characters. | | | Separates alternative choices that satisfy a particular branch of the case structure. |
The next script accepts both uppercase and lowercase letters: $ cat case2 echo -n "Enter A, B, or C: " read letter case "$letter" in a|A) echo "You entered A" ;; b|B) echo "You entered B" ;; c|C) echo "You entered C" ;; *) echo "You did not enter A, B, or C" ;; esac $ case2 Enter A, B, or C: b You entered B
optional The following example shows how you can use the case structure to create a simple menu. The command_menu script uses echo to present menu items and prompt the user for a selection. (The select control structure [page 466] makes it much easier to code a menu.) The case structure then executes the appropriate utility depending on the user's selection. $ cat command_menu #!/bin/bash # menu interface to simple commands echo -e "\n COMMAND MENU\n" echo " a. Current date and time" echo " b. Users currently logged in" echo " c. Name of the working directory" echo -e " d. Contents of the working directory\n" echo -n "Enter a, b, c, or d: " read answer echo case "$answer" in a) date ;; b) who ;; c) pwd ;; d) ls ;; *) echo "There is no selection: $answer" ;; esac $ command_menu COMMAND MENU a. Current date and time b. Users currently logged in c. Name of the working directory d. Contents of the working directory Enter a, b, c, or d: a Wed Jan 5 12:31:12 PST 2005
echo e The e option causes echo to interpret \n as a NEWLINE character. If you do not include this option, echo does not output the extra blank lines that make the menu easy to read but instead outputs the (literal) two-character sequence \n. The e option causes echo to interpret several other backslash-quoted characters (Table 11-3). Remember to quote (i.e., place double quotation marks around the string) the backslash-quoted character so that the shell does not interpret it but passes the backslash and the character to echo. See xpg_echo (page 322) for a way to avoid using the e option. Table 11-3. Special characters in echo (must use e)Quoted character | echo displays |
|---|
\a | Alert (bell) | \b | BACKSPACE | \c | Suppress trailing NEWLINE | \f | FORMFEED | \n | NEWLINE | \r | RETURN | \t | Horizontal TAB | \v | Vertical TAB | \\ | Backslash | \nnn | The character with the ASCII octal code nnn; if nnn is not valid, echo displays the string literally |
You can also use the case control structure to take various actions in a script, depending on how many arguments the script is called with. The following script, named safedit, uses a case structure that branches based on the number of command line arguments ($ #). It saves a backup copy of a file you are editing with vim. $ cat safedit #!/bin/bash # UNIX/WORLD, IV:11 PATH=/bin:/usr/bin script=$(basename $0) case $# in 0) vim exit 0 ;; 1) if [ ! -f "$1" ] then vim "$1" exit 0 fi if [ ! -r "$1" -o ! -w "$1" ] then echo "$script: check permissions on $1" 1>&2 exit 1 else editfile=$1 fi if [ ! -w "." ] then echo "$script: backup cannot be " \ "created in the working directory" 1>&2 exit 1 fi ;; *) echo "Usage: $script [file-to-edit]" 1>&2 exit 1 ;; esac tempfile=/tmp/$$.$script cp $editfile $tempfile if vim $editfile then mv $tempfile bak.$(basename $editfile) echo "$script: backup file created" else mv $tempfile editerr echo "$script: edit error--copy of " \ "original file is in editerr" 1>&2 fi
If you call safedit without any arguments, the case structure executes its first branch and calls vim without a filename argument. Because an existing file is not being edited, safedit does not create a backup file. (See the :w command on page 153 for an explanation of how to exit from vim when you have called it without a filename.) If you call safedit with one argument, it runs the commands in the second branch of the case structure and verifies that the file specified by $1 does not yet exist or is the name of a file for which the user has read and write permission. The safedit script also verifies that the user has write permission for the working directory. If the user calls safedit with more than one argument, the third branch of the case structure presents a usage message and exits with a status of 1. Set PATH In addition to using a case structure for branching based on the number of command line arguments, the safedit script introduces several other features. First, at the beginning of the script, the PATH variable is set to search /bin and /usr/bin. Setting PATH in this way ensures that the commands executed by the script are standard utilities, which are kept in those directories. By setting PATH inside a script, you can avoid the problems that might occur if users have set PATH to search their own directories first and have scripts or programs with the same names as the utilities the script calls. You can also include absolute pathnames within a script to achieve this end, but this practice can make a script less portable. Name of the program In a second safedit feature, the following line creates a variable named script and assigns the simple filename of the script to it: script=$(basename $0)
The basename utility sends the simple filename component of its argument to standard output, which is assigned to the script variable, using command substitution. The $0 holds the command the script was called with (page 481). No matter which of the following commands the user calls the script with, the output of basename is the simple filename safedit: $ /home/alex/bin/safedit memo $ ./safedit memo $ safedit memo
After the script variable is set, it replaces the filename of the script in usage and error messages. By using a variable that is derived from the command that invoked the script rather than a filename that is hardcoded into the script, you can create links to the script or rename it, and the usage and error messages will still provide accurate information. Naming temporary files A third significant feature of safedit relates to the use of the $$ variable in the name of a temporary file. The statement following the esac statement creates and assigns a value to the tempfile variable. This variable contains the name of a temporary file that is stored in the /tmp directory, as are many temporary files. The temporary filename begins with the PID number of the shell and ends with the name of the script. Use of the PID number ensures that the filename is unique, and safedit will not attempt to overwrite an existing file, as might happen if two people were using safedit at the same time. The name of the script is appended so that, should the file be left in /tmp for some reason, you can figure out where it came from. The PID number is used in front of rather than after $script in the filename because of the 14-character limit placed on filenames by some older versions of UNIX. Linux systems do not have this limitation. Because the PID number ensures the uniqueness of the filename, it is placed first so that it cannot be truncated. (If the $script component is truncated, the filename is still unique.) For the same reason, when a backup file is created inside the if control structure a few lines down in the script, the filename is composed of the string bak. followed by the name of the file being edited. On an older system, if bak were used as a suffix rather than a prefix and the original filename were 14 characters long, .bak might be lost and the original file would be overwritten. The basename utility extracts the simple filename of $editfile before it is prefixed with bak. Fourth, safedit uses an unusual test-command in the if structure: vim $editfile. The test-command calls vim to edit $editfile. When you finish editing the file and exit from vim, vim returns an exit code. The if control structure uses that exit code to determine which branch to take. If the editing session completed successfully, vim returns 0 and the statements following the then statement are executed. If vim does not terminate normally (as would occur if the user killed [page 693] the vim process), vim returns a nonzero exit status and the script executes the statements following else. |
select The select control structure (not available in tcsh) is based on the one found in the Korn Shell. It displays a menu, assigns a value to a variable based on the user's choice of items, and executes a series of commands. The select control structure has the following syntax: select varname [in arg . . . ] do commands done
The select structure displays a menu of the arg items. If you omit the keyword in and the list of arguments, select uses the positional parameters in place of the arg items. The menu is formatted with numbers before each item. For example, a select structure that begins with select fruit in apple banana blueberry kiwi orange watermelon STOP
displays the following menu: 1) apple 3) blueberry 5) orange 7) STOP 2) banana 4) kiwi 6) watermelon
The select structure uses the values of the LINES and COLUMNS variables to determine the size of the display. (LINES has a default value of 24; COLUMNS has a default value of 80.) With COLUMNS set to 20, the menu looks like this: 1) apple 2) banana 3) blueberry 4) kiwi 5) orange 6) watermelon 7) STOP
PS3 After displaying the menu select displays the value of PS3, the special select prompt. The default value of PS3 is ?# but you typically set PS3 to a more meaningful value. When you enter a valid number (one in the menu range) in response to the PS3 prompt, select sets varname to the argument corresponding to the number you entered. If you make an invalid entry, varname is set to null. Either way select stores your response in the keyword variable REPLY and then executes the commands between do and done. If you press RETURN without entering a choice, the shell redisplays the menu and the PS3 prompt. The select structure continues to issue the PS3 prompt and execute the commands until something causes it to exit typically a break or exit statement. A break statement exits from the loop and an exit statement exits from the script. The following script illustrates the use of select : $ cat fruit2 #!/bin/bash PS3="Choose your favorite fruit from these possibilities: " select FRUIT in apple banana blueberry kiwi orange watermelon STOP do if [ "$FRUIT" == "" ]; then echo -e "Invalid entry.\n" continue elif [ $FRUIT = STOP ]; then echo "Thanks for playing!" break fi echo "You chose $FRUIT as your favorite." echo -e "That is choice number $REPLY.\n" done $ fruit2 1) apple 3) blueberry 5) orange 7) STOP 2) banana 4) kiwi 6) watermelon Choose your favorite fruit from these possibilities: 3 You chose blueberry as your favorite. That is choice number 3. Choose your favorite fruit from these possibilities: 99 Invalid entry. Choose your favorite fruit from these possibilities: 7 Thanks for playing!
After setting the PS3 prompt and establishing the menu with the select statement, fruit2 executes the commands between do and done. If the user makes an invalid entry, the shell sets varname ($FRUIT) to a null value, so fruit2 first tests whether $FRUIT is null. If it is, echo displays an error and continue causes the shell to redisplay the PS3 prompt. If the entry is valid, the script tests whether the user wants to stop. If so, echo displays a message and break exits from the select structure (and from the script). If the user entered a valid response and does not want to stop, the script displays the name and number of the user's response. (See page 463 for information about the e option to echo.) Here Document A Here document allows you to redirect input to a shell script from within the shell script itself. A Here document is so called because it is here immediately accessible in the shell script instead of there, perhaps in another file. The following script, named birthday, contains a Here document. The two less than (<<) symbols in the first line indicate that a Here document follows. One or more characters that delimit the Here document follow the less than symbols this example uses a plus sign. Whereas the opening delimiter must appear adjacent to the less than symbols, the closing delimiter must be on a line by itself. The shell sends everything between the two delimiters to the process as standard input. In the example it is as though you had redirected standard input to grep from a file, except that the file is embedded in the shell script: $ cat birthday grep -i "$1" <<+ Alex June 22 Barbara February 3 Darlene May 8 Helen March 13 Jenny January 23 Nancy June 26 + $ birthday Jenny Jenny January 23 $ birthday june Alex June 22 Nancy June 26
When you run birthday, it lists all the Here document lines that contain the argument you called it with. In this case the first time birthday is run, it displays Jenny's birthday because it is called with an argument of Jenny. The second run displays all the birthdays in June. The i argument causes grep's search not to be case sensitive. optional The next script, named bundle,[2] includes a clever use of a Here document. The bundle script is an elegant example of a script that creates a shell archive (shar) file. The script creates a file that is itself a shell script containing several other files as well as the code to re-create the original files: $ cat bundle #!/bin/bash # bundle: group files into distribution package echo "# To unbundle, bash this file" for i do echo "echo $i 1>&2" echo "cat >$i <<'End of $i'" cat $i echo "End of $i" done
Just as the shell does not treat special characters that occur in standard input of a shell script as special, so the shell does not treat the special characters that occur between the delimiters in a Here document as special. As the following example shows, the output of bundle is a shell script, which is redirected to a file named bothfiles. It contains the contents of each file given as an argument to bundle (file1 and file2 in this case) inside a Here document. To extract the original files from bothfiles, you simply run it as an argument to a bash command. Before each Here document is a cat command that causes the Here document to be written to a new file when bothfiles is run: $ cat file1 This is a file. It contains two lines. $ cat file2 This is another file. It contains three lines.
$ bundle file1 file2 > bothfiles $ cat bothfiles # To unbundle, bash this file echo file1 1>&2 cat >file1 <<'End of file1' This is a file. It contains two lines. End of file1 echo file2 1>&2 cat >file2 <<'End of file2' This is another file. It contains three lines. End of file2
In the next example, file1 and file2 are removed before bothfiles is run. The bothfiles script echoes the names of the files it creates as it creates them. The ls command then shows that bothfiles has re-created file1 and file2: $ rm file1 file2 $ bash bothfiles file1 file2 $ ls bothfiles file1 file2
|
[2] Thanks to Brian W. Kernighan and Rob Pike, The Unix Programming Environment (Englewood Cliffs, N.J.: Prentice-Hall, 1984), 98. Reprinted with permission.
|