Integration with an External Web Site
Frequently, one of the first questions we hear from prospects and customers is, "Can my company's Web site integrate with Microsoft CRM?" Hopefully you realize that the answer is yes, but many customers and prospects don't know how to approach this project. This question is a little tricky: There is no one way to set up a Web site for Microsoft CRM integration because the recommended solution architecture varies depending on the location of your servers, your network configuration, and the access protocols allowed between them. However, we'll talk you through a common customer configuration and then show you how to create code that converts a Web site form request into a Microsoft CRM Lead record.
Our Web site integration explanation will cover the following topics:
-
Integration architecture
-
The External Connector license
-
Sample integration code
Integration Architecture
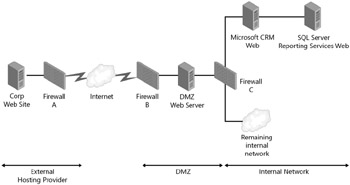
Most companies install Microsoft CRM on their local network, and it's pretty typical to use a third-party hosting provider to host corporate Web sites. In this scenario, the actual code for integrating Microsoft CRM with your Web site isn't too complex, but you might face some hurdles getting all of the network configurations correct. Figure 11-1 shows a sample network layout for a company hosting its corporate Web site with a third party.

Figure 11-1: Typical network topology for a corporate Web site
Let's assume that you want to create a contact request form on your corporate Web site that potential customers fill out with basic information about themselves to request more information about your products and services. When prospects submit the form, most Web sites capture the data in a database or send a notification e-mail, and then salespeople must retype the information in their company's CRM system. However, instead of having to manually retype these leads in Microsoft CRM, you want the Web site requests to automatically flow into the Microsoft CRM database as Lead records.
Again, you have plenty of programming options available to accomplish this integration, but we'll just discuss one potential implementation. We recommend using a Web service-based approach for this integration example, using the following process:
-
A customer submits a request on a corporate Web site form.
-
The form calls a custom Web service that is installed on the same server as the corporate Web site (running on its own Web site).
-
The Web service receives data from the Web site form and calls the Microsoft CRM Web service.
-
The Microsoft CRM Web service inserts the new record in the database as a Lead record.
Figure 11-2 shows the programming flow for this process.

Figure 11-2: Architecture of sample Web site and Microsoft CRM integration
This Web service-based approach offers the following benefits:
-
You can call the Web service client-side from an XMLHTTP call or by using standard server-side techniques. So, even if your Web site form is a simple HTML page, you can still easily communicate with the Web service.
-
Using the Web service eliminates data latency between the Web site request and the record's insertion into Microsoft CRM. After record creation, the Microsoft CRM software can immediately take additional actions, such as sending a confirmation e-mail message.
-
You can reuse the Web service for other applications that must insert Lead records into Microsoft CRM. For example, you might allow your partners to register their leads into your Microsoft CRM system by granting them programmatic access to the Web service.
-
Because Web services can use HTTP or Secure Sockets Layer (HTTPS) for communication, they can traverse firewalls without additional network hardware and minimal (if any) changes to your network infrastructure.
-
A Web service-based approach follows the Web service-based architectural model used by Microsoft CRM.
Although this design offers many benefits, you should consider some of the potential downfalls related to using a Web service-based integration mechanism. Ask yourself these questions:
-
What will happen if the Web service temporarily cannot connect to the Microsoft CRM Web service? What type of error feedback should you display to the prospect who is submitting the Web form?
-
What types of traffic do the firewalls in this scenario allow? For example, your network administrator might block incoming traffic on the firewall port needed (port 443 for HTTPS connections) to allow the Web service to connect to Microsoft CRM.
If you're concerned that you might temporarily lose the connection between your corporate Web site and Microsoft CRM, a queuing mechanism might work better for your situation. Such a design is more complex to code and test, but it would solve any issues related to intermittent connectivity.
If your network administrator blocks incoming traffic on the firewall ports that you need, you will probably have to consider an alternate design in which Microsoft CRM "pulls" lead data from the corporate Web site. In our example design, the corporate Web site "pushes" data to Microsoft CRM whenever new leads submit a request.
The External Connector License
You already learned that Microsoft CRM software licensing is based on named users. Therefore, when you're implementing integration solutions such as the one in our corporate Web site example, you must consider the licensing ramifications of extending Microsoft CRM data to third parties and external users. Sometimes, purchasing a license for each external named user can be difficult (or impossible) to execute in Web site portal scenarios, because the external users are constantly changing. Fortunately, Microsoft CRM offers an External Connector license for just these types of integration scenarios. The External Connector license gives you the rights to push and pull data from Microsoft CRM without requiring a separate user license for each user. Chapter 1, "Microsoft Dynamics CRM 3.0 Overview," explains the details related to Microsoft CRM licensing.
Sample Integration Code
Now let's see how the code for this Web site integration example works! To accomplish our goal of inserting Lead data directly into Microsoft CRM from a Web site form (via a custom WebSiteConnector Web service), we must follow these steps:
-
Determine which parameters (fields) you want to capture from your Web site Lead form.
-
Create a Web service that accepts the parameters you want to capture and then calls the Microsoft CRM Web service to insert that information as a new Lead record.
-
Deploy this Web service to your Web site's server.
-
Update and deploy your contact request form on your corporate Web site to use this new Web service.
We recommend that you configure the WebSiteConnector Web service to communicate with the Microsoft CRM API Web service through HTTPS.
Creating the Web Service
-
Create a new C# ASP.NET Web Application project in Microsoft Visual Studio .NET 2003 called WebSiteConnector. See Chapter 9 for more details on creating a Web application project in Visual Studio .NET 2003.
-
Add a Web Reference to the Microsoft CRM CRMService Web service called CrmSdk. The reference should be http://<crmserver>/mscrmservices/2006/crmservice.asmx. See Chapter 9 for more details.
-
Add a Web Service file called InsertLead.asmx.
-
Switch to code view, and replace the default code with the following code. Be sure to add a using statement with the correct reference to the CrmSdk service, and replace <externalcrmserverdomain> with a domain name that maps to your Microsoft CRM server. For the service Credentials property, be sure to use a licensed Microsoft CRM user that has the ability to create a new lead record.
Important Unlike previous examples, the Web service call to the Microsoft CRM server will be coming from outside your network. Therefore, you will need to use a domain name that will resolve to the public IP address of the Microsoft CRM Web server. You could do this by registering a domain name or using an IP address (depending on your network configuration and preferences) that points to your network. Then you must configure your fire-walls to direct traffic from that domain to your Microsoft CRM Web server.
using System; using System.Collections; using System.ComponentModel; using System.Data; using System.Diagnostics; using System.Web; using System.Web.Services; using WebSiteConnector.CrmSdk; namespace WebSiteConnector { /// <summary> /// Summary description for InsertLead. /// </summary> public class InsertLead : System.Web.Services.WebService { public InsertLead() { //CODEGEN: This call is required by the ASP.NET Web Services Designer InitializeComponent(); } #region Component Designer generated code //Required by the Web Services Designer private IContainer components = null; /// <summary> /// Required method for Designer support - do not modify /// the contents of this method with the code editor. /// </summary> private void InitializeComponent() { } /// <summary> /// Clean up any resources being used. /// </summary> protected override void Dispose(bool disposing) { if(disposing && components != null) { components.Dispose(); } base.Dispose(disposing); } #endregion [WebMethod] public string InsertLeadFromWebForm(string Token, string FirstName, string LastNam e, string Company, string EmailAddress, string Comments) { string ret = string.Empty; // Ensure that only valid users use the service by checking for the proper Key value. if (Token == "some long string") { // Validate we have required fields if (LastName == string.Empty) { ret = "Last name must be entered.<br>"; } else if (Company == string.Empty) { ret += "Company must be entered.<br>"; } // If our return value is empty, we passed our validation, so submit to CRM. if (ret == string.Empty) { CrmService service = new CrmService(); // Replace https://<externalcrmserverdomain> with a URL that will resolve // to the external IP address of the Microsoft CRM server. // Change https: to http: if you do not have SSL installed. service.Url = "https://<externalcrmserverdomain>/mscrmservices/2006/ crmservice.asmx"; // We need to set the Web service authentication to a user with the ability to create a Lead record. // This user should have only enough privileges to perform the task required. // For production, please encrypt this information. service.Credentials = new System.Net.NetworkCredential("crmuser", "password" , "domain"); lead oLead = new lead(); oLead.firstname = FirstName; oLead.lastname = LastName; oLead.companyname = Company; oLead.emailaddress1 = EmailAddress; oLead.description = Comments; oLead.subject = LastName + ", " + FirstName; oLead.leadsourcecode = new Picklist(); oLead.leadsourcecode.Value = 8; // Web try { // Create the lead Guid leadId = service.Create(oLead); ret = "Success"; } catch (System.Web.Services.Protocols.SoapException ex) { ret = ex.Detail.InnerXml; } } } else { ret = "Unauthorized"; } return ret; } } }Tip Store the Web service URL and the Microsoft CRM user credentials securely in a configuration file. See Chapter 9, "Microsoft CRM Server-Side SDK," for more information on how to do this.
-
Build your assembly.
-
Create a new virtual directory on your corporate Web site server called WebSiteConnector, and then deploy your files.
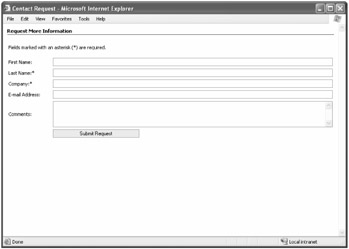
After we deploy our Web service to the corporate Web server, we must either update our Web site's lead form to pass the information to our service or create a new form. For this example, we will create a simple new form to demonstrate how to connect with the WebSiteConnector Web service and pass the user-entered data into it. Figure 11-3 displays our sample information request form.

Figure 11-3: Information request Web form
You will deploy this contact request Web page to your corporate Web site. Because we don't have a sample corporate Web site, we will simply deploy this file to the root of the WebSiteConnector virtual directory.
Creating a Sample Contact Request form Web Page
Because we will create an HTML page, you can use any tool to create this page. For this example, we will reuse our WebSiteConnector project in Visual Studio .NET.
-
Create a new HTML Page called ContactRequest.htm.
-
Add the following code, replacing the url variable with the path to your WebSiteConnector virtual Web site.
<!doctype html public "-//w3c//dtd html 4.0 transitional//en" > <html> <head> <title>Contact Request</title> <script language="JavaScript"> function submitForm() { // Set the url variable to the URL where the Web service is installed. var url = "/WebSiteConnector/insertlead.asmx/InsertLeadFromWebForm"; // Validate our required fields. We will also validate on the server. if (document.all.crm.lastname.value == "") { alert('Please enter a last name.'); document.all.crm.lastname.focus(); return; } else if (document.all.crm.company.value == "") { alert('Please enter a company name.'); document.all.crm.company.focus(); return; } try { // Use xmlhttp connection to web server containing SDK code to retrieve the phone number var oXmlHTTP = new ActiveXObject("Msxml2.XMLHTTP"); // Open connection to web service oXmlHTTP.Open("POST", url, false); // We set a header to tell the browser we are sending posted data oXmlHTTP.setRequestHeader("Content-Type", "application/x-www-form-urlencoded") // Build query string based on entered values var qs = "token=some long string"; qs += "&firstname=" + document.all.crm.firstname.value; qs += "&lastname=" + document.all.crm.lastname.value; qs += "&company=" + document.all.crm.company.value; qs += "&emailaddress=" + document.all.crm.emailaddress.value; qs += "&comments=" + document.all.crm.comments.value; // Send request, passing in the request string oXmlHTTP.Send(qs); var result = ""; // Check to see if we have a valide response if ((oXmlHTTP.responseXML.xml) != null && (oXmlHTTP.responseXML.xml.toString() .length > 0)) { // The service will return the result in a string node. result = oXmlHTTP.responseXML.selectSingleNode("string").text; } // Check to see if our service returns a success. if (result == "Success") { // Let the user know their submission was a success. msg = "<br><br>Thank you for your request. A representative will contact you shortly."; // Hide the form document.all.formtable.style.display = "none"; } else { msg = "There was an error with your submission. Please try again. <br>Error: " + result; } } catch(e) { msg = "There was an error with your submission. Please try again. Error: <br>" + e.message; } // Display our results back to the user. document.all.div_results.innerHTML = msg; } </script> <style> body{ font-size:11px; margin:10px; border:0px; cursor:default; } table.layout { table-layout:fixed; width:100%; height:auto; } td, div {font-size:11px; font-family:tahoma, verdana; } .bar { border-bottom:1px solid #000000; } td.req { font-weight:bold; color:#9f2409; overflow:hidden; text- overflow:ellipsis; padding-top:5px; } textarea { font-size:8pt; width:100%; border:1px solid #7b9ebd; } input { font-size:8pt; width:100%; height:19px; border:1px solid #7b9ebd; } .sec { font-size:11px; font-family:tahoma, verdana; width:100%; color:#000000; font-weight:bold; padding-left:0px; padding-bottom:2px; text-overflow:ellipsis; overflow:hidden; } button { filter:progid:DXImageTransform.Microsoft.Gradient(GradientType=0, StartColorStr= #ffffff, EndColorStr=#cecfde); cursor:hand; font-size:11px; padding-left:5px; padding-right:5px; border:1px solid #7b9ebd; } </style> </head> <body> <div >Request More Information</div> <div ></div> <form name="crm" method="post"> <div > <table > <col width="100"><col/> <tr><td colspan="2">Fields marked with an asterisk (*) are required.<br><br></td></ tr> <tr> <td>First Name:</td> <td><input name="firstname" type="text" maxlength="50" /></td> </tr> <tr> <td>Last Name:*</td> <td><input name="lastname" type="text" maxlength="50" /></td> </tr> <tr> <td>Company:*</td> <td><input name="company" type="text" maxlength="100" /></td> </tr> <tr> <td>E-mail Address:</td> <td><input name="emailaddress" type="text" maxlength="100" /></td> </tr> <tr> <td>Comments:</td> <td><textarea rows="4" cols="40"></textarea></td> </tr> <tr> <td> </td> <td><input type="button" name="btnsubmit" value="Submit Request" on click="submitForm();" style="width:200px;" /></td> </tr> </table> </div> </form> </body> </html> -
Deploy this file to your WebSiteConnector Web site.
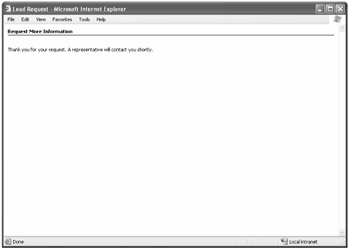
When users submit the contact request Web page, they see a confirmation page indicating that their information was received, shown in Figure 11-4.

Figure 11-4: Web page result displayed to a prospect after a successful transaction
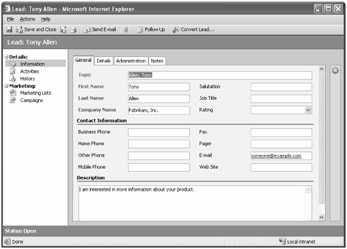
Meanwhile, our code takes the user-entered values from the form and passes them to our Web service, which attempts to insert a Lead record into Microsoft CRM through the Microsoft CRM Web service. Figure 11-5 shows a sample Lead record created using this code.

Figure 11-5: Lead record created from our Web page
That's it! You now have fully functioning integration between your corporate Web site and your Microsoft CRM system.
Web Service Security Considerations
When you deploy your Web service on a server over the Internet, you should consider how you will prevent unauthorized users from accessing your Web service and inserting records into your Microsoft CRM application. To keep our sample code simple, we merely forced the request to pass in a valid string token. Although this approach is better than nothing, it certainly isn't sufficient for a production, Internet-exposed service.
Because this book is about Microsoft CRM and not Web service security, we won't go further into this topic. However, when you're ready to design and implement your Web service on your production Web site, you should review the Web Service Security article on MSDN at http://msdn.microsoft.com/library/default.asp?url=/library/en-us/dnpag2/html/wssp.asp.
Additional Integration Considerations
In addition to considering Web service security, keep these additional points in mind whenever you design and implement Microsoft CRM integration code:
-
As mentioned earlier, exposing Microsoft CRM data to external users and third-party systems requires an External Connector license.
-
You should try to only allow SSL connections for your Web services.
-
You must authenticate as a licensed user with the appropriate security privileges to communicate with the Microsoft CRM Web service. In our example, we used a user who only had the rights to create and read Lead records. By leveraging a user with limited roles, you will limit your exposure should a malicious program compromise your Web service or user account. And always remember to encrypt the Microsoft CRM user information.
-
Remember to check your data types. Make sure that each field you're inserting will not exceed the maximum length for that field, and verify that it conforms to the data type requirements of the corresponding Microsoft CRM field.
-
When working with picklists (drop-down lists), make sure that your source integer values match the values in Microsoft CRM. Alternately, you could create a mapping file between the two systems to keep the values in sync.
-
Always validate your input on the server side, in addition to any client-side validation you choose to add. If you only use client-side validation, a malicious user could modify the Web page, remove your client-side validation, and submit data.
Extending the Example
Hopefully this sample showed you how easily you can create integration between your company Web site and Microsoft CRM. The following is a list of additional ways in which you could extend this simple example by using the techniques you learned in previous chapters:
-
Update the Web service to check Microsoft CRM for duplicates based on some of the entered parameters. Then, instead of creating an additional record, you could add a note to the previously created Lead record.
-
After a Lead record is created, set up a workflow rule to send an automated response to the user confirming that you received the request.
-
Create a workflow rule that creates activities specific to your business process when a new Lead record is created from the Web site.
-
Use a pre-create callout routine before you create the Lead record in Microsoft CRM to validate the address information entered by the prospect.
-
Create a Web service that retrieves a customer's account information (such as cases or quotes) from Microsoft CRM and displays it to the customer on your company Web site.
-
Publish your Knowledge Base articles to your company Web site so that your customers can troubleshoot their own issues.
Really, there's almost no limit to the types of integrations you can create between Microsoft CRM and your company Web site.
EAN: 2147483647
Pages: 120