Calling Assemblies in Workflow
You already know that you can call a .NET assembly as an action within a workflow rule. A typical .NET assembly would accept one or more parameters as input, and then it would return some values as output. Of course, you could pass static values as inputs for your workflow assembly, but we know that you'll want to pass data specific to a record in to your assembly. More importantly, you will want to reference the data that your assembly outputs within your workflow conditions and actions. You'll use the dynamic value techniques that we just explained to pass data in to your workflow assemblies as input, and then you can reference the assembly output as a dynamic value with your conditions and actions.
Let's walk through a simple example using one of the workflow assemblies that Microsoft CRM includes with the default installation: Add date and time. We want to further expand our customer service case example to make sure that we automatically set a follow up by date equal to 24 hours after the case is created. If you try to use the update entity action to set the follow up by date field in your workflow rule, you'll notice that the static value gives you only two options:
-
Execution time
-
Static date and time
Neither of these will work because we want to set the case follow-up date to be 24 hours after the case created on date, and each case has a different created on date and time value. There-fore, we'll have to use a workflow assembly to perform the date manipulation (add 24 hours to the case create date) that we want to determine the correct value for the follow up by field. Conceptually, we're going to follow the process outlined in Figure 8-27.

Figure 8-27: Process flow to reference assembly with dynamic values
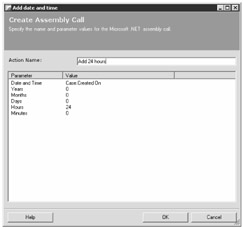
First, we will define a new workflow action by using the Add date and time assembly. In the workflow rule editor, click Insert Action in the Common Tasks section, point to Call Assembly, point to Date And Time Functions, and then click Add Date And Time. The Create Assembly Call dialog box appears, where we'll enter the new action name and specify the input parameters for the Add date and time assembly. Let's enter a name of "Add 24 hours" for this action.
Now we must specify the input parameters for this assembly, so we'll double-click the Date and Time parameter. In the Select Value dialog box, we'll select Dynamic Value and choose the Case Entity and the Created On date because that's the value that we want to add 24 hours to. Back in the Create Assembly Call dialog box, we'll double-click the Hours parameter and then, in the Select Value dialog box, enter 24 as the static value. Finally, we'll click OK in the Create Assembly Call dialog box, shown in Figure 8-28.

Figure 8-28: Settings for the Add 24 hours action referencing an assembly
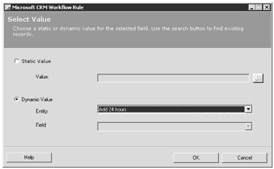
We just defined our custom workflow action that will accept a dynamic input value of Case Created On and then add 24 hours. Now we want to use this action to update the follow up by date of new cases in our workflow rule. Click Insert Action, and then click Update Entity. In the Update Entity dialog box, select the Case entity and the Follow Up By field. Set the expression to = and click the look-up button to open the Select Value dialog box. Now for the impressive part: when you select Dynamic Value and click the Entity list, you'll see that our custom-defined action appears, as shown in Figure 8-29.

Figure 8-29: Referencing the output of an assembly as a dynamic value
| Caution | It might not be intuitive, but you reference your custom actions (defined through workflow assembly output) as an entity in the Dynamic Value selection. |
Select Add 24 Hours, and then click OK twice to return to the workflow rule editor and save your updated workflow rule. That's it, you just implemented a call to an assembly that will update the case follow up by date to a value 24 hours later than the case created on date.
As we mentioned, there's almost no limit to the types of customization and integration that you can perform by combining your custom .NET assemblies with workflow and dynamic values. Chapter 9 includes more technical information about
-
Creating custom code for a workflow assembly.
-
Deploying a workflow assembly.
-
Modifying the Workflow.config file.
EAN: 2147483647
Pages: 120