Workflow Actions
Now that you understand workflow conditions, we'll explain the workflow actions that you can insert into conditions. After all, using conditions without any actions wouldn't really provide any benefits. If you click Insert Action, Microsoft CRM lists the workflow actions available, as shown in Figure 8-12.
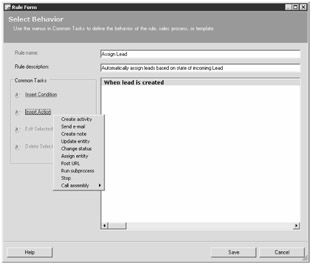
Figure 8-12: Workflow actions
You'll use the workflow editor to set up and manage the conditions and actions for this workflow rule. The following workflow actions are available when you're creating workflow rules:
-
Create activity
-
Send e-mail
-
Create note
-
Update entity
-
Change status
-
Assign entity
-
Post URL
-
Run subprocess
-
Stop
-
Call assembly
Create Activity
You can obviously use the create activity action to create a Task, Phone Call, Fax, or Letter activity. When you click Create Activity, the dialog box shown in Figure 8-13 appears, allowing you to specify additional parameters related to the activity, such as due date, owner, and priority.
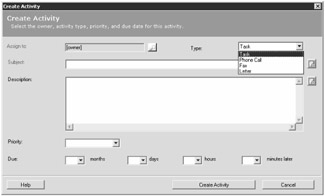
Figure 8-13: Create Activity dialog box
Send E-Mail
Use this action when you want to automatically send an e-mail message as part of your workflow rule. When you select the send e-mail action, the dialog box shown in Figure 8-14 appears.
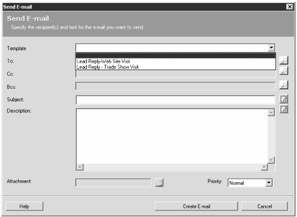
Figure 8-14: Send E-mail dialog box
From here, you can configure the key attributes of the message, such as the recipients, the subject, and the body. The following are some of the key details and constraints related to sending e-mail messages with workflow:
-
You can select an E-mail template if the entity of the workflow rule offers a template. However, you cannot specify the recipient of the E-mail template. Microsoft CRM automatically sends the E-mail template to the customer record.
-
You can select only one recipient for the To line, but you can select multiple recipients for the Cc and Bcc lines.
-
Although Microsoft CRM sends the message as HTML (instead of plain text), you cannot include images or hyperlinks in the Description box (body) of the message, like you can with an E-mail template. However, you can send images and hyperlinks in an e-mail created in workflow by selecting an E-mail template.
-
If you enable e-mail tracking, Microsoft CRM automatically appends the tracking code to the Subject line of your workflow messages.
-
You can specify one file attachment per e-mail message. Note that you aren't uploading the file to the Microsoft CRM server; instead, you're specifying a path where the workflow engine can locate the file. Make sure that this file remains accessible via the network based on the security credentials of the workflow rule when it executes (for either the rule owner or the user who manually applied the rule).
Create Note
Use this action when you want to append a note to the entity record. You can specify the note subject and description, and you can add an attachment, just as you can with the send e-mail action. Figure 8-15 shows the Create Note dialog box.
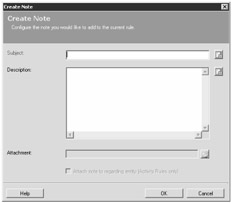
Figure 8-15: Create Note dialog box
If you're creating a workflow rule for an activity, you also have the option to attach the note to the regarding record of the activity (instead of adding a note to the activity record) by selecting the check box at the bottom of the dialog box.
Update Entity
The update entity action allows you to update data in the fields of records related to the workflow entity. For example, you might create an opportunity workflow rule that automatically changes the priority attribute to High if the estimated value of the deal is greater than $100,000. To change the value of the record's priority attribute, you must use the update entity action. When you select the update entity action, a dialog box like the one shown in Figure 8-16 appears.
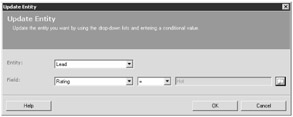
Figure 8-16: Update Entity dialog box
In addition to selecting the entity of the workflow rule, Microsoft CRM automatically determines which related entities you can include in the rule. After you select an entity, you can select the field that you want to update and then set the new value. You should consider the following points when you use the update entity action:
-
You can update any attribute of an entity by using this technique, even if the attribute does not appear on the entity's form. So, you can update data on "hidden" attributes to track and manage behind-the-scenes data.
-
Microsoft CRM prevents you from entering invalid data types into fields (you can't enter text in an integer field), but the update entity action bypasses any client-side validation that might exist, such as the onChange or onSave events. Consequently, you want to make sure that you don't accidentally configure an update entity action that will insert invalid data into your system.
-
Updating an entity with this action triggers any post-callouts related to the entity.
Change Status
The change status action changes the status of the entity. Again, don't confuse this with the status reason (as we explained earlier in this chapter); you can think of this as changing the state of the entity.
Assign Entity
Use this action to change the assignment of the workflow entity. Figure 8-17 shows that you can assign the workflow entity to the Manager, User, or Queue.
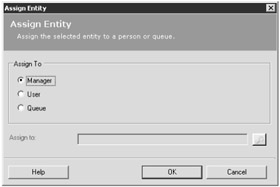
Figure 8-17: Assign Entity dialog box
To assign an entity to the Manager, you must specify a user as the Manager in the user record. If a Manager isn't specified, workflow will generate an error when it tries to complete the assignment.
If you assign the entity to the Manager or to a User, Microsoft CRM actually changes the owner of the entity. However, if you assign the entity to a Queue, Microsoft CRM does not change the owner—it just adds the record to the queue. You can only assign certain types of entities to a queue, such as cases and activities, so this option is disabled for non-queue-supported entities.
Post URL
This action sends data from the workflow entity to a URL address that you specify. Although this action does work for very simple scenarios, it involves a couple of critical shortcomings:
-
It sends data only; it cannot determine whether the recipient system actually received the transmission. The post URL action cannot receive data from the other application.
-
It might pause the workflow rule if the post URL address is not available, requiring a manual restart of the workflow rule.
Because of these issues, Microsoft replaced the post URL action with the greatly enhanced call assembly action in Microsoft CRM 3.0. However, the post URL action remains in the user interface to support customers who developed post URL workflow rules in Microsoft CRM 1.2.
| Important | Use the post URL action only if you need to reuse workflow rules that you created in previous versions of Microsoft CRM. You should not create any new workflow rules through the post URL action; use the call assembly action instead. Microsoft announced that the post URL action will not be supported in future releases of Microsoft CRM (after Microsoft CRM 3.0). |
Run Subprocess
The run subprocess action allows you to insert an entirely separate workflow rule as an action in the original workflow rule. When the subprocess rule completes, it returns the record back to the original workflow rule so that it can complete its process. You can reference a workflow rule as a subprocess only if it uses a Manual workflow event trigger. Figure 8-18 shows how to use one workflow rule to reference a second workflow rule as a subprocess.
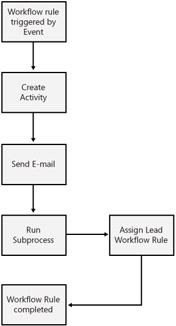
Figure 8-18: Sample workflow subprocess flow
When you start to develop a large number of workflow rules, you might find that multiple rules perform the same subset of actions. To help make workflow rules easier to manage, you could create a manual workflow rule that performs this subset of actions and then have all other rules run this subset workflow rule as a subprocess. Then if you need to change the subset of actions, you only have to edit the subset workflow rule in order for the new logic to be immediately applied to all of the workflow rules that reference this rule as a subprocess.
| Caution | When you use subprocesses, you might accidentally create a situation in which a workflow rule can't ever complete because it's stuck in a loop. If a workflow rule gets stuck in an infinite loop, it will have a negative impact on your server's performance. If you experience this, immediately cancel all of the looping rules in Workflow Monitor and deactivate the rule stuck in the loop. You should always carefully examine your business logic and test your complex workflow rules in a development environment—you don't want to be the person who accidentally sends 1,000 copies of the same e-mail message to all of your customers because a workflow rule got stuck in an infinite loop! |
Stop
A workflow rule processes all of the conditions and actions that you configure, and then it considers the rule finished. However, you might face a situation in which you want to stop a workflow rule somewhere in the middle of its process (typically based on a condition evaluation).
You would use the stop action for such situations. When you insert a stop action, you can select from one of four options:
-
Complete Immediately stops the workflow rule with a status of Finished.
-
Cancel Immediately stops the workflow rule with a status of Canceled.
-
Complete and stop processing other rules Immediately stops the workflow rule with a status of Finished. This action also stops any other workflow rules that were triggered by the same workflow event.
-
Cancel and stop processing other rules Immediately stops the workflow rule with a status of Canceled. This action also stops any other workflow rules that were triggered by the same workflow event.
Let's look at an example scenario with the complete and stop processing other rules action. Assume that you have two workflow rules for the Lead entity based on the Create event. When you create a new lead record, Microsoft CRM runs both workflow rules in the order specified within Workflow Manager.
| Tip | Microsoft CRM processes workflow rules for an entity in the order in which they're listed in Workflow Manager. You can move rules up and down in the order process by clicking Move Up or Move Down on the Actions menu in Workflow Manager. |
If you used the stop action within the first rule, workflow would still process the second rule for the Create event. However, if you used the complete and stop processing other rules action within the first rule, workflow would not run that second rule (or any other subsequent rules).
Call Assembly
If none of the previous workflow actions accomplishes what you want, Microsoft CRM allows you to call your own Microsoft .NET assembly directly within workflow. So what could you do within workflow by calling an external assembly? Well, just about anything, really. You might create a simple assembly that performs a mathematical calculation, or perhaps you would use an assembly that calls a Web service hosted on an external Web site that integrates directly with your financial system.
| Important | The call assembly action opens the door to almost unlimited customization and integration options within workflow, because you can reference your own .NET assemblies. We even heard a member of the Microsoft CRM product team describe the call assembly action as your "Get Out of Jail Free card," and we like that analogy! |
We'll explain more about using the call assembly action in this chapter. Chapter 9, "Server-Side SDK," also includes a detailed explanation of how to build and deploy your own .NET assemblies for use in workflow.
EAN: 2147483647
Pages: 120