Dynamic Excel Files
Many people consider Excel to be the world's most popular reporting and analysis tool, and we wholeheartedly agree with that statement. With its broad range of features and ease of use, we expect that your users leverage Excel for a lot (or most) of their data analysis needs. Fortunately, Microsoft CRM provides excellent integration with Excel so that your users can create reports and perform analysis of CRM data with a tool that they're already comfortable using.
To export data from Microsoft CRM to Excel, users can simply click the Export to Excel button in the grid toolbar and Microsoft CRM will export the data from the current view. When users export data to Excel, Microsoft CRM provides three types of export options:
-
Export to static worksheet
-
Export to dynamic PivotTable
-
Export to dynamic worksheet
Let's review the difference between static and dynamic exports.
Static vs. Dynamic Exports
If you choose one of the dynamic export options, Microsoft CRM creates a live link between the data in your Excel file and the view data in Microsoft CRM. When the data in Microsoft CRM changes, you can automatically update the data in your dynamic Excel file by simply refreshing the external data. Exporting data to a static worksheet takes a snapshot of data at the time that you export it, but you can't automatically update the data in Excel like you can with a dynamic export.
| Important | Dynamic Excel files update Microsoft CRM data only when Excel refreshes external data. When you export a dynamic Excel file from Microsoft CRM, Excel prompts you about whether you want to enable automatic data refresh for this file. |
In addition to creating a live link between the Excel file and the Microsoft CRM database, the dynamic Excel files also respect the Microsoft CRM security settings. This means that each user sees only the data that he or she is allowed to see in the dynamic Excel file. For example, let's assume that we have two customer support representatives named Scott Bishop and Eli Bowen. If Scott exports a dynamic worksheet of the view My Active Cases, the Excel file shows the cases that Scott owns. Now imagine that Scott creates several additional customizations and additions to the Excel file and then e-mails the modified Excel file to Eli. When Eli opens the spreadsheet, Excel refreshes the Microsoft CRM view data to show only the cases that Eli owns. Although both Scott and Eli are using the same Excel file, Microsoft CRM automatically displays the correct data to each of them based on their security settings. Because static Excel files don't maintain a link to the Microsoft CRM database, they don't update the data based on the user's security settings.
| More Info | If you choose to disable automatic refresh, and multiple users share the same file (such as via e-mail or a network share, for example), it's possible for users to view records that they should not have access to. In our example, if Scott disabled the automatic refresh option and then e-mailed the file to Eli, Eli would see all of Scott's active cases upon opening the file because the data would not refresh with Eli's credentials. Excel would show the appropriate data the next time that Eli refreshed external data, but this clearly isn't an ideal scenario. Because of this potential issue, we recommend that you enable the automatic refresh option if multiple users might access the same Excel file. |
At first, you might wonder why anyone would want to export a static worksheet. We can think of several instances in which you might prefer a static export over a dynamic export:
-
If you want to capture data at a specific time, you should use a static worksheet. For example, you might want to run a weekly report every Monday and compare the results to the previous week. With a dynamic Excel file, the numbers in the report constantly change because it's always pulling live data.
-
If you want to share an Excel file exported from Microsoft CRM with a non-Microsoft CRM user, you should use a static worksheet. When a user opens a dynamic Excel file, Excel retrieves the latest data from Microsoft CRM based on the user's security settings. If the person opening the file (such as an external vendor or partner) doesn't have an active account, he or she encounters a login error.
-
Similarly, if the person viewing the report isn't logged on to the computer with the same credentials used for his or her Microsoft CRM user account, that user also receives a login error message. Microsoft CRM uses integrated authentication, passing the domain and user name that the user logs on to the machine with, to retrieve the appropriate dynamic data. Even if the person has a Microsoft CRM license, he or she might be logged on under a different name or domain. This could happen if a user tried to open a dynamic Excel file from a personal computer at home if that computer were not part of the user's work domain.
Now that you understand the differences between static and dynamic exports, we'll explain how to use the Export to Excel feature in the user interface.
| Caution | Remember that when users export dynamic Excel files, they are running their reports on your live production database. Therefore, it's possible for a user to unknowingly create a complex query that seriously degrades the performance of your server. Because all Microsoft CRM users share the server, a renegade query or report could destroy the performance of Microsoft CRM for all of your users. If you're concerned about this scenario, you can disable the Export to Excel security privilege for certain roles in Security Settings as explained in Chapter 3. |
When you export data to a dynamic Excel file, Microsoft CRM automatically creates a link in the Excel file to Microsoft CRM SQL Server database. The process of refreshing external data in Excel isn't unique to Microsoft CRM, but we want to briefly explain some tips on how to do it. Here are three methods for refreshing external data in Excel:
-
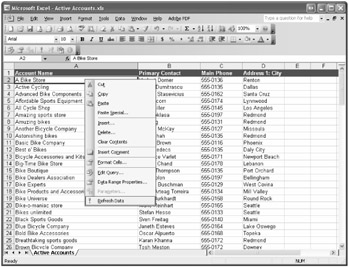
Right-click the dynamic data range, and then click Refresh Data.
-
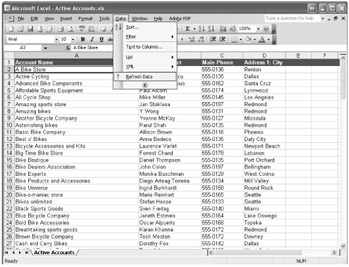
Select a cell within the dynamic data range, click Data in the menu bar, and then click Refresh Data.
-
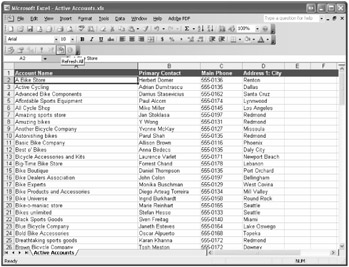
Display the External Data toolbar by clicking View in the menu bar, selecting Toolbars, and then clicking External Data. Click Refresh All, and Excel refreshes the external data for all of the dynamic ranges in your workbook.
In addition to manually refreshing the external data, you can also configure the automatic refresh control by editing the data range properties. You access the data range properties by selecting a cell within the dynamic data range, clicking the Data menu, pointing to Import External Data, and then clicking Data Range Properties.
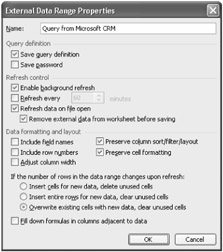
In the External Data Range Properties dialog box, you can enable an auto-refresh at a specified time interval or force a data refresh every time someone opens the Excel spreadsheet.
Exporting
To export data from Microsoft CRM to Excel, you simply click the Excel button on the grid toolbar, shown in Figure 7-1.
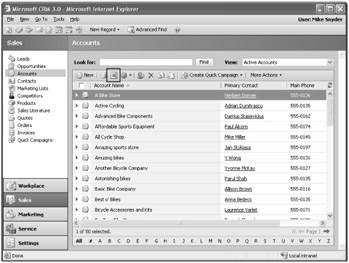
Figure 7-1: Excel button on the grid toolbar
| Note | To access the Excel button in the grid toolbar, users must have the Export to Excel security privilege enabled for at least one of their assigned security roles. |
After you click the Excel button, Microsoft CRM prompts you to select the type of Excel file that you want to export. As we reviewed, you can choose to export data into Excel with one of the following methods:
-
Static worksheet (one page or all pages)
-
Dynamic PivotTable
-
Dynamic worksheet
Static Worksheet
This option exports a snapshot of the CRM data at the time the user created the export. If data changes in Microsoft CRM after the export, the new data will not be reflected in the user's Excel file.
If you view a grid with multiple pages, you are prompted with the additional option of exporting to a static worksheet with records from all pages in the current view (see Figure 7-2). You can then determine whether you want all the records in the view, or just the records displayed on the current page.
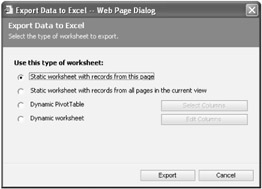
Figure 7-2: Exporting records from one page or all pages
When you export a static worksheet, Microsoft CRM automatically creates a column in Excel for each column in your view.
Dynamic PivotTable
If you choose to export data as a dynamic PivotTable, Microsoft CRM automatically creates a blank PivotTable using the view's data as its source data. By default, Microsoft CRM includes all of the view's columns in the PivotTable source data, but you can add or remove these columns by clicking the Select Columns button before you click the Export button. Figure 7-3 shows a sample PivotTable created by exporting the All Opportunities view.
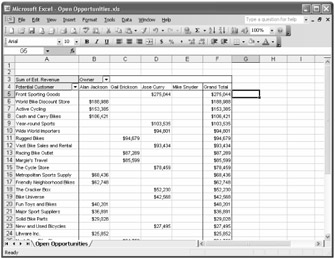
Figure 7-3: Sample dynamic PivotTable using the All Opportunities view
As you can see, PivotTables allow you to sort, summarize, and group data into meaningful reports. From any PivotTable in Excel, you can easily create a chart by right-clicking the PivotTable and clicking PivotChart on the resulting menu. Figure 7-4 shows the sample chart created with one click from the dynamic PivotTable in Figure 7-3.
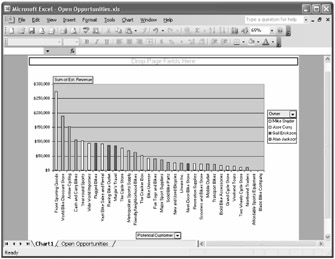
Figure 7-4: Sample chart created with one click from a PivotTable
| Tip | PivotTables might appear intimidating to new users, but they're actually quite easy to use, and they provide excellent data analysis and charting options. The Microsoft Office Web site (http://office.microsoft.com) offers several excellent free tutorials that introduce PivotTables. We highly recommend these online tutorials if you're not comfortable using PivotTables as a data analysis tool. |
Dynamic Worksheet
Exporting a view to Excel as a dynamic worksheet creates a worksheet of rows and columns in Excel similar to a static worksheet export. However, the dynamic worksheet allows you to select additional data columns to include in your Excel worksheet before you click the Export button. And, of course, it automatically creates the live link to the Microsoft CRM database. By exporting a dynamic worksheet, you can use the data in that dynamic worksheet to create your own PivotTables, charts, and additional calculations as necessary.
When you export an Excel file from Microsoft CRM, the file is saved with an .xls extension. However, the file that Microsoft CRM exports is not a typical Excel file. Microsoft CRM actually exports an XML file that it saves with an .xls extension to maintain correct file associations. Just like any .xml file, you can open and edit the exported Excel file with any text editor or XML editor. If you tried to open a regular (non-XML) Excel file in a text editor, you would see a bunch of strange characters.
For example, if you exported the default My Active Accounts view as a dynamic worksheet and opened the exported file in an XML editor, you would see something like this.

From here, you could manually edit various properties of the Excel XML file as you saw fit. You probably won't ever have to edit the XML of an exported Excel file, but it's nice to know that the option exists.
| Caution | Only advanced users should attempt to manually edit an Excel XML file. You could very easily make a change that prevents Excel from opening the file correctly, so be very careful. If you do edit the file, make sure that you have a backup in case something goes wrong. |
One instance in which you might want to edit the Excel XML file is if you need to change the connection string information of the Excel file. Exporting a dynamic worksheet or PivotTable creates a live link to the originating Microsoft CRM database, but there's no user interface in Excel 2003 to change the SQL database that the file references. However, you can change the connection string by editing the Excel XML file. If you examine the XML nodes, you'll see a node called <Worksheet> with a child element called <QueryTable>.
Under the <QueryTable> node, you will see a node called <QuerySource>. <QuerySource> contains an element called <Connection> that will look similar to this.
<Connection>DRIVER=SQL Server;APP=Microsoft Office 2003;Network=DBMSSOCN;Trusted_Conne ction=Yes;SERVER=sqlserver;DATABASE=organizationname_MSCRM</Connection>
Simply enter your updated SERVER and DATABASE values, save the file, and then open it in Excel. Voilà! You just changed the connection string.
Microsoft CRM also exports static worksheets as XML, but manually editing those files obviously won't provide as much benefit as editing the dynamic files because the data in a static worksheet won't change.
The ability to export Microsoft CRM data directly into Excel is a powerful reporting and analysis option for your end users to quickly create ad hoc analyses. We want to share two advanced techniques for working with dynamic Excel files:
-
Using Microsoft Query to edit columns in exported dynamic Excel files
-
Running Excel as a different user
Using Microsoft Query to Edit Columns in Exported Dynamic Excel Files
-
After you export your dynamic worksheet or PivotTable to Excel, you might realize that you want to add columns to your file, but you want to save the work you've already done in Excel. If you're comfortable manually editing SQL syntax, you can follow these steps to add (or remove) the columns that Excel queries from Microsoft CRM in your dynamic files. The Microsoft Query Excel component must be installed on your machine to perform these steps. Excel 2003 can automatically install this component for you.
-
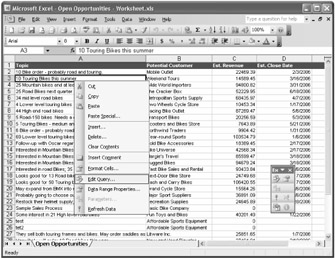
In your dynamic Excel file, right-click the data range, and then click Edit Query.
-
A message appears that says, "If you modify the query, columns that you deleted from the Excel external data range will reappear as new columns, unless you also eliminate those columns from the query." Click OK.
-
A message appears that says, "This query cannot be edited by the Query Wizard." Click OK.
-
In the Microsoft Query editor, click the SQL button on the toolbar.
-
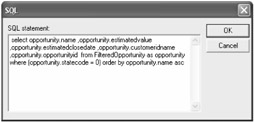
In the SQL editor, you will see the data query and all of the columns that Excel pulls from Microsoft CRM. From here you can manually add or remove the columns that you want to appear in your Excel file.
-
After editing the columns in SQL, click OK. You might see another message that says, "SQL Query can't be represented graphically. Continue anyway?" Click OK.
-
On the File menu, click Return Data to Microsoft Office Excel. Excel returns the modified columns in your data set.
Running Excel as a Different User
-
The dynamic Excel files exported from Microsoft CRM connect to the database using integrated Microsoft Windows authentication. This means that Excel uses your current user credentials to query the Microsoft CRM database when you open dynamic Excel files. This works great for your end users, but as an administrator you might want to run dynamic Excel files as if you're a different user to confirm the data that your users will see. If you used the default Windows authentication, you would have to log off from your computer and then log on as the user whom you want to impersonate. If you have to do this frequently, the process might take too much time. Fortunately, you can follow these steps to impersonate a different user when running Excel 2003.
-
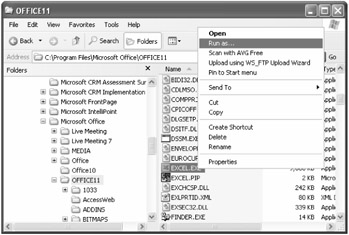
Navigate to C:\Program Files\Microsoft Office\Office11 and locate EXCEL.EXE in the file list.
-
Right-click EXCEL.EXE, and then click Run as.
-
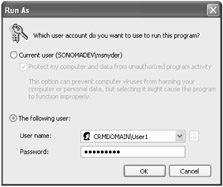
Select The following user, and then enter the credentials of the user whom you want to impersonate when Excel runs.
-
When you refresh external data, Excel retrieves data from Microsoft CRM using the user credentials that you just supplied.
| Important | The first time you run an Office application (such as Excel or Microsoft Office Word) as a user on your machine, you are prompted to set up your profile. You won't be able to do this correctly if you're impersonating another user the first time you run an Office application. Therefore, if you want to use this technique, you might need to log on to the computer one time as the impersonated user and then launch Excel to set up your profile. Then you can log back on as yourself and use the technique previously described. |
EAN: 2147483647
Pages: 120