Application Navigation
Because of the flexibility and power of custom entities, you will find yourself creating multiple custom entities in your Microsoft CRM system. Simple deployments might use just a few custom entities, but a complex deployment might contain 25, 50, or 100 custom entities! By default, Microsoft CRM adds custom entities to the user interface and site navigation in the order in which you create them, listing the first custom entity at the top of the list. In addition, Microsoft CRM lists the custom entities together under an extensions group in the navigation pane. If you use more than a handful of custom entities, you will want to alter where and how they appear in the user interface. Microsoft CRM uses multiple tools to configure how users access entities and navigate in the application. These application navigation customization tools include:
-
Site map
-
Entity display areas
-
ISV.config
Microsoft CRM combines data from these three tools to create the user interface on a system-wide level. After it determines the system navigation, Microsoft CRM also provides a Personalize Workplace feature in which individual users can customize the groups that appear in their workplaces. Before we discuss what each application navigation tool configures, let's quickly review the Microsoft CRM terminology for the screen region names in the Web application and the Microsoft CRM client for Outlook application. Use the following figures and list to map the screen regions to their names.
Figure 6-26 shows the user interface screen regions.
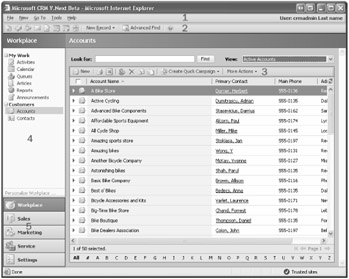
Figure 6-26: Screen regions in the Microsoft CRM user interface
Figure 6-27 shows the entity record screen regions.
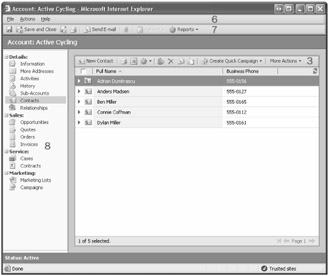
Figure 6-27: Screen regions on a Microsoft CRM entity record
-
Application menu bar
-
Application toolbar
-
Grid tool bar
-
Application navigation pane
-
Wunderbar
-
Entity menu bar
-
Entity toolbar
-
Entity navigation pane
Table 6-6 summarizes which customization tool you should use to modify the Microsoft CRM application navigation, depending on the type of customization that you want to make and where in the application navigation that customization resides.
| Screen region name | Site map | ISV.config | Entity display areas (custom entities only) | Personalize workplace |
|---|---|---|---|---|
| Application menu bar | Add, modify, and reorder items on Go To menu | Add new menu items | Choose the areas in which to display an entity | No |
| Application toolbar | No | Add custom buttons only | No | No |
| Application navigation pane | Add, modify, and reorder items | No | Choose the areas in which to display an entity | Users can specify the groups in which to display their workplace |
| Grid toolbar | No | Add custom buttons only | No | No |
| Wunderbar | Add, modify, and reorder items | No | No | No |
| Entity menu bar | No | Add new menu items | No | No |
| Entity toolbar | No | Add custom buttons only | No | No |
| Entity navigation pane | No | Add custom links only | No | No |
These four tools allow you to customize almost every part of the user interface. In general, the site map allows you to add, reorder, and remove items in the application navigation pane and the wunderbar. Use ISV.config to add new links and buttons to the application menu bar and toolbar, in addition to adding new links and buttons to individual entities.
| More Info | You might be wondering, what does ISV.config mean, anyway? Unlike the site map, the name of the ISV.config feature does not exactly indicate its purpose. Microsoft CRM 3.0 uses the ISV.config terminology as a carryover from earlier versions of Microsoft CRM. The ISV.config file originally allowed independent software vendors (ISVs) to configure their enhancements in the Microsoft CRM interface. The term ISV refers to third-party companies that develop software enhancements and add-ons for the Microsoft CRM platform. Although ISVs do make heavy use of the ISV.config file, customers can also use ISV.config for their own internally developed customizations and enhancements. Because the ISV.config file deals mostly with extending Microsoft CRM, we discuss how to work with it in Chapter 10 along with the other extension features. |
Now that you understand which tools to use to customize the navigation components of Microsoft CRM, let's discuss the details of how to edit the site map and Personalize Workplace features.
Site Map
Modifying the site map allows you to customize the user interface of the application navigation pane, the wunderbar, and parts of the application menu bar. As we discussed earlier, if you add more than a few custom entities, you will probably want to modify the site map so that your custom entities appear exactly where you want them in the user interface. Conceptually, the site map is just an .xml file that you edit (with the XML editing tool of your choice) to configure different parts of the Microsoft CRM navigation. Before we explain how to edit the site map, it will help to further define the screen components in the application navigation pane and the wunderbar (as shown in Figure 6-28) because the site map uses new terms to describe these areas of the user interface.

Figure 6-28: Screen components of the application navigation pane and the wunderbar
Microsoft CRM displays five buttons in the wunderbar by default:
-
Workplace
-
Sales
-
Marketing
-
Service
-
Settings
When you are working with the site map, Microsoft CRM refers to these five buttons as areas. When users click an area, Microsoft CRM updates the application navigation pane to show the appropriate links for that area. As the example in Figure 6-28 shows, the Workplace area contains three main elements:
-
My Work
-
Customers
-
Marketing
The site map refers to these elements as groups. Microsoft CRM formats groups in the Web client's application navigation pane with bold text and with the expand/collapse control.
Within each group are additional links that the site map refers to as subareas. For example, the My Work group in Figure 6-28 includes six subareas:
-
Activities
-
Calendar
-
Queues
-
Articles
-
Reports
-
Announcements
In addition to updating the application navigation pane and the wunderbar, editing the site map concurrently updates the Go To menu on the application menu bar. Figure 6-29 shows the Go To menu for our example.
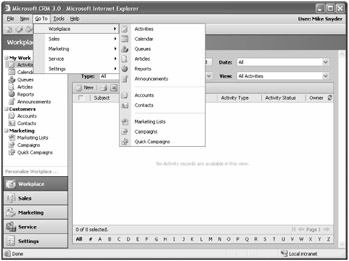
Figure 6-29: The Go To menu for the Workplace area
As you can see, the application menu bar lists the same areas that appear in the wunderbar (and in the same order). In addition, the application menu bar also displays all of an area's subareas nested in the menu. However, you will notice that the application menu bar does not display the group name. Instead of the group name, Microsoft CRM displays a horizontal line to graphically divide the groups.
| Important | Editing the site map updates the Web client's application navigation pane, the wunderbar, and the Go To menu in the application menu bar all at the same time. |
We also want to show you how the site map references screen regions in the context of the Outlook client. Although the Outlook client uses some of the same screen region names as the Web client, it also includes a few unique region names. Figure 6-30 shows the Microsoft CRM desktop client for Outlook, and the region names are identified in the subsequent list.
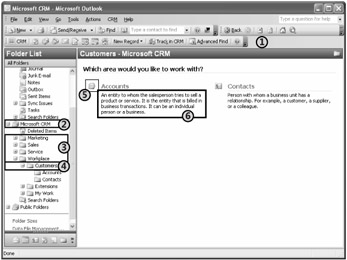
Figure 6-30: Screen regions in the Microsoft CRM desktop client for Outlook
-
Application toolbar
-
Microsoft CRM folder
-
Areas
-
Groups
-
Icon
-
Description
You can see that the Outlook client displays areas and subareas in the Outlook navigation pane as folders instead of as the buttons and links that the Web client uses.
| Important | Remember that the Web client and the Outlook client share the same site map to configure the application navigation. Therefore, you should always consider how changes you make in the site map will appear to Web and Outlook users. |
Sitemap.xml
Now that you understand the terminology that Microsoft CRM uses for the site map, we'll show you how to modify it to meet your needs. As we explained earlier, the site map is simply an .xml configuration file that you manually edit. To get a copy of the current site map of your deployment to edit, you must export it from Microsoft CRM. As with any customization, you export the site map by browsing to Settings, clicking Customization, and then clicking Export Customizations. Select the Site Map record, click More Actions in the grid toolbar, and then click Export Selected Customizations. Microsoft CRM prompts you to open or save the file, as shown in Figure 6-31.
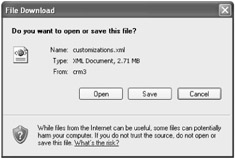
Figure 6-31: File download message for exporting customizations
Because you want to edit the site map file, you should save a copy to your local drive.
| Best Practices | Microsoft CRM uses customizations.xml as the default file name for all exported customizations. When you export the site map customizations, a best practice is to rename the customizations.xml file to Sitemap.xml. Although it is not required, using this naming convention makes the contents of the file obvious to you and others. |
You can edit .xml files by using any text editor, such as Notepad or WordPad, but using an XML-specific editor such as Microsoft Visual Studio .NET 2005 makes the editing process much easier because you can expand and collapse the different XML elements. You can use Microsoft Internet Explorer to view an .xml file (as shown in Figure 6-32), but you won't be able to edit it there.
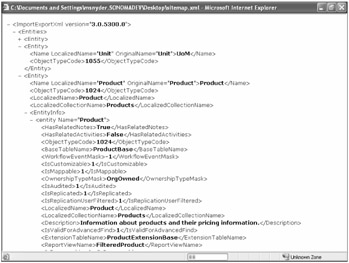
Figure 6-32: Viewing a sample Sitemap.xml file with Internet Explorer
Microsoft CRM creates a sitemap.xml file with the XML structure shown in Figure 6-33.
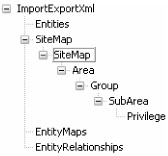
Figure 6-33: Sitemap.xml XML element structure
Only the SiteMap element in the Sitemap.xml file will contain any data. The Entities, Entity-Maps, and EntityRelationships elements should be empty. Let's discuss each of the SiteMap elements and its attributes in detail.
SiteMap It might seem a little confusing initially, but Microsoft CRM uses the name SiteMap as the root node of the SiteMap element (illustrated in Figure 6-33). Your Sitemap.xml file can include only one occurrence of the SiteMap node under the SiteMap elements. Table 6-7 lists the only attribute for the SiteMap node.
| Name | Description | Data type | Required? | Applies to Web client? | Applies to Outlook clients? |
|---|---|---|---|---|---|
| Url | Specifies a URL that Microsoft CRM will display in the Outlook clients when users click the Microsoft CRM folder Valid values: Any valid URL | String | No | No | Yes |
The SiteMap Url attribute lets you display the Web page of your choice when users click the Microsoft CRM folder in the Outlook client. Figure 6-34 shows an example in which we specified the URL http://sharepoint to display a Microsoft SharePoint intranet Web site.
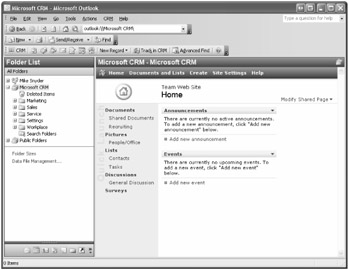
Figure 6-34: Using the Url attribute of SiteMap to change the default Web page in Outlook
To implement the example in Figure 6-34, you would change the SiteMap node from the default value.
<SiteMap>
Simply add the Url attribute to the node so that it looks like the following sample.
<SiteMap Url="http://sharepoint">
In the real world, you might want to display a custom Web page that you created, or perhaps some other intranet site. Note that changing this attribute affects both the laptop and desktop Outlook clients, but it does not affect users who access Microsoft CRM through the Web client.
Area The default sitemap.xml file includes five area elements (Workplace, Sales, Marketing, Service, and Settings), and you can modify, reorder, or remove any of these areas. You can also add entirely new areas to the Microsoft CRM navigation by adding new area elements to sitemap.xml. Remember, Microsoft CRM displays areas in the wunderbar, the application menu bar, and in the Outlook client folders.
| Caution | Although you can technically remove the Settings area from the application navigation by removing it from the site map, you might accidentally lock yourself out of the customizations section by doing so. Therefore, we strongly recommend that you never remove the Settings area from the site map. If you do not want users to see this area in the application navigation, you should change their security role settings instead of modifying the site map. |
Table 6-8 lists the attributes for the Area node.
| Name | Description | Data type | Required? | Applies to Web client? | Applies to Outlook clients? |
|---|---|---|---|---|---|
| Description | Text that Microsoft CRM displays in the Outlook client when users click the parent folder | String | No | No | Yes |
| DescriptionResourceID | For internal use only | String | No | Yes | Yes |
| Icon | Specifies a URL to an image; allows you to display a different icon for the area | String | No | Yes | Yes |
| ID | Specifies a unique identifier in ASCII; spaces are not allowed. Valid values: a–z, A–Z, 0–9, and underscore (_) | String | Yes | Yes | Yes |
| License | Specifies the user license requirement that determines whether the area is displayed Valid values: All, Professional, SmallBusiness | String | No | Yes | Yes |
| ResourceId | For internal use only | String | No | Yes | Yes |
| ShowGroups | Specifies whether Microsoft CRM will display an area's groups in the navigation pane Valid values: true false | Boolean | No | Yes | Yes |
| Title | Allows you to enter a different text label for the area | String | No | Yes | Yes |
| Url | Specifies a URL that Microsoft CRM will display in the Office Outlook clients when users click the folder that represents the area | String | No | No | Yes |
Group Within each area of the site map, you can specify multiple groups (or no groups at all). Groups allow you to categorize the subareas in a manner that makes the most sense for your end users. The Group element in Sitemap.xml uses the attributes listed in Table 6-9.
| Name | Description | Data type | Required? | Applies to Web client? | Applies to Outlook clients? |
|---|---|---|---|---|---|
| Description | Text that Microsoft CRM displays in the Outlook client when users click the parent folder | String | No | No | Yes |
| DescriptionResourceID | For internal use only | String | No | Yes | Yes |
| Icon | Specifies a URL to an image; allows you to display a different icon for the area | String | No | No | Yes |
| ID | Specifies a unique identifier in ASCII; spaces are not allowed. Valid values: a–z, A–Z, 0–9, and underscore (_) | String | Yes | Yes | Yes |
| IsProfile | Controls whether this group represents a user-selectable profile for the workplace Valid values: true, false | Boolean | No | Yes | No |
| License | Specifies the user license requirement that determines whether the subarea is displayed Valid values: All, Professional, SmallBusiness | String | No | Yes | Yes |
| ResourceId | For internal use only | String | No | Yes | Yes |
| Title | Allows you to enter a different text label for the group | String | No | Yes | Yes |
| URL | Specifies a URL that Microsoft CRM will display in the Outlook clients when users click the folder that represents the group | String | No | No | Yes |
Most of these attributes behave in exactly the same way as the Area element's attributes. We want to highlight one attribute unique to the group element: IsProfile.
When users navigate to the Workplace area, they can click a Personalize Workplace link in the navigation pane. Microsoft CRM displays the dialog box shown in Figure 6-35.
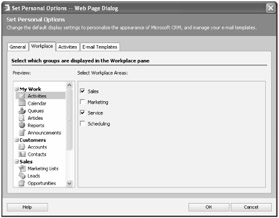
Figure 6-35: Set Personal Options dialog box
In this dialog box, users can select the groups that they want to see in their personal workplaces. Changing the groups displayed affects what they will see, but it does not affect what other users see.
| Tip | The Microsoft CRM user interface uses the phrase "Select Workplace Areas," but users actually select which workplace groups they want to display. |
Microsoft CRM does not display all of the groups in the Personalize Workplace area; it shows only groups with an IsProfile attribute value of true. So if you want a particular group in the Workplace area to always appear for all users, set the IsProfile attribute of the group to false so that Microsoft CRM won't allow users to deselect the group in the Personalize Workplace area.
| Tip | Although users can personalize their workplace only by using the Web client, their changes will also appear in their Outlook client. |
SubArea Each group element in the sitemap.xml file can contain multiple SubArea elements (or no SubAreas elements at all). SubArea elements possess the attributes shown in Table 6-10.
| Name | Description | Data type | Required? | Applies to Web client? | Applies to Outlook clients? |
|---|---|---|---|---|---|
| AvailableOffline | Specifies whether to display a subarea when the user is offline in Office Outlook client Valid values: true, false | Boolean | No | No | Yes (laptop client only) |
| Client | Specifies whether to display the subarea depending on the type of client the user is accessing Microsoft CRM with Valid values: All (the default value) Outlook OutlookLaptopClient OutlookWorkstationClientWeb | String | No | Yes | Yes |
| Description | Text that Microsoft CRM displays in the Outlook client when users click the parent folder (group) | String | No | No | Yes |
| DescriptionResourceID | For internal use only | String | No | Yes | Yes |
| Entity | Allows you to enter the schema name of the entity you want to display when users click the subarea link | String | No | Yes | Yes |
| Icon | Specifies a URL to an image; allows you to display a different icon for the subarea | String | No | Yes | Yes |
| ID | Specifies a unique identifier in ASCII, with no spaces Valid values: a–z, A–Z, 0–9, and underscore (_) | String | Yes | Yes | Yes |
| License | Specifies the user license requirement that determines whether the subarea is displayed Valid values: All, (the default value) Professional, SmallBusiness | String | No | Yes | Yes |
| OutlookShortcutIcon | Specifies the icon to display in the Outlook client | String | No | No | Yes |
| ResourceId | Used internally to address a localized label to display Valid values: a–z, A–Z, 0–9, and underscore (_) | String | No | Yes | Yes |
| Title | Allows you to enter a different text label for the subarea | String | No | Yes | Yes |
| URL | Specifies a URL that Microsoft CRM will display in the Outlook client when users click the folder that represents the subarea; overrides the schema name if you specify both a schema name and a Url attribute | String | No | Yes | Yes |
Privilege The last element of the sitemap.xml document is the Privilege element. Each SubArea element can include only one Privilege element, and using the Privilege element within a SubArea element is optional. The Privilege element allows you to specify security criteria that Microsoft CRM evaluates to determine whether it will display a subarea to a user.
It's important to note that the Privilege element does not override the Microsoft CRM security settings for custom and system entities. Therefore, even if you tried to assign display (read) rights to a user by adding a site map privilege, the Microsoft CRM security settings would not display the subarea to a user who did not have read rights to that entity.
So if the Microsoft CRM security settings always make the final determination on whether to display a subarea to a user, you might wonder why anyone would ever need to use a Privilege element. We think the most obvious benefit of the Privilege element is that you can use it to configure security display rights for custom Web pages that you integrate with Microsoft CRM (which you cannot do by using the native Microsoft CRM security settings).
The Privilege element has the attributes listed in Table 6-11.
| Name | Description | Data type | Required ? | Applies to Web client? | Applies to Outlook clients? |
|---|---|---|---|---|---|
| Entity | Allows you to enter the schema name of the entity that you want to reference for the privilege check | String | Yes | Yes | Yes |
| Privilege | Specifies the privileges needed to display this subarea Valid values: A comma-separated list with no spaces, made up of these possible values: All, Append, AppendTo, Assign, Create, Delete, Read, (the default value) Share, Write | String | No | Yes | Yes |
Let's look at an example that uses the Privilege element.
<SubArea Title="Test Subarea" Url="custompage.aspx"> <Privilege Entity="account" Privilege="Delete, Write"/> </SubArea>
In this example, if the user had Delete or Write privileges for the account entity, Microsoft CRM would display the subarea in the application navigation pane. Conversely, if you added the custom Web page Custompage.aspx to your system and you didn't want a particular user to see this page, you would simply use the Privilege element in your site map to specify a security privilege that you knew the user didn't have. If you don't specify a Privilege attribute, Microsoft CRM defaults to the Read privilege of the entity.
<SubArea Title="Test Subarea" Url="custompage.aspx"> <Privilege Entity="account"/> </SubArea>
In this example, if the user had Read rights to the Account entity, Microsoft CRM would display the subarea.
Site Map Editing Tips and Tricks
Editing the sitemap.xml file might initially appear as a very straightforward process, but here are a few tips and tricks that might save you some time:
-
Editing the order of elements in the site map works only in the Web client The Microsoft CRM Web client displays navigation elements (such as subareas) in the order that you specify in the site map. However, the Microsoft CRM Outlook clients use folders to display the navigation. Outlook always displays folders in alphabetical order, not in the order that you specified in the site map.
-
Don't confuse the Title and Description attributes It's easy to confuse what the Title and Description attributes do. The Description attribute appears only in the Microsoft CRM Outlook client; the Title attribute appears in both the Web and Outlook clients.
-
The site map is case-sensitive Because the site map uses XML, which is case-sensitive, you must ensure correct casing for all of your attributes.
-
Watch out for default attributes When we first opened the Sitemap.xml file to edit the name of a group or area (such as Sales), we looked for the text "Sales" so that we could change it. However, that text does not appear in the default sitemap.xml file. Instead, the Area element for sales looks like the following.
<Area Resource Icon="/_imgs/sales_24x24.gif" DescriptionResource>
It isn't obvious what text you need to change because the word that we want to update ("Sales") does not appear anywhere in this element. To change the text to a new value, you must add a Title attribute to the Area element.
<Area Resource Icon="/_imgs/sales_24x24.gif" DescriptionResource Title="New Sales Title">
Because the Title attribute does not appear in any of the default elements, Microsoft CRM uses a behind-the-scenes translation to display the titles of the default entities. In this example, we would describe the Title attribute as defaulted from Microsoft CRM because it doesn't exist in the site map. So if you're looking in the site map and you can't find the correct attribute to update in the Sitemap.xml file, it's probably a default attribute that you'll need to explicitly add.
-
Id attributes must be unique Each element requires an Id attribute. Remember that it must be unique from all of the other Id attributes in the site map.
-
Beware of conditionally required attributes Earlier in this chapter, we outlined the attributes of each element and identified whether Microsoft CRM requires them. In some cases, an attribute might become required depending on the settings of other elements. For example, Microsoft CRM does not require you to enter a title for Group elements. However, if you want to display groups for a particular area (ShowGroups = "true"), the Title attribute becomes required for the groups nested under that area. Microsoft CRM usually prompts you with a good description of the error, but you should know that these conditional requirement possibilities exist.
-
How to recover from a site map error Although Microsoft CRM validates the sitemap.xml file before the import, you might accidentally import a sitemap.xml file that modifies the navigation so that you cannot access the import customizations tool. If you cannot access the import tool, you obviously can't import a corrected site map file! Microsoft CRM allows you to directly access the import customizations tool at the following URL: http://<crmserver>/tools/systemcustomization/ImportCustomizations/importCustomizations.aspx.
-
Refreshing site map changes When you import a new site map, sometimes clicking the Refresh button in Internet Explorer does not update Microsoft CRM with your changes. This depends on the type of change you made. If you don't see the changes you expect, we recommend closing the Web browser window and launching a new one. If that does not work, we have occasionally needed to restart Internet Information Services (you can use iisreset) on the Microsoft CRM Web server to get your navigation changes to appear.
-
Do not change the home page of Microsoft CRM Outlook folders You might think that you can also customize the Microsoft CRM clients for Outlook by changing the home page of a folder in Outlook.
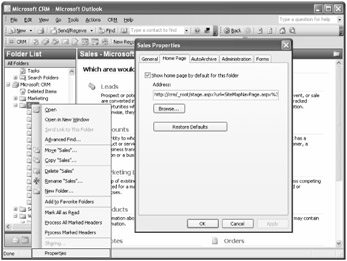
Although making this change is technically possible, it might adversely affect how the Microsoft CRM client for Outlook interacts with the site map, so we strongly discourage you from trying this.
-
Consistent attribute ordering will save editing time You can put the attributes in any order you want, but putting them in a consistent order will save you time later when you want to edit them.
Entity Display Areas
As you learned earlier in this chapter, custom entities allow you to select the areas where you want Microsoft CRM to display your custom entities. You select or clear the appropriate areas by using the entity editor in the Web client, as shown in Figure 6-36.
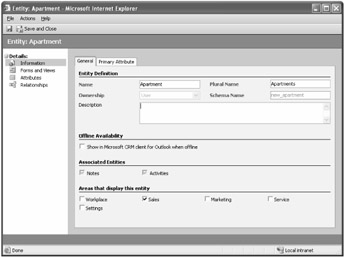
Figure 6-36: Editing display areas for a custom entity
When you select new areas or remove existing areas with the entity editor, Microsoft CRM automatically edits the site map for you. Because of this nuance, you should always export the site map before you edit it to make sure that you are working with the latest version.
Conversely, editing the different areas of the site map to include different entities and then importing the new file will automatically update the custom entity in Microsoft CRM. Therefore, the display area check boxes will update accordingly the next time you access this Web page.
EAN: 2147483647
Pages: 120