Using Built-In Filters
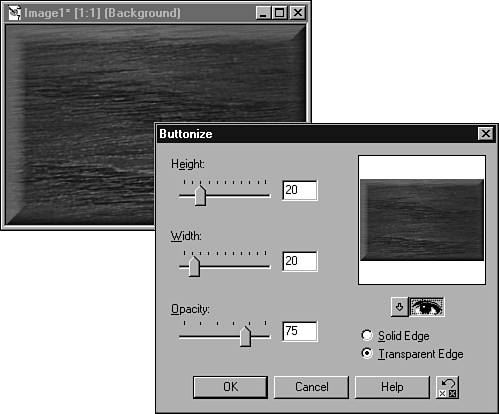
| You've already seen examples of at least one of the built-in filters. I've used the Hot Wax Coating filter in a couple of examples to add even more texture to the woodgrain texture and to create a chrome effect. Paint Shop Pro has a few more built-in filters, though, and the nicest are the Effects filters, many of which were new as of version 6 with even more added to version 7. In fact, there are so many built-in filters available now, that I won't even list them all here. To see what's available, choose Effects from the menu and then choose a submenu, such as 3D Effects or Artistic. That should give you an idea of just how many filters come with Paint Shop Pro 7. Buttonize FilterThe Buttonize filter (choose Effects, 3D Effects, Buttonize enables you to instantly create rectangular buttons from any image. Figure 40.1 shows the Buttonize dialog box. Figure 40.1. A button being created with the Buttonize filter and the Buttonize dialog box. You can see the settings I've chosen for the button and the result of applying those settings in Figure 40.1. You can change the height, width, and opacity of the bevel. You also can choose a solid or transparent edge. You can use the Auto Proof feature so that the changes you're applying can be viewed in real time. Both the Solid Edge and Transparent Edge options use the current background color for the bevel. The difference is that the solid edge is a solid color, using only shades of the background color , whereas the transparent edge allows the image to show through, as seen in Figure 40.1. Chisel FilterThe Chisel, Chisel) adds an outer bevel around the current selection. This bevel can be transparent or in the background color. You can also adjust the size of the bevel. You can see the effect of the bevel in the preview window of the dialog box and, as a result of my clicking the Preview icon, in the image behind the dialog box in Figure 40.2. Figure 40.2. The Chisel effect to some text. In this dialog box, you can set the size of the bevel and whether it should be transparent or created with the current background color. Cutout FilterThe Cutout filter (choose Effects, 3D Effects, Cutout) makes selections appear to be cut out of the background. Essentially, this filter adds a shadow to the inside of the object (see Figure 40.3). Figure 40.3. The Cutout effect being applied to some text. You can fill in the area with white, if you like. You also can set the interior and shadow colors, the opacity and blur of the shadow, and the vertical and horizontal offsets of the shadow. The vertical and horizontal offsets enable you to move the shadow around to get different effects. The Blur setting also affects this feature. A softer blur makes the cutout appear higher than the same effect done with less blurring. The Opacity setting affects how opaque or transparent the resulting shadow will be. Drop Shadow FilterThe Drop Shadow effect adds a drop shadow to selected objects. This effect is often used on text. You can set the color, the opacity, and the blur of the shadow. You also can set the vertical and horizontal offsets of the shadow (see Figure 40.4). Figure 40.4. The Drop Shadow effect being applied to text. One effect that I like is to apply the drop shadow to white text on a white background (see Figure 40.5). Figure 40.5. The Drop Shadow effect applied to white text on a white background. To create this effect, open a new image with a white background and follow these steps:
Recall also that many of the filters discussed in this chapter are used throughout various parts of the book. In Chapter 39, "Creating Cool Text Effects," for example, I used the Gaussian Blur filter for the X-Files text. Filter Effects with Layer Blending Mode VariationsSometimes you can filter to a layer and, with the help of a layer blending mode change, get a truly awesome effect. To see an example of this technique, open a scan of a photo and follow along with the next example:
Your photograph should resemble a softly colored, hand-drawn sketch (see Figure 40.6). Figure 40.6. Applying the new Black Pencil the look of a hand-drawn sketch. Figure 40.6 shows all three stages of the photograph. You can see the original photo, the layer with the Black Pencil filter applied, and the final image with the layer blending mode changed to allow the two layers to interact. Examples of how some ofthe other built-in filters can be applied are shown throughout this book. |

EAN: 2147483647
Pages: 350