|  Inserting Clip Art 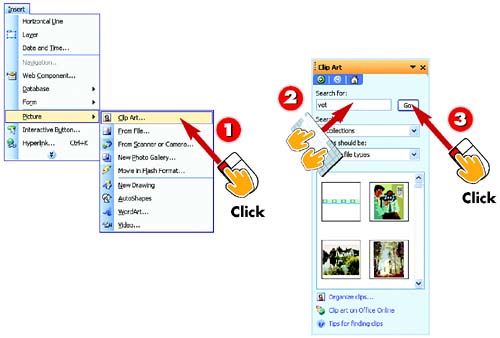 -
 | Click in your page where you want to insert the clip art and open the Insert menu, choose Picture , and then choose Clip Art . | -
 | The Clip Art task pane opens. In the Search box , type a word or phrase describing the sort of picture you want. | -
 | Click the Go button. | INTRODUCTION Even if you don't have a specific image you want to add to your page you might use a few pictures to dress it up. Enter Microsoft's built-in Clip Art gallery. The Clip Art gallery lets you quickly add to a page any item from the clip library, which contains thousands of graphics, photos, sound clips, and animations. |
TIP Try Multiple Search Terms You can type more than one word in the Search for text box (for example, "circus clown") to narrow the search even further, but one well- chosen word usually works best. |
TIP Limit the Type of Clip You're Looking For You can better target your search by choosing a particular clip-art collection from the Search in drop-down list, or by choosing a media file type from the Results should be list, before clicking Go. |
 -
 | Use the scrollbar in the task pane to scroll through the pictures shown. | -
 | When you see a picture you like, click it once to insert it in your page. | -
 | The picture is added to your page. Click the Close (x) button in the task pane's upper-right corner to close it. | HINT You Can Change a Clip Any Way You Want To After you insert a clip, you can change that clip's appearance or position in any of the ways described later in this part, including changing the clip's size, repositioning it, or giving it a border. |
TIP There's Still More Clip Art Online Click the Clip art on Office Online link that appears at the bottom of the Clip Art task pane. That link opens your default Web browser and Internet connection, and goes to a Microsoft Web site where you can find additional clips. |
Inserting a Picture from a File 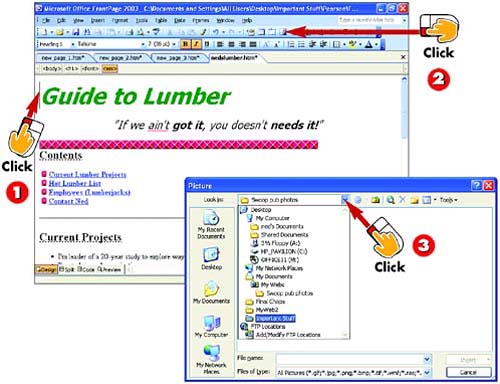 -
| | Open the Web page in Design view and click at the spot where you want to insert the picture. | -
| | Click the Insert Picture from File button on the Standard toolbar. | -
| | The Picture dialog box opens. Use the Look in list to navigate to the folder where the picture is stored. | INTRODUCTION Got a picture file of your own that you want to drop in your page? If so, this task is for you. (If not, the next three tasks will help you get one.) Ideally, any picture file you use in a Web page will be in GIF or JPEG file format (that is, using the file extension .gif or .jpg), but you can use pictures stored in just about any file format, including PNG, BMP, TIF, PCX, WMF, and others. |
TIP Just Get the Clip in the Ballpark Don't worry too much about exactly where you position the picture. After inserting it, you can fine-tune its location, size, shape, and more, as you learn to do later in this part. |
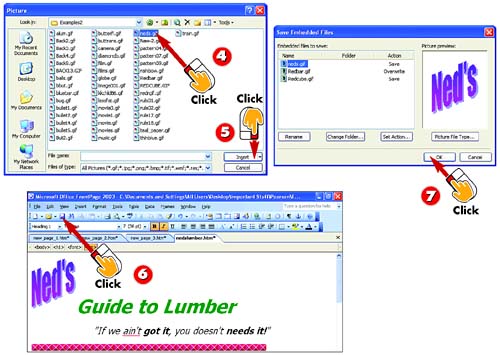 -
| | Click the picture's name to select it. | -
| | Click OK . | -
| | The image is inserted in the spot you specified. Click the Save button on the Standard toolbar to save the change to the page. | -
 | When you save the page, a dialog box might appear to report that the picture files will be copied to the same folder as the Web page file. Click OK . | HINT FrontPage Converts Pictures to GIF Picture files you've inserted that are not already in GIF or JPEG format are automatically converted to GIF when FrontPage copies them to the Web page's folder. |
Adding a Picture from a Scanner or Digital Camera 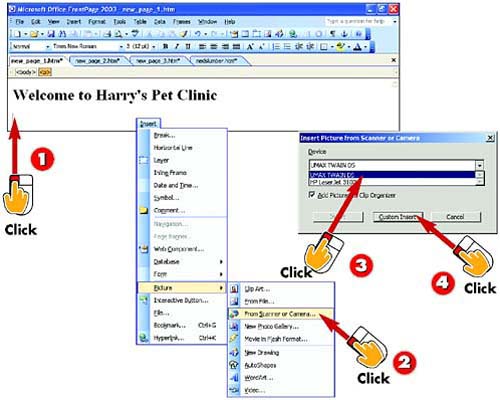 -
| | Open the Web page in FrontPage's Design view, and click the spot where you want the picture. | -
| | Open the Insert menu, choose Picture , and choose From Scanner or Camera . | -
| | Click your scanner or camera in the Device list. | -
| | Click the Custom Insert button to open the software that came with the camera or scanner you chose. | INTRODUCTION Got a scanner or a digital camera? Then you can scan pictures directly into your Web pages in FrontPage 2003, or copy pictures directly from your camera (or its software) into FrontPage. |
TIP Set Up Your Camera or Scanner First This task assumes that you have already connected your scanner or camera to your PC and set up any software it requires. |
TIP TWAIN Devices If your device's software installs in Windows as a TWAIN-compliant device but is not actually TWAIN-compliant, these steps might not work for you. Use the software that came with our device for use on your page. |
 -
| | In your scanner or camera program, choose among your options for scanning (if you have a scanner) or saving (if you have a camera), and then scan or save. | -
| | After you scan or save, the picture appears in your page. Click the Save button in the Standard toolbar. | -
| | When you save the page, a dialog box might appear to report that the picture files will be copied to the same folder as the Web page file. Click OK . | HINT Actual Steps May Vary Steps 5 and 6 will vary, depending on whether you have a scanner or camera, and depending on the specific steps to open and scan (or save) pictures in the software that came with your scanner or camera. |
TIP Choose the Right Resolution for Web Pics Most scanners can capture images at higher resolutions and color depths than necessary for the Web. In step 5, use your scanning software to dial down to Web-appropriate scan settings: 72 dpi resolution, 256 colors. |
Replacing a Picture 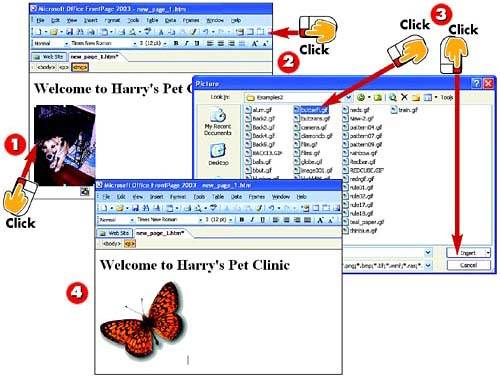 -
| | Click the picture to select it. Handles ”little squares ”appear around the picture to show it's selected. | -
| | Click the Insert Picture from File button. | -
| | The Picture dialog box opens. Navigate to the folder that contains the picture you want to add, click the picture file to select it, and click the Insert button. | -
| | The new picture replaces the old one. | INTRODUCTION If you insert a picture into your page but decide that you don't want it after all, you can replace it. (These steps also come in handy for replacing pictures left in the page by a template with new pictures you've hand-picked.) |
TIP Deleting Pictures To delete a picture without replacing it, just click it to select it, and then press the Delete key on your keyboard. |
HINT Deselecting a Picture To deselect a picture after working with it, just click anywhere in the page except on the picture. |
Changing the Size of a Picture 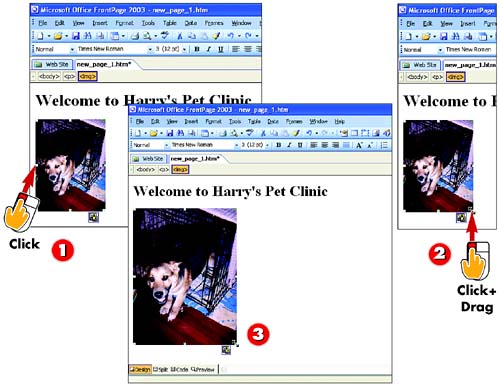 -
| | Click the picture to select it. Handles appear around the picture to show it's selected. | -
| | Click and hold on a corner handle ” not a side, top, or bottom handle ”and drag toward the picture's center (to shrink it) or away from the center (to enlarge it). | -
| | Release the mouse button when the picture is the desired size. | INTRODUCTION If, after you insert a picture, you feel it's too large or too small, you can change its size right from within Design view. |
TIP Be Careful Resizing Pics If a picture looks lousy after sizing, click Undo to restore its original size, or replace it with a new picture that's already sized correctly. |
TIP Resampling Can Improve a Picture's Appearance You might be able to improve the appearance of a picture after changing its size by selecting the picture and then clicking the Resample button on the Pictures toolbar. |
Changing the Shape of a Picture 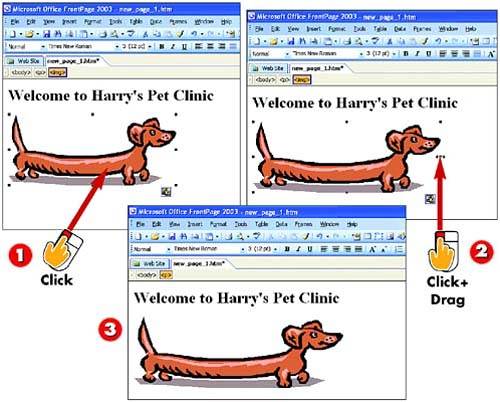 -
| | Click the picture to select it and display its handles. | -
| | Click and drag a side handle (to change width) or top or bottom handle (to change height) toward the picture's center (to reduce width or height) or away from center (to increase width or height). | -
| | Release the mouse button when the picture is the desired shape. | INTRODUCTION You can stretch a picture out of its original shape. You might do this to change the look of an abstract graphic or to create a fun, funky effect with a photo. |
TIP Undo Erases All Mistakes Don't like the way the picture looks after you reshape it? Don't fiddle with trying to drag it back into shape. Just click Undo . If that doesn't work, see the task "Undoing Everything You've Done to a Picture" later in this part. |
Cropping a Picture 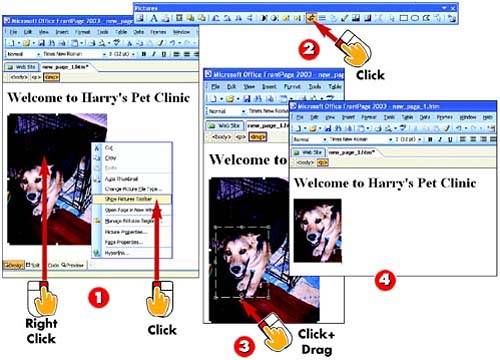 -
| | Right-click the picture and choose Show Pictures Toolbar from the shortcut menu that appears. | -
| | Click the Crop button on the Pictures toolbar. A dashed line appears around the image, showing its own set of cropping handles. | -
| | Click on a cropping handle and drag toward the center of the image. When the dashed lines frame the part of the image you want to keep, click the Crop button again. | -
| | The picture is cropped | INTRODUCTION Whenever you can, you should crop a picture ”trim unwanted regions off the sides, top, and bottom ”in the program in which it was created before inserting it in a page. But when that's not possible, FrontPage lets you trim up a picture right in Design view. |
TIP Cropping from the Corners To crop both one side and the top or bottom in one move, click and hold on a corner handle in step 3. |
Rotating or Flipping a Picture 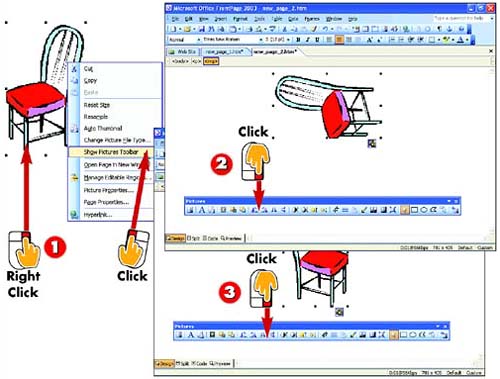 -
| | Right-click the picture and choose Show Pictures Toolbar in the shortcut menu that appears. | -
| | Click the Rotate Left or Rotate Right button on the Pictures toolbar to rotate 90 degrees. (Click again to go another 90 degrees.) | -
| | Click the Flip Horizontal or Flip Vertical button to reverse the image. | INTRODUCTION So you've got a picture that's just what you want, except it's sideways , upside down, or backward (or it's fine, but you want it to be sideways, upside down, or backward). No problem. Rotating can turn a sideways or upside down picture the right way, and flipping a picture reverses it. |
TIP Quick Guide to Flip/Rotate Fixes If the picture is upside down (but not backward), click a Rotate button (either one will do) twice. If the picture is upside down and backward, click Flip Vertical once. If the picture is backward but not upside down, click Flip Horizontal once. |
Changing the Contrast or Brightness of a Picture 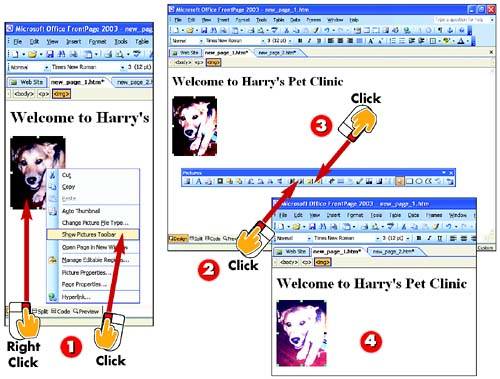 -
| | Right-click the picture and choose Show Pictures Toolbar in the shortcut menu that appears. | -
| | Click the More Contrast or Less Contrast button on the Pictures toolbar to adjust the picture's contrast. | -
| | To adjust the brightness level, click the More Brightness or Less Brightness button. | -
| | The image's brightness is adjusted. | INTRODUCTION With some types of picture files, you can adjust contrast and brightness with FrontPage. Changing these qualities can dramatically improve the image. Note that this won't work with very simple graphical images, but often works with photos or other images that contain many different shades. |
HINT Clicking Multiple Times Amplifies the Effect You can click any of these buttons multiple times to amplify the effect applied. |
HINT What If Changing Contrast and Brightness Shows No Effect? If you click any of these buttons several times in a row and see no apparent change in the picture, the picture is of a type whose brightness and contrast cannot be adjusted. |
Changing to Grayscale or "Washing Out" Color 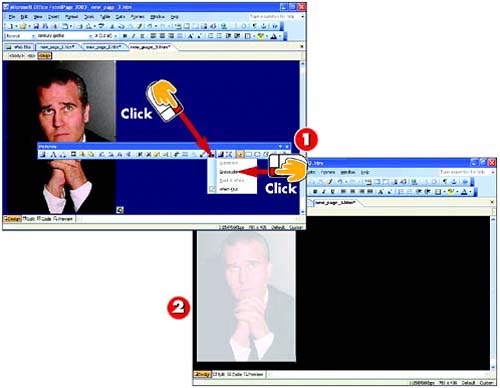 -
| | Click the Color button on the Pictures toolbar, and choose Grayscale or Wash Out . | -
| | The desired effect is applied. | INTRODUCTION On the Web, where so many authors assault you with color overkill, carefully selected grayscale images ”such as a black-and-white TV image ”add a touch of class. Another cool effect is "washing out" ”fading the colors in a picture so that they're softer, more muted. In FrontPage, you can easily apply either of these elegant effects to any picture. |
TIP Graying or Washing Out Could Require Fine-Tuning Brightness/Contrast After going to gray or washing out, you might want to adjust the picture's contrast and/or brightness (see the preceding task). |
Giving a Picture a Transparent Background 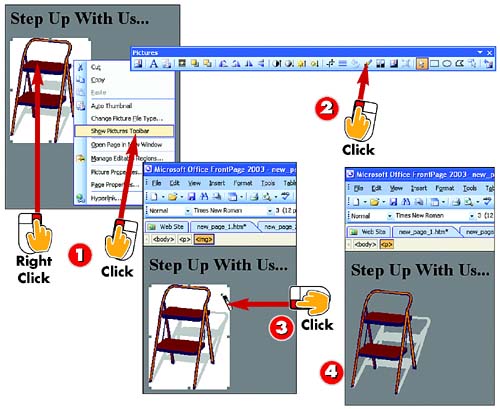 -
| | Right-click the picture and choose Show Pictures Toolbar . | -
| | Click the Set Transparent Color button on the Pictures toolbar. | -
| | Carefully point to the picture's background, and click. | -
| | The picture's background becomes transparent, making the page background visible. | INTRODUCTION Even when an image appears as an irregular shape, it actually has a rectangular background that shows up behind the shape, covering any background in your page (see Part 7). By making the picture's background color transparent , you enable the page's background to show through; only the important part of the picture remains visible. |
TIP Transparency Only Works on GIF Files If you set a transparent color for a picture that is not currently in GIF format, FrontPage reports that it must convert the picture to GIF to set transparency after step 3. Click OK to complete the conversion. |
Undoing Everything You've Done to a Picture 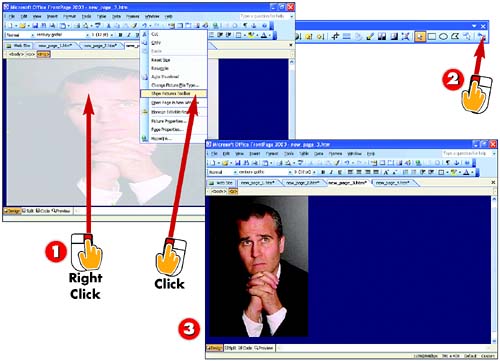 -
| | Right-click the picture and choose Show Pictures Toolbar . | -
| | Click the Restore button on the Pictures toolbar. | -
| | The picture is restored to its original form. | INTRODUCTION Sometimes you'll monkey around with a picture so much that you wind up wishing you could erase all your changes and restore the original, unaltered picture. In such cases, issuing the Undo command often won't work ”too many changes under the bridge. But in just two steps, you can remove any and all changes you made to a picture. |
TIP Use Undo to Selectively Reverse Changes to Pictures If you want to remove some, but not all, of the changes you've made to a picture, use the Undo list or selectively change the formatting however you want. |
Choosing a Picture's Alignment 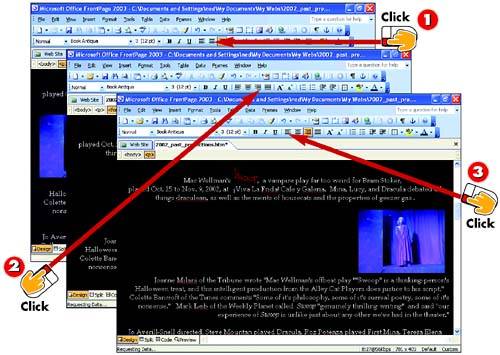 -
| | After you click the picture to select it, click the Center button on the Formatting toolbar. | -
| | The picture is centered on the page. To right-align it, click the Right Align button on the Formatting toolbar. | -
| | The picture is right-aligned on the page. To left-align it, click the Left Align button on the Formatting toolbar. | INTRODUCTION By default, a picture you insert goes on the left side of the page. But you can center it or align it to the right side of the page, exactly as you do text. |
TIP Pictures Are Paragraphs For all intents and purposes, a picture is a paragraph. That means that you can not only use the Alignment buttons to align it as you would a text paragraph, but also that you can indent pictures with the Increase Indent button. |
Changing the Position of a Picture 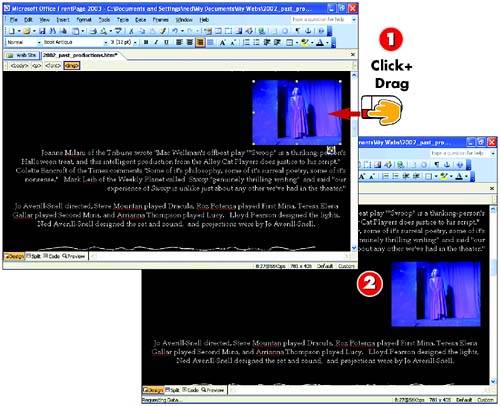 -
| | Click the picture and drag it to where you want it. (A little square icon follows the pointer to tell you you're dragging something.) | -
| | When the square icon is in the spot where you want the picture to be placed, release the mouse button. The picture is moved. | INTRODUCTION Generally, you position a picture only in the ways you position a paragraph; it can go at the top of the page, at the bottom, or between any two paragraphs, and it can be aligned to the left, right, or center. There are exceptions, which you'll explore in the next three tasks; here are the simple steps for moving a picture from one general location to another. |
TIP If you prefer, you can move a picture using FrontPage's Cut and Paste commands, just like you do text. Select the picture, click the Cut button, click in the new spot, and click the Paste button. |
Wrapping Text to a Picture 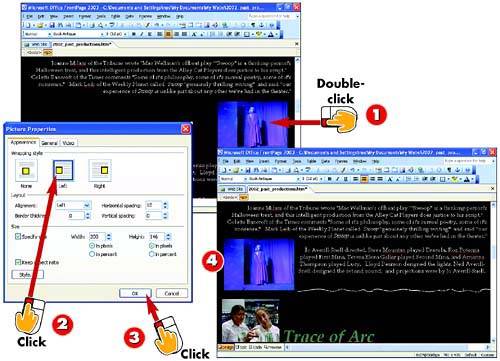 -
| | Double-click the picture to open the Picture Properties dialog box. | -
| | On the Appearance tab, click None, Left , or Right in the Wrapping style area to choose the kind of wrapping style you want. | -
| | Click OK . | -
| | The text is wrapped in the style you selected. | INTRODUCTION When text comes right after a picture, you can choose the relationship between the text and picture. For example, should the text start below the image, to the right of it, or to the left of it? |
TIP Cutting and Pasting You can't use a wrapping style with a picture that's absolutely positioned (see the next task). If you do, the absolute positioning is removed automatically, and the picture reverts to standard positioning. |
Choosing the "Absolute" Position of a Picture 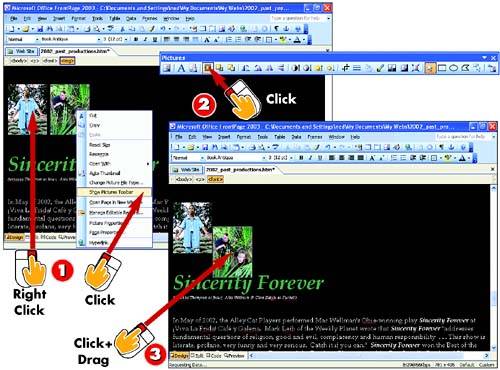 -
| | Right-click the picture and choose Show Pictures Toolbar . | -
| | Click the Position Absolutely button on the Pictures toolbar. | -
| | Drag the picture to any spot you want. | INTRODUCTION As you've seen, pictures plug into your Web page layout in a general way, like big paragraphs, so that you don't have the sort of precise control of where they appear in the layout that you might have in a word processing or desktop publishing program. Using this task, you can position a picture at a precise spot on the page in relation to the outlines of the page itself and all the other elements it contains. You can position pictures so precisely that you can overlap them, or overlap text or tables. This "absolute positioning" gives you far greater control of your page layout. Note, however, that this positioning shows up only when the page is viewed through a DHTML-compatible browser, such as Internet Explorer 4 (or later) or Navigator 4 (or later). |
HINT Using Tables You can get better control of where pictures and other objects appear in the layout ”without resorting to absolute positioning ”by laying out the page as a big table. See Part 8 for more information. |
Layering Pictures 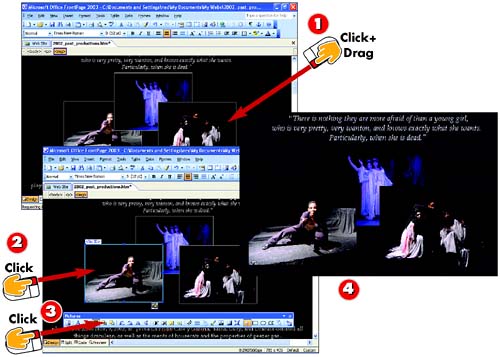 -
| | With the Picture toolbar displayed, drag your absolutely positioned object or objects on top of one another, in any order. | -
| | Click any visible portion of the object whose position in the pile you want to change. | -
| | On the Pictures toolbar, click the Bring Forward button to move the object one level closer to the top of the pile, or the Send Backward button to move the object one level deeper. | -
| | The picture is layered accordingly . | INTRODUCTION You can lay an absolutely positioned picture (see the preceding task) on top of other pictures or text in the page. But suppose that you want the object underneath the absolutely positioned picture to appear on top of the picture? Here's how to control the order of layers you can create with absolutely positioned objects. |
TIP Unhiding What's Behind If the object you want to work on is completely hidden (so that you can't select it), use Send Backward on other objects to move them beneath the one you want. |
Putting Multiple Links in a Picture 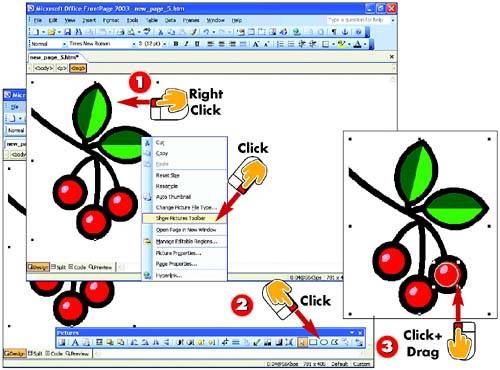 -
| | Right-click the picture you want to make into an image map and choose Show Pictures Toolbar . | -
| | Click the Rectangular, Circular , or Polygonal Hotspot button. | -
| | Point to a spot on the picture in or near where the link should go. Click and drag outward to create the hotspot, and release (you'll fine-tune its size and position later). | INTRODUCTION A picture containing multiple links is called an image map . The word to remember is hotspots ”invisible boxes on the picture, each of which has a link attached to it. Use a picture that has easily identifiable regions in it so that visitors don't have to guess where the links are. |
TIP Using the Polygonal Hotspot Tool When using the Polygonal hotspot tool, click and drag to draw the first line. Click again and drag to draw the next, and so on. When drawing the last line, make sure that you draw all the way to the start of your first line (closing the shape) and click. |
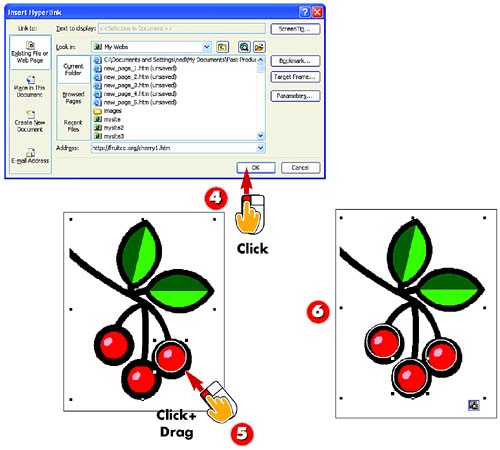 -
| | In the Insert Hyperlink dialog box, specify the Web page, email address, file, or other element that you want to link to (refer to Part 5 for help) and then click OK . | -
| | Adjust the hotspot so that its size and position more or less fit the region (see the tip on this page for help resizing and repositioning hotspots). | -
| | Repeat steps 2 “5 for each link in the picture, creating a separate hotspot for each. | TIP Resizing and Repositioning Hotspots To resize a hotspot, drag the hotspot's handles as you would when resizing a picture. To fine-tune a polygonal hotspot, drag the handles at its corners. To move a hotspot, click anywhere within the hotspot, drag it to the new location, and release the mouse button. |
TIP Changing a Hotspot's Link To change a hotspot's link, double-click the hotspot and use the Edit Hyperlink dialog box as you learned in Part 5. To delete a hotspot, click it to select it, and then press the Delete key on your keyboard. |
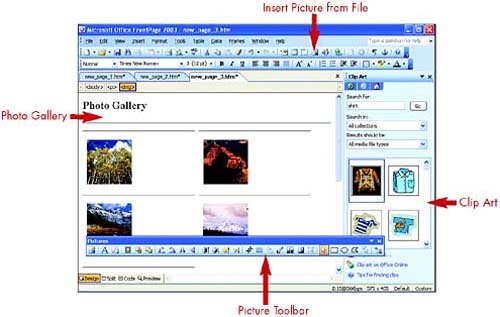
Creating a Photo Gallery 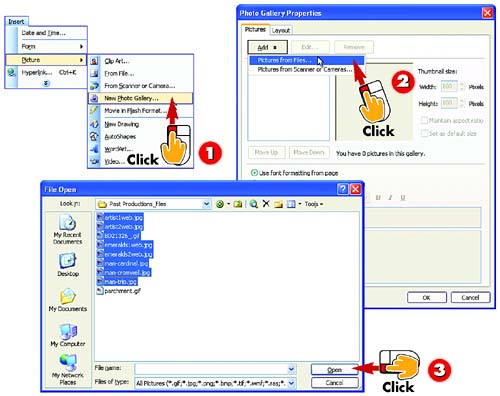 -
| | Click the spot in a Web page where you want to add a photo gallery, and choose Insert, Picture, New Photo Gallery . | -
| | The Photo Gallery Properties dialog box opens. Click the Add button, and choose Pictures from Files . | -
| | The File Open dialog box opens. Navigate to the folder where the picture files are stored, select the picture files you want to use, and click the Open button. | INTRODUCTION A photo gallery is a nicely laid out set of thumbnails ”smaller, quick-to-download versions of larger pictures. When a visitor clicks on a thumbnail in the gallery, the full picture appears. FrontPage 2003 includes a fast, easy tool for adding a photo gallery to any page, and for updating that gallery in a snap anytime you want. (Before you add a series of pictures to a FrontPage photo gallery, you must collect them all into one folder.) |
HINT You Can Add Scanner/Camera Pics, Too Notice in step 2 that you can also add pictures directly from your scanner or digital camera, although it's probably easiest to scan or otherwise prepare all your pictures in advance. |
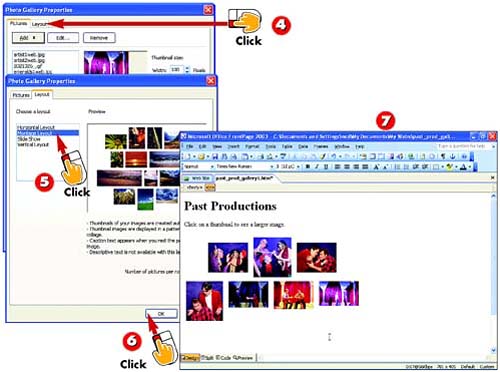 -
| | In the Photo Gallery Properties dialog box, click the Layout tab. | -
| | Choose a layout for your gallery. | -
| | Click OK . | -
| | The gallery is created. Save your page and continue to edit it any way you want. | TIP FrontPage Saves the Pic Files with the Page FrontPage automatically saves the pictures with the Web page and copies the thumbnails and the full versions of the photos to the Web when you publish. (FrontPage may display a box telling you this when you save.) |
TIP Double-Click the Gallery to Change It, Anytime To change your gallery or its appearance anytime, double-click on it to open the Photo Gallery Properties dialog box and change whatever you want ”even the list of pictures. |
HINT Preview Your Page to Test Your Gallery To test your gallery ”so that you can click the thumbnails and see the full pictures appear ”preview the page. |
 |