Using a PPP Link
| Most of this book assumes that the network to which the Linux computer is connected is a dedicated one, such as an Ethernet network. In this environment, it's possible to run servers, as discussed in Parts II and III; the security and router issues of Part IV are very important, as well. Some configurations, though, use a less permanent type of network link. These connections use a telephone modem and PPP to create a temporary connection to the Internet, or at least to one other computer. Although you're not likely to run servers over a PPP link, they do have their place. For instance, you might run a small office or home office network, and so use various local network servers, as discussed in Part II, but use a PPP link to connect that network to the Internet on an as-needed basis. You can even share this connection among all the computers on the network by setting up Network Address Translation (NAT; also called IP masquerading), as discussed in Chapter 25. In order to do these things, though, you'll first have to establish the PPP connection. This section describes how to do this.
Using a GUI DialerPPP can be a tricky tool to use; the protocol has many options that, if set incorrectly, can disrupt the PPP connection or even prevent it from coming up initially. For this reason, many people find it easier to use PPP via a GUI dialer than through configuration scripts. In fact, many Linux GUI PPP dialers closely resemble their counterparts in other OSs, such as Windows, so if you're familiar with PPP in another OS, you shouldn't have too much difficulty using a Linux GUI PPP dialer. Different GUI dialers differ in some details, but they are similar in broad outline. This section presents information on the popular KPPP dialer, which is part of the K Desktop Environment (KDE). You can use KPPP even if you don't use KDE; or you can use GNOME PPP (part of the GNU Network Object Model Environment, or GNOME) or a dialer that's not part of any desktop environment, such as X-ISP (http://xisp.hellug.gr). NOTE
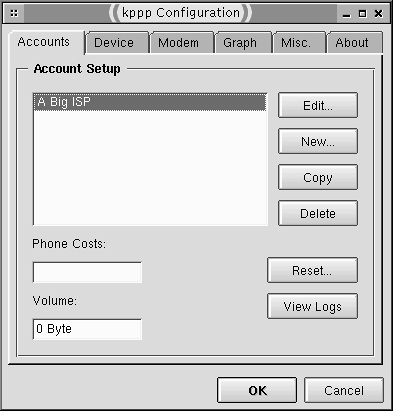
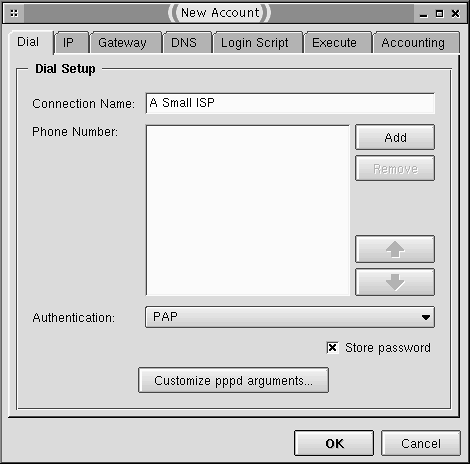
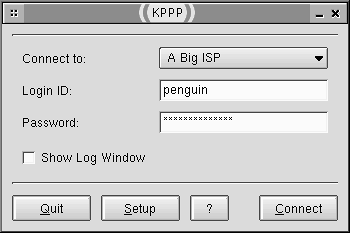
To start KPPP, you can select it from a menu on your desktop environment, or you can type kppp in an xterm . The result should resemble Figure 2.4, except that the first time you launch KPPP, it probably won't include any ISP names in the Connect To list, nor a login ID or password. In order to set the program up to use an account, follow these steps:
Figure 2.4. GUI PPP dialers usually provide some way of selecting an account, entering a username and password, and initiating a connection. NOTE
Using a GUI PPP dialer is a fairly simple matter; after launching the program, you need only click the Connect button (which may be called something else in some programs). Some dialers will provide you with an indication of their progress during the connection phase, and many modems will echo the sounds of the modem negotiations. In KPPP, clicking the Show Log Window button will provide added details. Some dialers, including KPPP, require you to enter the username (in the Login ID field) and password before clicking Connect. Others will ask for this information after you click Connect. Many let you store your password on disk (the Store Password check box in the KPPP New Account dialog box lets you set this option). WARNING
Once a connection is initiated, the Connect button changes names so that you can break a connection. (Some dialers may use a different button or present another dialog box to let you end a connection.) If your ISP or telephone company charges by the minute, remember to do this or you'll get an unexpectedly large bill! Adjusting Configuration ScriptsGUI dialers are a convenient way to get started with PPP, but they aren't ideal for all situations. For instance, if you want to initiate a PPP connection automatically, a GUI dialer won't do the job, because it requires manual intervention to begin the call. For this reason, PPP connection scripts can also initiate connections. You may use these scripts manually or as part of an auto-dialing scheme, as discussed in the next section, "Configuring Dial-on-Demand." Using the scripts requires setting authentication options and configuring the scripts themselves . Setting PPP Authentication OptionsAs noted earlier, most ISPs use a protocol called PAP for authenticating dial-in users. In order to use this protocol from a dialing script, you need to edit the file /etc/ppp/pap-secrets . (A similar file, called /etc/ppp/ chap-secrets , is used by another protocol that some ISPs use. Both files use the same format, so you can edit both, if you like.) This file consists of a series of lines, one for each PPP account you have. The format of each line is as follows : username server password IP_address Each of these elements is separated by one or more spaces or tabs. Their meanings are as follows:
WARNING
Most systems connect to just one ISP, so the pap-secrets file will have just one line. This line might resemble the following: penguin * w8terfow1 Configuring Dialing ScriptsOnce you've set up the PAP or CHAP authentication file, you can begin adjusting the dialing scripts themselves. Because GUI dialers have become so prevalent , most distributions now hide these scripts in a documentation directory, such as /usr/share/doc/ppp- version /scripts , where version is the version of PPP your distribution uses, such as 2.4.0 . There are three scripts that are of interest:
You'll need to modify ppp-on , and possibly ppp-on-dialer , in order to connect to an ISP. You'll also probably want to move all three scripts to a convenient location, like /usr/local/bin . In ppp-on , set the following items:
Once you've adjusted your ppp-on script to your needs, you should examine the ppp-on-dialer script. This script controls pppd 's interactions with your modem, including sending the commands that cause it to dial, and any interactions required to log in if your ISP doesn't use PAP or CHAP. The script does this by calling a utility known as chat , which handles automated exchanges with tools that expect text-based input. Most of this script is a series of expect/reply strings, arranged in columns . The first column is the value for which the script looks, and the second column is the response that chat sends in response. Some of these, such as an expect value of ABORT , carry special meaning; for instance, ABORT tells chat when to halt because of an error. Most of the lines end in a backslash ( \ ), the common convention for a line continuation. (In reality, chat expects a single line with interspersed expect/reply pairs; they're grouped in columns only for the convenience of humans .) The final line lacks a backslash. The main feature that may need adjustment is the final three lines of the ppp-on-dialer script. The default script is usually written with the expectation that the ISP is not using PAP, so it concludes with two lines that echo your username and password (as entered in the ACCOUNT and PASSWORD variables in ppp-on ). You may need to delete these lines or comment them out (by preceding them with pound signs, # ). If you do this, you'll also have to remove the backslash from the third-to-last line, which normally begins with an expect string of CONNECT . Removing these final two lines and adjusting the preceding one will cause chat to terminate immediately after connection, whereupon pppd will try to use PAP or CHAP to authenticate the connection. If your ISP does not use PAP or CHAP, you may need to modify the expect portions of these lines to match the prompts your ISP uses for your username and password, and possibly add more prompts if you have to enter additional commands yourself, such as a command to explicitly start PPP on the ISP's system. Using PPP Dialing ScriptsEditing the script files is the most difficult part of initiating a PPP connection via these scripts. When this task is done, you need only type ppp-on (preceded by a complete path to the script, if you didn't put it somewhere on your path ) to initiate a connection. If your modem is external, you should see its lights blink, and if it's configured to echo sounds to its speaker during dialing, you should hear this process. If all goes well, after a few seconds you should be able to access the Internet using Linux's normal networking tools. If you encounter problems, you should first check the log file to which pppd logs its actions (normally /var/log/messages ). The end of this file should contain information on pppd 's actions, including whatever caused it to faila timeout waiting for PAP, a failure when running chat , or what have you. If this output is cryptic or doesn't provide you with the clues you need, try searching for keywords related to your problem on http://groups.google.com. This site hosts archives of recent posts to Usenet newsgroups, where discussions of problems with PPP and other Linux networking tools frequently appear. Searching there will quite possibly turn up an answer, or at least a lead you can follow. The PPP HOWTO document, mentioned earlier, also has PPP debugging tips. One drawback to connecting via scripts is that most distributions are configured in such a way that only root may initiate a PPP connection. This can be an important security measure on a multi-user system, because you may not want unauthorized personnel making random PPP connections. It can be a nuisance, though. The GUI dialers get around this problem by using the set user ID (SUID) bit to have the GUI dialer run with root privileges. Of course, this opens up the system to the security problems of allowing random users access to the dialer. (You may restrict execute privileges to the GUI dialer by creating a PPP users group, assigning the GUI dialer to that group , and denying world execute privileges on the program.) Many ISPs communicate the IP addresses of DNS servers along with other information as part of the PPP negotiation. Sometimes, though, you'll need to enter this information in /etc/resolv.conf yourself, as described earlier in this chapter in "Configuring DNS." You should be able to set up your DNS servers permanently. Configuring Dial-on-DemandWhen your computer is used primarily as a single-user workstation, GUI dialers or manually launched scripts like ppp-on are good methods of initiating PPP connections. In a multi-user environment, though, these tools have their problems. Users could try to initiate connections when they're already up, terminate connections when other users are using them, or accidentally leave connections active for long periods of time. For this reason, Linux supports a procedure known as dial-on-demand, which is implemented through a program called diald . This tool detects outgoing network traffic, initiates a PPP connection in response to the traffic, and terminates the connection after a specified period of time with no network activity. The result is that users may use network tools almost as if they were on an always-up network connection; they need take no explicit actions to start or stop the PPP link. There will be a delay, however, between the time when diald detects the outgoing traffic and the time the connection is finished (after all, the system has to dial the modem, and the modem must negotiate the connection). If you program the system to drop a connection too soon after the cessation of network activity, this can result in annoying delays during normal network usesay, a long pause when a user clicks on a link in a Web page, because the connection timed out when the user was reading the first page. To use diald , you must have SLIP support compiled in your kernel, as described in Chapter 1. This is because diald uses SLIP to set up a virtual connection, essentially linking your computer to the diald program itself. Programs therefore see an always-up network interface, and diald receives the network traffic so that it can control when to initiate the real connection. Unfortunately, most Linux distributions don't ship with diald . You can obtain the package from its home Web site, http://diald. sourceforge .net, or you can search for a prebuilt binary on http://www. rpmfind .net or http://www.debian.org/distrib/packages for RPM or Debian packages, respectively. The diald program is controlled through three configuration files:
In addition to these configuration files, you must edit your /etc/ppp/ pap-secrets or /etc/ppp/chap-secrets file if your ISP uses PAP or CHAP, just as for a regular script-based PPP connection. You may also need to enter your ISP's DNS server addresses in /etc/resolv.conf , as described earlier. To use diald , type /usr/sbin/diald as root to start the program. It should then detect outgoing network activity and initiate a connection. Because of the connection delays, though, a first attempt to use a tool may fail; for instance, a Web browser may time out before it can display a page. The second attempt should work, though. If you want your system to start diald automatically when it boots, you can create a SysV startup script, or add an entry to a local startup script, such as /etc/rc.d/rc.local or /etc/rc.d/boot.local . Whether you start it manually or automatically, diald can detect network traffic that originates on a local network if you configure your computer to function as a NAT router, as described in Chapter 25. Thus, you can link a small local network to the Internet via a Linux computer and modem, and configure your local computers as if they were on the Internet at large, using the Linux system as the local gateway. |

EAN: 2147483647
Pages: 203