Working with Tables
| |
In the previous chapter we created a table by building a make-table query. We'll now see how to build a table using the Data Access Object hierarchy. One of the advantages of using DAO to create the table is that it gives us more control over the way the table is constructed . When you use a make-table query to create a table, Access determines the data types for the fields in the tables. In addition, tables created from make-table queries don't have any indexes created initially. In contrast, however, if we create a table using DAO, we can specify the data types of the fields in the table and add whatever indexes we want.
Using tables this way also enables us to change their existing structure at runtime, perhaps allowing the user to specify a number of additional columns to be added.
| Important | The judicious use of indexes can have a dramatic impact on the performance of queries. You can think of an index as a list of shortcuts to the data that are sorted independently of the data rows they refer to and so can be searched extremely quickly. It is also possible to have multiple indices for a table, each sorted in a different way ready for different types of queries. Conversely, inappropriate use of indexes can hugely increase data storage requirements as all those shortcuts have to be stored somewhere! |
However, in order to do this, we must first understand exactly how tables are constructed. Aside from the data that is held in them, tables have two major constituents: Fields and Indexes .
-
A Field is a column of data with a specified data type and length. Fields may expose certain properties. For example, a Field has a DefaultValue property that, not surprisingly, indicates the default value that Access places there if the user doesn't supply one. Another property is the Required property that is False if a Field allows Null values and True if Null values aren't allowed.
-
An Index is an object that holds information about the ordering and uniqueness of records in a field. Just as is it is faster to look up a page in a large book if it has an index at the back, so it is faster for Access to retrieve records from a large table if the table is indexed. As well as containing Field s an Index object also has Properties . For example, the Unique property of an Index object indicates whether all values in the Field to which that Index applies should be unique.
We'll now take this opportunity to introduce the TableDef object. A TableDef object is an object that holds a complete table definition. Just as we saw with a QueryDef object, a TableDef object holds the definition of a table and not the actual data. If you want, you can think of the TableDef as being like a table in design view.
| Access | VBA Equivalent |
|---|---|
| Table (Design View) | TableDef object |
| Table (Datasheet View) | Table-type Recordset object |
| Query (Design View) | QueryDef object |
| Query (Datasheet View) | Dynaset-type, Snapshot-type, or Forward-only-type Recordset object |
The lower portion of the following diagram indicates how TableDef objects, Field objects, and Index objects fit into the overall Data Access Object hierarchy.
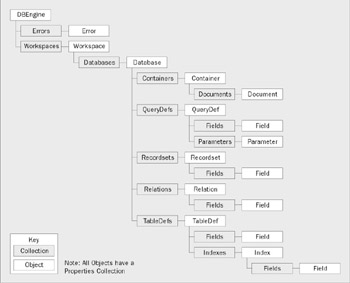
Once you understand the diagram above, creating tables in VBA is a relatively simple process. If you aren't sure you understand how objects and collections work, you should re-read Chapter 5 and Chapter 6 where they are described in detail. These are the fundamental building blocks of the Data Access Object hierarchy and you need to make sure that you are familiar with how they work.
The Ten Steps
To create an empty table using VBA, you will always carry out the following steps:
-
Create a TableDef object.
-
Set any properties for the TableDef.
-
Create one or more Field objects.
-
Set any properties for the Field objects.
-
Append the Field objects to the Fields collection of the TableDef .
-
Create one or more Index objects.
-
Set any properties for the Index objects.
-
Append any Field objects to the Fields collection of the Index.
-
Append the Index objects to the Indexes collection of the TableDef .
-
Append the TableDef object to the TableDef' s collection of the Database .
Try It Out-Creating a Table Using VBA
-
In the IceCream.mdb database, create a new module called Chapter 8 Code and type in the following procedure:
Public Sub MakeATable() Dim db As Database Dim tbl As TableDef Dim fld As Field Dim idx As Index 'Start by opening the database Set db = CurrentDb() 'Create a TableDef object Set tbl = db.CreateTableDef("tblCountries") 'Create a field; set its properties; add it to the TableDef Set fld = tbl.CreateField("CountryID", dbLong) fld.OrdinalPosition = 1 fld.Attributes = dbAutoIncrField tbl.Fields.Append fld 'Create another; set its properties; add it to the TableDef Set fld = tbl.CreateField("CountryName", dbText) Fld.OrdinalPosition = 2 fld.Size = 50 fld.Required = True fld.AllowZeroLength = False tbl.Fields.Append fld 'Create an index and set its properties Set idx = tbl.CreateIndex("PrimaryKey") idx.Primary = True idx.Required = True idx.Unique = True 'Add a field to the index Set fld = idx.CreateField("CountryID") idx.Fields.Append fld 'Add the index to the TableDef tbl.Indexes.Append idx 'Finally add table to the database db.TableDefs.Append tbl 'And refresh the database window RefreshDatabaseWindow 'Indicate creation was successful MsgBox "The " & tbl.Name & " table was successfully created" End Sub
-
Now run the procedure, either by hitting F5 or the Go/Continue button on the toolbar. You should see a message box informing you that the table has been successfully created. You will get an error message if this table already exists, so you might want to make sure the table doesn't exist before running this function:

-
Hit the OK button and then hit Alt+F11 to switch to Access. If you go to the database window, the table that you have just created should be visible there. Open it in Design View and have a look at the two fields that you have created. Note the properties in the lower half of the window:

-
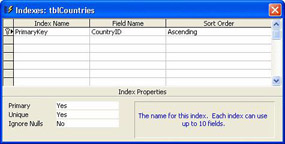
Now look at the indexes, either by clicking the Indexes button or by selecting Indexes from the View menu. Does everything look as you expected?
How It Works
Although the code may look a little tortuous, it's actually very easy to follow if you bear in mind the Data Access Object hierarchy and follow the steps listed above.
After opening the database, the first thing we must do is create a new TableDef object:
Set tbl = db.CreateTableDef("tblCountries") Creating any Data Access Object is a simple task. All you need to do is use the Create < Object > method on the Data Access Object which is the next highest in the hierarchy. The TableDefs collection belongs to a Database object so, to create a TableDef , you use the CreateTableDef method on the Database object.
As with QueryDefs , when we create a TableDef object, we give it a name by which we can refer to it later and which will appear in the database window when it is saved.
We don't want to set any other properties for the TableDef (the next step in the process), and so we move on and create a Field object:
Set fld = tbl.CreateField("CountryID", dbLong) Fields are a collection within the TableDef object, so we use the CreateField method on the TableDef object that will contain the Field , and give it a name by which we can refer to it later. We also need to specify the type of data that this Field will hold. We want the field to be an AutoNumber field, and as AutoNumber fields are long integers, we specify dbLong as the data type.
Next, we must set properties for the Field :
fld.OrdinalPosition = 1 fld.Attributes = dbAutoIncrField
The OrdinalPosition property indicates where a Field appears in a table. The leftmost Field in a table has an OrdinalPosition property of 1 , the next has an OrdinalPosition property of 2 , and so on. The OrdinalPosition property of the rightmost Field is equal to the number of Fields in the TableDef .
The Attributes property is used to specify how an object behaves. By setting the Attributes property of our Field to dbAutoIncrField , we are indicating that the field should behave like an AutoNumber field and increase by one every time a new record is added.
Now we must add the Field to the Fields collection of the TableDef using the Append method:
tbl.Fields.Append fld
We then repeat the process to create another Field and append it to our TableDef object.
Once all the Field objects have been added, we create an Index for the table and call it PrimaryKey :
Set idx = tbl.CreateIndex("PrimaryKey") We then set its properties:
idx.Primary = True idx.Required = True idx.Unique = True
The Primary property indicates whether an Index is the primary key for the TableDef to which it is to be added. The Required property determines whether the Index can accept Null values - if it is True , Nulls will not be accepted. The Unique property determines whether duplicate values are allowed within the Index . We have set this to True , so duplicate values will not be allowed.
The proper use of indexes can make a dramatic difference to the performance of applications, particularly where large amounts of data are involved. As this is primarily a book about VBA we don't have space to cover indexes in detail here. If you are still baffled by indexes, their properties, and their uses then I suggest you read more about them in Beginning SQL Programming, from Wrox Press (ISBN 1-861001-80-0).
The next stage is to specify the Field that will be indexed:
Set fld = idx.CreateField("CountryID") idx.Fields.Append fld Here, we use the familiar Create < Object > syntax to create a Field object within the Index object. By setting the name of the Field object to CountryID , we are indicating that the Field called CountryID, which we created earlier in the procedure, is the one to be indexed. Next, we add the Index to the TableDef :
tbl.Indexes.Append idx
Finally, we add the TableDef to the database:
db.TableDefs.Append tbl
Note that if a table of the same name already exists then this line will raise an error - the existing table will not be replaced . You cannot use the Append method to modify an existing table either. The method for this is explained below.
That's all there is to it!
If you cast your mind back to the BuildResultsTable function in the previous chapter, you may remember that we created the tblResults table using a make-table query. It is left to you as an exercise at the end of this chapter to rewrite the procedure to allow the table to be created using the DAO hierarchy, but if you want to see how this is done, you can have a look at the BuildResultsTable function in the Chapter 07 Code module of the database.
You need to be aware of the fact that the table might already exist in the database, in which case this statement will cause a run-time error to be generated. You should make sure you delete the table before running this code.
Modifying the Table
Modifying tables is even easier than creating them in the first place. Here we will add an extra field, CountryCode, to the tblCountries table that we created before. To do this we will need to carry out the following steps:
-
Retrieve the TableDef object for this table
-
Create a new Field objects
-
Set the properties for the Field object
-
Append the Field object to the Fields collection of the TableDef
Try It Out-Adding an Extra Field using DAO
-
In the IceCream.mdb database, open the Chapter 8 Code module that you created earlier and enter the following subprocedure:
Sub ModifyATable() Dim db As Database Dim tbl As TableDef Dim fld As Field 'Start by opening the database Set db = CurrentDb() 'Retrieve the tabledef object Set tbl = db.TableDefs("tblCountries") 'Create a field; set its properties; add it to the tabledef Set fld = tbl.CreateField("CountryCode", dbText) fld.Size = 5 fld.Required = True fld.AllowZeroLength = False tbl.Fields.Append fld 'Indicate creation was successful MsgBox "The " & tbl.Name & " table was successfully modified" End Sub
-
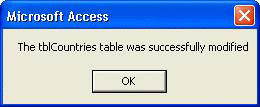
Now run the procedure, either by hitting F5 or the Go/Continue button on the toolbar. You should see a message box informing you that the table has been successfully modified. You will get an error message if this table does not already exist, so you might want to make sure the table does exist before running this function:
-
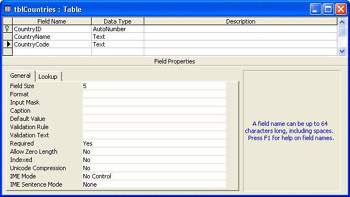
Hit the OK button and then hit Alt+F11 to switch to Access. If you go to the database window, the table that you have just modified should still be visible there. Open it in Design View and have a look at the new field that you have created. Again note the properties in the lower half of the window:
How It Works
After opening the database, the first thing we must do is to retrieve the TableDef object for tblCountries :
Set tbl = db.TableDefs("tblCountries") As before, the TableDefs collection belongs to the Database object, so to retrieve a TableDef , you use the TableDefs method on the Database object.
We don't want to modify any properties for the TableDef (if we did then the code for this would come here), and so we move on and create a new Field object using the same method we used earlier:
Set fld = tbl.CreateField("CountryCode", dbText) Next, we must set properties for the new Field :
fld.Size = 5 fld.Required = True fld.AllowZeroLength = False
We have not bothered to specify the OrdinalPosition property so the field will simply be added onto the end of the current list of fields.
Now we must add the Field to the Fields collection of the TableDef using the Append method:
tbl.Fields.Append fld
We are now done!
Adding indexes, modifying field properties, and so on, all require a similar method to the one above. We won't cover them in detail here but by referring to this example and the create table example given before, together with the DAO hierarchy, you should have no problems.
Creating a Table Using an XML Schema
By importing an XML schema ( .xsd file), perhaps downloaded from a web site, you can create new tables. If you are not familiar with XML then you should know that XML files are an excellent way to transfer table structures because they contain simple ASCII text which makes them easy to receive by e-mail or download through a firewall.
The subject of XML and schemas is complex and wide- ranging . It will certainly have a major impact on data interchange over the next few years . To read more about XML we suggest Beginning XML 2nd Edition, from Wrox Press (ISBN 1-861005-59-8).
Here's the XML schema for the Countries table we created above:
<?xml version="1.0" encoding="UTF-8"?> <xsd:schema xmlns:xsd="http://www.w3.org/2000/10/XMLSchema" xmlns:od="urn:schemas-microsoft-com:officedata"> <xsd:element name="dataroot"> <xsd:complexType> <xsd:choice maxOccurs="unbounded"> <xsd:element ref="tblCountries"/> </xsd:choice> </xsd:complexType> </xsd:element> <xsd:element name="tblCountries"> <xsd:annotation> <xsd:appinfo> <od:index index-name="PrimaryKey" index-key="CountryID " primary="yes" unique="yes" clustered="no"/> </xsd:appinfo> </xsd:annotation> <xsd:complexType> <xsd:sequence> <xsd:element name="CountryID" od:jetType="autonumber" od:sqlSType="int" od:autoUnique="yes" od:nonNullable="yes"> <xsd:simpleType> <xsd:restriction base="xsd:integer"/> </xsd:simpleType> </xsd:element> <xsd:element name="CountryName" minOccurs="0" od:jetType="text" od:sqlSType="nvarchar"> <xsd:simpleType> <xsd:restriction base="xsd:string"> <xsd:maxLength value="50"/> </xsd:restriction> </xsd:simpleType> </xsd:element> <xsd:element name="CountryCode" minOccurs="0" od:jetType="text" od:sqlSType="nvarchar"> <xsd:simpleType> <xsd:restriction base="xsd:string"> <xsd:maxLength value="5"/> </xsd:restriction> </xsd:simpleType> </xsd:element> </xsd:sequence> </xsd:complexType> </xsd:element> </xsd:schema>
The first thing to say about this is "DON'T PANIC!" You really don't need to know anything about XML in order to use it to create tables.
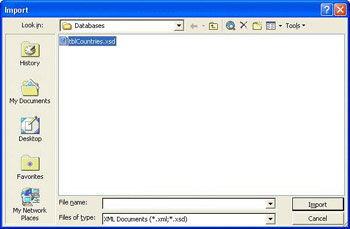
To import this database just follow these simple steps:
-
From the main menu select File Get External Data Import :
-
In the Import dialog that appears make sure that you have selected Files of Type XML Documents . Then select the schema to be imported, tblCountries in this case:
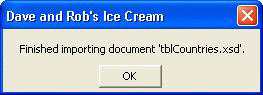
-
In the next dialog, if you press the Options >> button you can choose whether you want to import an empty table (structure only) or include the data (if there is any). You can also add just the data to an existing table. We will choose to import the structure only as we know that there is no data in this file anyway:
-
Hit the OK button. After a few moments the import completes.
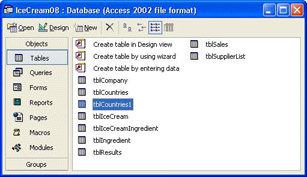
-
If you now look at the database window again you will see that the table has been added. You might also notice that because we already had a table called tblCountries Access has thoughtfully renamed the imported table tblCountries1 rather than overwriting the original:
That's all there is to it. Exporting tables, or even entire databases, to XML is just as easy so we won't cover it here.
| |
EAN: 2147483647
Pages: 256