Recording a Macro
|
| < Free Open Study > |
|
The Macro Explorer
The Macro Explorer is the primary tool for managing and running macros. It is a window in the main Visual Studio .NET integrated development environment (IDE) that you can view by pressing Alt-F8. You can also access it by selecting Tools → Macros → Macro Explorer. Additionally, you can arrange your IDE so that tool windows open and close automatically as you move your mouse over them or move your mouse away from them. The Macro Explorer is just another tool window. The primary tasks associated with managing macros are as follows:
-
Creating new macro projects and modules. Macros exist as commands (Subs or Functions) in a module. You can place multiple modules in amacro project. You can create a new macro project by right-clicking the Macros node and choosing New Project. To create a new macro module, you should right-click a project and choose New Module.
-
Loading and unloading existing macro projects. To load an existing macro project in the Macro Explorer, you should right-click the Macros node and choose Load Project. Next, browse to the macro project file and then choose Open. To unload a macro project from the Macro Explorer, right-click the macro project you want to unload and choose Unload Project.
-
Deleting macro projects and modules. To unload a macro from the Macro Explorer, right-click the macro project you want to unload and choose Unload Project. To delete a macro module or command from the Macro Explorer, select the item and press the Delete button or right-click the module and choose Delete.
-
Renaming macro projects, modules, and commands. To rename a macro project, module, or command, right-click it and choose Rename. Next, type the new name and press Enter.
The macro facility has several features. Macros are stored in special modules. The Macro Explorer window lists all macros available in the current solution. The macros are listed in a TreeView form. You can view a list of each macro's modules by expanding the module name. You can open modules by double-clicking their names or by right-clicking their names and choosing Edit. Macro modules are opened in the Macros IDE, which is discussed in the "The Macros IDE" section later in this chapter.
| Note | You can save macros as either binary or text files. Binary is the default format for macros and uses the .Vsmacros extension.You can also choose, however, to save the macro as Unicode text (.txt). Saving a macro as a binary file makes it convenient to distribute several macros in a project as a single file. Saving a macro as a text file enables you, for example, to open the file outside of Visual Studio .NET, copy a single command from it, and then e-mail it to someone. |
You can find the Macros menu options on the Tools menu. Figure 8-1 shows the Macros menu. It will serve you well to memorize the shortcut keys for getting to various components of the macro facility. Table 8-1 lists the various features and their associated shortcut keys.

Figure 8-1: Macros menu
| FEATURE | SHORTCUT KEYS |
|---|---|
| Record TemporaryMacro | Ctrl-Shift-R |
| Run TemporaryMacro | Ctrl-Shift-P |
| Macro Explorer | Alt-F8 |
| Macros IDE | Alt-F11 |
In order to record and run a macro, you will normally need to have a project open. What you want to do with the macro determines the amount of code and/or controls you may need to have in the project. For now, you will create a new Windows application project called "Chap 8 Sample Project1". Creating the project automatically creates Form1. Add three command buttons as shown in Figure 8-2.
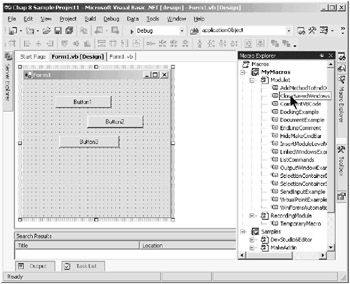
Figure 8-2: Form1 and controls
The Macro Explorer window is also displayed in Figure 8-2. Notice that it has aTreeView that, when expanded, reveals two root nodes. One is called MyMacros and the other is called Samples. The Samples macros are provided with Visual Studio .NET and can be extremely helpful in learning how the IDE performs certain operations. During this chapter, you will explore several of the macros in the Samples set. You will notice that I have even added some extra macros to the Samples set. I have saved all of the macros that I discuss in this chapter and more in Module.vb with the code for this chapter. You can store your macros anywhere you want to.
If you right-click a macro in the Macro Explorer, a pop-up menu will display, as shown in Figure 8-3. Clicking the Run option will actually run the selected macro. Double-clicking the desired macro in the Macro Explorer will also run the macro. Clicking the Edit option will display the Macros IDE, which is covered in detail later in this chapter.
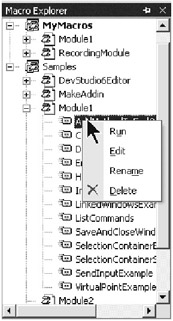
Figure 8-3: Macro Explorer pop-up menu
Now you will run a macro from the Macro Explorer. Figure 8-2 shows the Visual Studio IDE with the Form1 designer open. The code window is also open. The macro in Listing 8-1 will close all saved windows. You will see that a macro is encapsulated in a Sub/End Sub construct, just like any normal code for a procedure.
Listing 8-1: CloseSavedWindows Macro
Sub CloseSavedWindows() ' Close all saved documents. Dim i As Integer With DTE On Error Resume Next For i = .Documents.Count To 1 Step -1 If .Documents.Item(i).Saved Then .Documents.Item(i).Close(vsSaveChanges.vsSaveChangesPrompt) End If Next i End With End Sub
As you recall from add-in code, you have to reference objects within the IDE by qualifying them with a DTE object instance. In the code for a macro, you reference the DTE object directly. That's because the macro is actually executed inside the DTE. Other than that, the code is exactly as it would be coded in an add-in. Conversely, once you have debugged a section of code in a macro and then want to move it to an add-in, you simply substitute the add-in's applicationObject (oVB in the case of my add-ins) for DTE. That's normally all there is to it, and your code is ready to run in an add-in.
The code in Listing 8-1 is very simple. I simply set up a For/Next loop through the Documents collection. I test the Saved status of the window before attempting to close it. I also protect the code with On Error Resume Next to ensure that no type of error will stop the macro. I chose not to use a Try/Catch construct here, because if an error occurred, the code would exit without closing the remaining windows.
In Figure 8-2, you will see that I have the mouse positioned over the CloseSavedWindows macro. I am going to double-click the name of the macro in the Explorer that will cause it to run. I could also right-click the desired macro and then choose the Run option, but I'm basically a "double-clicker". Figure 8-4 shows that the macro has run and closed both of the windows previously named.
Figure 8-4: Windows closed by macro
|
| < Free Open Study > |
|
EAN: 2147483647
Pages: 172