Assigning Shortcut Keys to a Macro
|
| < Free Open Study > |
|
Recording a Macro
Recording macros is the simplest and most common way to create macros. Alternatively, you can manually create macros without recording them. You can think of the macro recorder as a VCR recorder. If you have a VCR recorder hooked to your television, you can record television programs. Macro recording simply "remembers" actions you performed in the environment, similar to the way aVCR records a television program. When you press the Record button on a VCR, all the sound and pictures are stored on the VCR tape until you press Stop. Recording a macro is a virtually identical process. When you click the Record button, the tasks you perform, the windows and tools used, and so on are recorded as macro code. You can also use Ctrl-Shift-R to start or stop recording a macro.
Unlike recording a television program, however, after you record amacro, you can examine the recording and even change it. If the macro does not do exactly what you want it to do, or if you want to add additional functionality, you can edit it after recording and customize the code.
You will use the macro recorder to record a macro. Before you start to record amacro, open the Form1 designer so that you can manipulate the controls on the form and record the actions in a temporary macro. With the Form1 Designer as the active document, press Ctrl-Shift-R or select Tools → Macro → Record Temporary Macro. You will see the little macro recorder toolbar display. Next, you could select all three command buttons by drawing a box completely around them with the mouse. However, this action would not be recorded, because mouse clicks in the Text Editor window are not recorded. Instead, select Edit → Select All to select all of the controls. Next, select Format → Align → Left. The buttons now have been aligned with the same Left property. Next, while holding the Ctrl key down, press in sequence the right arrow, the down arrow, the left arrow, and the up arrow.
Now click the Stop Recording button on the macro recorder toolbar to stop the recording. Open the Macros IDE by right-clicking the temporary macro in the Macro Explorer and select the Edit option. The Macros IDE opens and reveals the code shown in Listing 8-2.
Listing 8-2: Temporary Macro
Sub TemporaryMacro() DTE.ExecuteCommand("Edit.SelectAll") DTE.ExecuteCommand("Format.AlignLefts") DTE.ExecuteCommand("Edit.MoveControlRight") DTE.ExecuteCommand("Edit.MoveControlDown") DTE.ExecuteCommand("Edit.MoveControlLeft") DTE.ExecuteCommand("Edit.MoveControlUp") End Sub | Caution | The macro has not been saved yet. If you want to save it, click Save Temporary Macro on the Macros submenu of the Tools menu. Alternatively, you can right-click TemporaryMacro and choose Rename. This allows you to rename the macro and prevent it from being overwritten by the next new macro. |
Because the majority of macros are used only for a short time and then discarded, TemporaryMacro is overwritten each time a macro is recorded. If you want to reuse the macro later, you can rename TemporaryMacro to prevent it from being overwritten by the next recorded macro.
| Note | If you accidentally start recording a macro, you can prevent deletion of your previous temporary macro by canceling the macro recording. If you do this, Visual Studio reverts back to your previous macro code in TemporaryMacro. |
While recording a macro, you can pause the recording and then resume it later. Typically, you'll do this to make preparations in the environment that will be required by the macro, but that you do not want to record. To cancel recording of a macro, either click the Cancel Recording button on the Recording toolbar or click the spinning cassette icon in the status bar.
In order to test the macro, go back to the Visual Studio IDE and move the buttons around to get them unaligned. Figure 8-5 shows the position of my buttons prior to running the macro. You can see that the mouse is positioned over the temporary macro.

Figure 8-5: Form1 with buttons randomly placed
Next, double-click TemporaryMacro to run it. If you do this, you will see the buttons align and then they will seem to jump around momentarily. This is because they are actually moving in a 360-degree circle. Figure 8-6 shows that the buttons have been realigned.
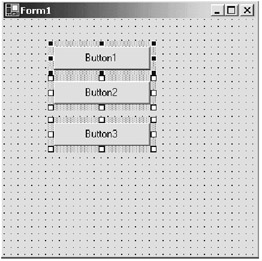
Figure 8-6: Form1 with buttons realigned
|
| < Free Open Study > |
|
EAN: 2147483647
Pages: 172