Input Method Editors
| When Christopher Sholes invented the QWERTY typewriter in the late 1860s, he wasn't overly concerned with being able to type any characters other than those used in the United States. Although some keyboards are designed for other character sets, they are not in widespread use in the Windows world, and the primary text input for Windows-based PCs remains the QWERTY keyboard. Imagine that you want to type one of the 5,000-odd Japanese Kanji characters, and you will understand that the QWERTY keyboard doesn't cut it. For some languages (e.g., Arabic, Hebrew), the problem can be solved by installing new keyboards. For others, there are simply too many characters to be input effectively using a QWERTY keyboard. Enter Input Method Editors. An Input Method Editor (IME) is a program that enables the user to type characters that are not available on the QWERTY keyboard. The user types several letters to make up a single character. Often the same combination of letters can resolve to more than one combination of characters in the target language, so the IME uses a combination of dictionaries and user preferences to help resolve ambiguities. IMEs exist for most languages that need one (including Devanagari, Gujarati, Bangla, Gurumukhi, Oriya, Tamil, Telugu, Kannada, Malay-alam, Urdu, and Vietnamese). Windows offers IMEs for Chinese, Japanese, and Korean. In this section, we look at how to install these IMEs, how to use an IME from the user's point of view, and what you need to do to use an IME in your application. This subject is of interest mainly to Windows Forms developers because Windows Forms applications have some control of the active IME. However, ASP.NET developers might still find this section interesting because, although HTML (and, therefore, ASP.NET) has no control over IMEs, users will still use them to enter text in Web applications.
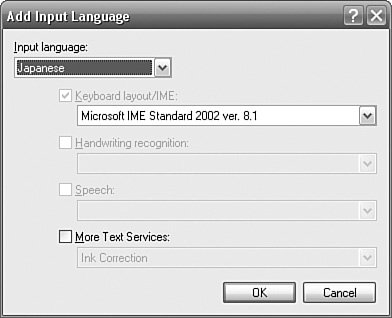
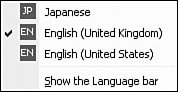
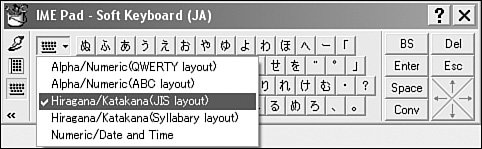
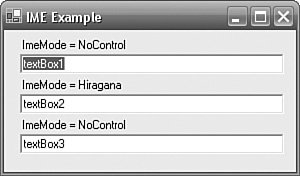
Installing an IMEIf you are using a Chinese-, Japanese-, or Korean-language version of Windows, you already have an IME appropriate for your language. If you are using Windows 2000 or XP, start by following the steps in the "Supplemental Language Support" section, earlier in this chapter, to install the necessary language support for these languages. Next, open Regional and Language Options from the Control Panel, select the Languages tab, and click the Details... button to show the Text Services and Input Languages dialog (see Figure 7.13). Click the Add... button and, in the Add Input Language dialog (see Figure 7.14), select either Chinese, Japanese, or Korean and click OK. For the examples in this chapter, I use the Japanese language and the Microsoft IME Standard 2002. Back in the Text Services and Input Languages Dialog, click OK. Figure 7.13. Text Services and Input Languages Dialog Figure 7.14. Add Input Language Dialog If you are using Windows 98, Me, or NT 4, the steps that you followed in the section "Supplemental Language Support," earlier in this chapter, to install the Microsoft Global IME with Language Pack will have been sufficient, and you do not need to take further steps. How to Use an IMEIf you ask nontechnical users of a Chinese-, Japanese-, or Korean-language version of Windows what an Input Method Editor is, they will probably tell you that they don't know what it is and have never used one. They will, however, be thoroughly familiar with that little thing that helps them enter characters in their own language. Watch them use the Input Method Editor, and you will be amazed at the speed at which such a tool can be used in the hands of someone who uses it as part of their everyday Windows experience. At times like these, it is helpful to be humble. So it is for monolingual English developers everywhere that this section presents a basic introduction to how to use an IME. Open NotePad and type in konnichiwa, the Japanese Romaji for "Hello." You shouldn't be surprised to see the characters represented "as is" using the Roman alphabet. On the taskbar at the bottom of the screen, you should see a little "EN" symbol indicating that the current keyboard is English. Click the EN symbol, and you will see a menu of keyboard languages for which you have installed support (see Figure 7.15). Figure 7.15. Keyboard Language Selection Select JP (Japanese). To get a better idea of what the IME looks like, also select the Show the Language bar option. Figure 7.16 shows the Language Bar with Japanese selected. Figure 7.16. Language Bar with Japanese SelectedThe Language Bar respects the language that was selected for each application, so if you select an application that was opened (and remained open) before you switched to Japanese, you will see the Language Bar snap back to English when that application is selected. Switch back to NotePad, where Japanese was selected, and you will see the Language Bar change back to Japanese. In the Language Bar, open the Input Mode menu and select Hiragana (see Figure 7.17). Figure 7.17. Selecting Hiragana Input Mode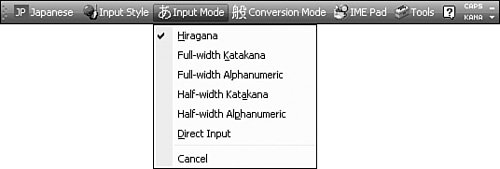 Now we will type "konnichiwa" again, but first here's a quick lesson in how to type it properly. konnichiwa is made up of three syllables: kon, nichi, and wa. When a syllable ends in an n in Romaji, it must be typed with an additional n to terminate the syllable. wa is correct only in the spoken form of konnichiwa; it is written as "ha". So to type konnichiwa properly, you should type "konn", "nichi" and "ha". When you have finished typing, press Enter to confirm the word. You should see " An alternative to typing characters using the keyboard is to use the IME Pad. The IME Pad offers a selection of alternative input methods. Select IME Pad from the Japanese Language Bar and, in the drop-down menu, select Soft Keyboard (JA). Click the keyboard icon on the left side and select Hiragana/Katakana (JIS layout) (see Figure 7.18). Using the mouse, you can click on different Hiragana/Katakana characters and they will be entered into the application. Close the window to finish using the IME Pad. The IME Pad offers further alternative input methods in the form of handwriting recognition, character lookups, character recognition by their combination of strokes, individual radical selection, and, finally, speech recognition. Figure 7.18. Selecting the Hiragana/Katakana (JIS layout) Soft Keyboard in the Japanese IME Pad To return your Windows to its original state, drag the Language Bar back onto the taskbar. You might also find that the "EN" shown in the taskbar has more icons on view than it had before. You can change the display back by right-clicking the Language Bar and selecting "Additional icons in taskbar." Using an IME in a Windows Forms ApplicationNow that you know how to install and use an IME, let's look at what you need to do to make use of an IME in your application. At the simplest level, you don't need to do anything. The user can continue to use an IME with your Windows Forms application without any change to the application. Users can set the keyboard language to, say, Japanese, and when they need to enter text in a control such as a TextBox, they need only set the Input Mode to a suitable value and start typing. Of course, if the keyboard layout used with your application is not the default keyboard layout, they will need to set the required keyboard layout every time the application starts. Setting the Keyboard Layout ProgrammaticallyYour application can programmatically set the keyboard layout using the System. Windows.Forms.InputLanguage class. The following SetInputLanguage method sets the keyboard input language to a culture corresponding to the CurrentUICulture: public static bool SetInputLanguage() { return SetInputLanguage(CultureInfo.CurrentUICulture); } public static bool SetInputLanguage(CultureInfo cultureInfo) { foreach(InputLanguage inputLanguage in InputLanguage.InstalledInputLanguages) { if (cultureInfo.Equals(inputLanguage.Culture) || cultureInfo.Equals(inputLanguage.Culture.Parent)) { InputLanguage.CurrentInputLanguage = inputLanguage; return true; } } return false; } The overloaded SetInputLanguage method iterates through all the installed keyboard input languages, looking for one in which the given culture matches the input language's culture or the input language culture's parent. If such a keyboard input language is found, the CurrentInputLanguage is set. You would add a call to SetInputLanguage after the CurrentUICulture is changed (probably in your application's start up code). You can see the effect of this method by running this from a button on a form. In the form's constructor, force the CurrentUICulture to be Japanese (Japan): System.Threading.Thread.CurrentThread.CurrentUICulture = new CultureInfo("ja-JP"); Before the button is pressed, the keyboard input layout will be EN on English (US) Windows. Press the button and watch the keyboard input layout change to JP. The CurrentInputLanguage is specific to each thread, so if you create a new thread, you must set the keyboard input layout for the new thread. Because the System.Threading.Thread class does not have a CurrentInputLanguage property of its own, you can set the CurrentInputLanguage only in the thread's ThreadStart method: Thread thread = new Thread(new ThreadStart(Work)); // the new thread adopts the CurrentUICulture of the current thread thread.CurrentUICulture = Thread.CurrentThread.CurrentUICulture; thread.Start(); The ThreadStart method starts by initializing the CurrentInputLanguage just as the current thread had to do: public void Work() { SetInputLanguage(); // do some work } The solution to this problem lies in the ThreadStart method, so the problem is not solved by using a thread factory (as suggested in Chapter 3, "An Introduction to Internationalization"). Unfortunately, because the Thread class is sealed, the problem also cannot be solved by subclassing the Thread class. Consequently, you must code the solution manually for every thread. Control.ImeMode and the ImeMode EnumerationOf course, you can provide greater direct control over the IME in your application. The System.Windows.Form.Control class has an ImeMode property, which is an ImeMode enumeration that enables you to specify the IME's Input Mode. You can see the behavior of this property in a simple Windows Forms application. Figure 7.19 shows a Windows Forms application with three TextBox controls and corresponding Labels showing each TextBoxes' ImeMode. The first and third TextBox controls' ImeMode properties are unchanged from their default and are NoControl. The second TextBoxes' ImeMode is Hiragana. Figure 7.19. Windows Form with TextBox.ImeMode Set to Hiragana As you tab through the TextBox controls, watch the Language Bar. Figure 7.20 shows the state of the IME when the focus is on the first or third TextBoxes. Notice the character next to the Input Mode. If you opened the Input Mode menu, you would see that this character indicates Direct Input. Figure 7.20. Japanese Language Bar Indicating Direct InputWhen you tab onto the second TextBox, the Language Bar shows the new Input Mode (see Figure 7.21). Figure 7.21. Japanese Language Bar Indicating HiraganaSo the Control.ImeMode property simply controls the Input Mode of the IME. It doesn't do anything that users couldn't do themselves, but it does make their life easier by automatically selecting the right mode for a given context. The language you are supporting will most likely determine whether you can make an application-wide ImeMode setting. If you are supporting Korean, for example, you might be able to set the ImeMode to Hangul for every control in the application. If you are supporting Japanese, however, it is unlikely that an application would use the same ImeMode tHRoughout the application because Japanese text often consists of a combination of Romaji, Hiragana, Katakana, and Kanji. If an application-wide setting is suitable, consider using the StandardPropertiesResourceManager in Chapter 12 to apply the same ImeMode tHRoughout the application. If an application-wide setting is not suitable, you will probably need a localizer to determine which controls should use which input modes. Caution is advisable when taking such direct control of the IME, however. One of my general rules of development is that anything that is designed to be helpful to one person will nearly always end up being unhelpful to another. For each control that explicitly sets the ImeMode to a specific character set, the possibility exists that this character set is the wrong choice for some users in some contexts, and this will rapidly become an annoying experience for those users. Table 7.2 shows the ImeMode enumeration values. Some of the values are specific to one or more IMEs. ImeMode.Disable disables the IME so that it cannot be used. This is appropriate for numeric input for which an IME is not required. Do not read more into this value than there is. Whereas the IME would be disabled, the regular keyboard is still fully functioning and capable of entering alphanumeric characters. As such, if the control should accept only numeric input, this should be handled within the control itself; do not set the ImeMode to perform this kind of validation. Disabling the IME simply provides additional feedback to the user that it is inappropriate in the current context.
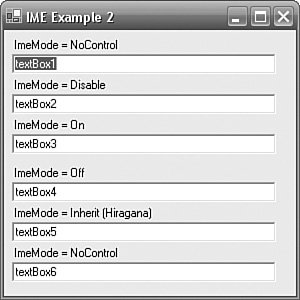
ImeMode.Inherit behaves in the same way as RightToLeft.Inherit does (see "Right-to-Left Languages and Mirroring in Windows Forms Applications," earlier in this chapter). So Control.ImeMode defaults to Inherit for controls that have a parent, and defaults to NoControl for controls that do not have a parent (e.g. Form, in this example). The behavior of the On, Off, and NoControl values needs a little more explanation. Figure 7.22 shows a Windows Form with several TextBox controls with different settings for ImeMode (indicated by their corresponding labels). Figure 7.22. Behavior of ImeMode On, Off, and NoControl Values ImeMode.On means that the IME's input mode is switched to the value that the user was last using to enter native characters. So if the user had manually selected Katakana in textBox1, when the user entered textBox3 (ImeMode.On), the IME would switch to Katakana. This would remain true even if the user approached textBox3 from textBox5 (textBox5 forces the ImeMode to Hiragana). When the user arrives in textBox3, the input mode is simply an input mode that the user had previously manually selected. ImeMode.Off means that the input mode is always changed to Direct Input. ImeMode.NoControl means that the application does not control the input mode, and it remains as whatever the user was using on the previous control that was set to ImeMode.NoControl. The IME tries to help the user by remembering the individual settings for the user within the same form. So if the user is on textBox3 (ImeMode.On) and the user changes the input mode to Half-width Katakana, the IME will remember this setting for the duration of the form. This setting will override the user's active setting, so if the user changes the input mode on a different control and then revisits textBox3, the IME will remember that textBox3 has a specific setting and will change the input mode to accommodate textBox3. As such, the ImeMode.On value represents a compromise between wanting to help the user and overhelping the user by making decisions that are too specific about how an IME should be used. |

EAN: 2147483647
Pages: 213