ClickOnce
| Visual Studio 2005 and the .NET Framework 2.0 introduce a new deployment model for Windows Forms and Console applications called ClickOnce. ClickOnce is the successor to the .NET Framework 1.1's No Touch Deployment (also called Zero Touch Deployment, HREF Deployment, and HTTP Download) and the Patterns and Practices Group's Updater Application Block. If you are using the .NET Framework 1.1 and like the look of ClickOnce functionality, take a look at the most recent Updater Application Block, which offers similar functionality to ClickOnce for .NET Framework 1.1 applications. ClickOnce brings the ease and reliability of Web deployment to Windows Forms applications. It allows developers to publish applications to a Web server, file server, or CD-/DVD-ROM from which the client can run the application online or offline. An online application is one that is available only by connecting to the server containing the application and, as such, is similar in behavior to a Web application. An offline/online application (also called an installed application) is one that is installed locally on the client machine and, once it has been installed, can be run without a connection to the server containing the application. A significant benefit to this deployment model is that clients have a simple application-upgrade path. As new versions of the application are published, the client can optionally automatically receive the new upgrade. This powerful new technology breathes new life into Windows Forms applications. This section is not intended to provide a complete introduction to ClickOnce. For further reading on ClickOnce, consult the following:
Instead, this section covers ClickOnce issues that are specific to internationalization. If you are new to ClickOnce, read the section entitled "A Brief Introduction to ClickOnce." If you are already familiar with ClickOnce, you can skip this section. Subsequent sections discuss publishing applications with a single culture using first Visual Studio 2005 and then msbuild, localizing the ClickOnce user interface, and publishing applications with multiple cultures using first Visual Studio 2005 and then msbuild.
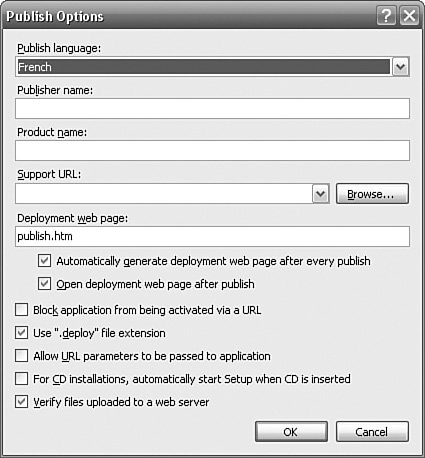
A Brief Introduction to ClickOnceTo get started with ClickOnce, create a Windows Forms applicationsay, WindowsApplication1and, within Visual Studio 2005, select Build, Publish WindowsApplication1. In the "Where do you want to publish the application?" dialog, accept the offered URL (i.e., http://localhost/WindowsApplication1). This option publishes your application to the local Web server, so you need IIS installed. If you don't have IIS installed on any machine, you can publish to a file location. Click Next. In the "Will the application be available offline?" dialog, accept the "Yes, this application is available online or offline" radio button. This means that when the client first connects to the Web server, the application will be installed into the Click-Once cache on the client machine. Each time the application is run, ClickOnce will check that the application is the latest version and check whether it is the application that will be run from the cache. If a newer version has been published, the user will be given an opportunity to upgrade the application. Click Next. Click Finish. When Visual Studio has finished publishing the application, the publish.htm Web page is displayed, showing a button to install WindowsApplication1. From here, you assume the role of the user. If you click the Install button, the WindowsApplication1 application is installed on your computer in the ClickOnce cache. An item is added to the Start menu, and an item is added to Add/Remove Programs to allow the user to remove the new application or to revert to the previous version. If you subsequently modify the application, all you need do is publish it again. When users run their application again, they will be prompted to upgrade it. You now have the basics of ClickOnce. Bear in mind that ClickOnce is a powerful and flexible technology, and this description skims the surface of this significant subject. Numerous options exist for changing ClickOnce behavior from within Visual Studio. Also be aware that the tools offered in Visual Studio are built using the ClickOnce API and simply represent just one way of assembling this functionality. If you find that one part of this technology is not to your liking, it is likely that your requirements can be met by using the tools or API at a lower level. Deploying a Single Culture Using Visual Studio 2005The first issue that you will notice when you publish an application with satellite assemblies is that none of the satellite assemblies are published. Let's assume that you now localize Form1 in the simple Windows Forms application created in the previous section, and that you create a French version of Form1. When you build the application, there will obviously be a new folder called fr that contains a satellite assembly called WindowsApplication1.resources.dll. When you publish the application, however, this assembly will not be published, and all recipients will get the fallback resources only. You can solve this problem in two ways. The first solution is to specify that the resource assemblies should be included. In the application's Properties page, select the Publish tab and click the Application Files... button. You should see just the main application, not the French satellite assembly. Check the "Show all files" check box, and the French satellite assembly appears (see Figure 4.14). Figure 4.14. ClickOnce Application Files Dialog Showing Satellite Assemblies You can see from this dialog that the French satellite assembly is excluded. To include the French satellite assembly, drop down the Publish Status combo box on the fr\WindowsApplication1.resources.dll line and click Include. Problem solved. The second solution is to set the ClickOnce publish language (also called the target culture). (If you intend to use this option, you should return to the ClickOnce Application Files dialog first and click the Reset All button to undo the previous change.) From the Publish tab of the application's Properties page, click the Options... button to see the ClickOnce Publish Options (see Figure 4.15). Figure 4.15. ClickOnce Publish Options In the "Publish language" combo box, select French. If you return to the Application Files dialog now, you will see that the fr\WindowsApplication1. resources.dll assembly's Publish Status has been set to "Include (Auto)". This is not quite the same as simply "Include". This means that the inclusion of the satellite assembly depends on the Publish language. If you had both French and Spanish resources, for example, and you changed the Publish language to Spanish, the French satellite assembly would be excluded and the Spanish satellite assembly would be included. When you publish the application after changing the target language, you receive the warning shown in Figure 4.16. The warning simply notes that the culture of the previously published version of the application is not the same as the culture of the version that you are now publishing. Answer Yes to overwrite the previous version of the application. Figure 4.16. ClickOnce Published Culture Change Warning In addition, if you do not have the .NET Framework 2 Language Pack installed for the target language, you will receive the following warning: Could not match culture 'fr' for item '.NET Framework 2.0'. Using culture 'en' instead. You can ignore this warning for now. The relevance of the presence or absence of a corresponding .NET Framework 2 Language Pack is discussed in the section entitled "The ClickOnce User Interface." Note that the Publish language automatically includes resources specifically, not generically. This means that if you add French (France) and French (Canada) versions of Form1, then setting the Publish language to French includes only the French satellite assembly; it does not also include the French (France) and French (Canada) satellite assemblies. So using the Publish language to automatically include satellite assemblies is not suitable if you want to publish a "generic" French version of your application that includes generic French and all specific versions of French. (Incidentally, if you set the Publish language to French (France), ClickOnce is intelligent enough to include the culture-neutral French satellite assembly.) The Publish language is used for two purposes: the automatic inclusion of satellite assemblies and also the language of the ClickOnce bootstrapper. We cover the latter in the next section. The ClickOnce User InterfaceSo far, we have simply specified what assemblies are included in the published application. An important part of internationalizing the ClickOnce deployment process is the localization of the ClickOnce user interface. All the dialogs from the publish.htm Web page onward (such as security warnings, installing and updating dialogs, and the add/remove program dialog) are all used by the recipient of your application and must all be localized. The localization of each dialog depends on the origin of the dialog (see Table 4.3).
The publish.htm Web page that starts the ClickOnce process going (if you are using IIS) originates from Visual Studio 2005. The language used in the dialog is determined by the language that Visual Studio 2005 uses, the presence of a corresponding .NET Framework Language Pack and the language of the operating system. For example, if you are developing using the English version of Visual Studio 2005, you will always get the English publish.htm. If you are developing using the Japanese version of Visual Studio 2005 (which includes the Japanese .NET Framework Language Pack) on a Japanese version of Windows, you will always get the Japanese publish.htm. There is no way to tell Visual Studio to generate publish.htm using a different language, so the English Visual Studio 2005 cannot generate a French publish.htm. In all likelihood, however, you would replace publish.htm with your own branded version of publish.htm, so even if such functionality existed, you might not use it anyway. To replace publish.htm with your own branded version, first publish your ClickOnce application as normal; when publishing is complete, then copy your branded publish.htm over the generated publish.htm. Simple, low-tech, and effective. The ClickOnce bootstrapper (setup.exe) is used to install the application's prerequisites (e.g., the .NET Framework and the .NET Framework Language Packs). Whether your users see dialogs from setup.exe depends on whether they need to install the application's prerequisites. The ClickOnce bootstrapper's user interface is determined by the application's Publish language. The support files for the ClickOnce bootstrapper are installed in %FrameworkSDK%\Bootstrapper (see Figure 4.17). Figure 4.17. ClickOnce Bootstrapper Support Files The Engine folder contains setup.bin and a collection of folders that are culture names. Each culture folder contains a localized setup.xml with Win32 resource strings, so the fr folder's setup.xml contains the French resource strings. When the application is published, a custom setup.exe is created by combining setup.bin with the resources in the setup.xml that corresponds to the publish language. This means that the ClickOnce bootstrapper that you create is for a single language. If you want to support more than one language, you must publish the application once for one language and then again for the second language. A number of localized setup.xml files are included in the .NET Framework SDK, but you are not restricted to this list. To add a new language, simply create a new folder, copy over the setup.xml from the English folder, and translate all the strings. The remaining dialogs (i.e., the dialogs that are certain to be seen by all users who use a ClickOnce-deployed application) are all supplied by a .NET Framework Language Pack. The ClickOnce engine, dfsvc.exe, is a .NET Framework application. It uses a ResourceManager to get its resources and obeys the resource-fallback behavior that we already know. ResourceManager uses CurrentUICulture to determine which culture to load resources for, and we know that CurrentUI Culture defaults to the language version of the operating system. So the language that the user sees in the ClickOnce dialogs is determined by the language of the operating system and the availability of a corresponding .NET Framework Language Pack. So if a user is running German Windows and has the German .NET Framework Language Pack installed, all ClickOnce applications will show German ClickOnce dialogs. If a user is running German Windows and the German .NET Framework Language Pack has not been installed, all ClickOnce applications will show English ClickOnce dialogs (because the fallback culture for the .NET Framework itself is English). The Publish language plays no part in this process. Also note that it is not possible to change this behavior because the ClickOnce engine, dfsvc.exe, does not support any facility for changing its CurrentUICulture. For example, you cannot deploy a French application and use a French ClickOnce user interface on an English version of Windows. From these explanations, you can see that the language of the complete ClickOnce user experience comes from three sources: Visual Studio, the ClickOnce bootstrapper, and the .NET Framework Language Packs. A well-designed deployment scenario would ensure that the language does not change as the user progresses from one stage of deployment to the next. Obviously, it is undesirable to have the publish.htm in English, the bootstrapper in French, and the ClickOnce dialogs in German. Your Click-Once strategy will be determined by those elements that you have control over and those elements that you do not. You have control over the publish.htm file because this is simply HTML that you can rewrite. You have control over the ClickOnce boot-strapper language because you can create new setup.xml files for your required languages. You do not have control over .NET Framework Language Packs because you are limited to the languages supported by Microsoft. You probably do not have control over the language version of the operating system that your users are running. Based on a lowest-common-denominator approach, you should restrict yourself primarily to the language version of the operating systems on which your application will run, and then to languages for which a .NET Framework Language Pack exists. Deploying a Single Culture Using msbuildVisual Studio is great for interactive development, but the .NET Framework 2.0 msbuild command-line utility is more appropriate for automating builds and automating publishing. To build a project from the command line, open a .NET Framework SDK Command Prompt (from the Microsoft .NET Framework SDK v2.0 program group), change directory to your application's source folder, and enter this: msbuild The default target for msbuild is "build", so this is the same as the following: msbuild /target:build To publish your application (i.e., deploy it using ClickOnce), enter this: msbuild /target:publish To override a setting in the application's project file (i.e., the values set in the Publish page of the project's properties), use the /property switch: msbuild /target:publish /property:ProductName=TimeZones Note that not all settings in the project file are applied when building from the command line. For example, the "Automatically increment revision with each release" check box does not apply when building using the command line, so no matter how many times you build using the command line, the revision number will not change. You can specify the full version number using the ApplicationVersion property, or, if this property ends in a "*" you can specify just the revision number (which is substituted for the "*") using the ApplicationRevision property.
To publish your application using msbuild, open a .NET Framework SDK Command Prompt and, from your application's folder, run msbuild and specify the TargetCulture: msbuild /target:publish /property:TargetCulture=fr /property:PublishUrl=http://localhost/WindowsApplication1/fr When the publish is complete, copy the files from the temporary publish directory to the publish destination (e.g., \inetpub\wwwroot\WindowsApplication1). Another localization issue to consider is that your publisher name and product name form part of the installation process and are used in the Start menu item and Add/Remove Programs item. If these differ in different cultures, you must include these differences in your language-specific publishing. You can specify the publisher name in msbuild using the PublisherName property, and you can specify the product name using the ProductName property. Deploying All Cultures Using Visual Studio 2005The scenario that we have looked at so far deploys a single-culture version of the application. If your application has more than one culture, you might like to deploy all cultures together. This scenario matches the typical Windows Installer deployment model used prior to ClickOnce. To deploy all cultures, you open the ClickOnce Application Files dialog (see Figure 4.14) and set all satellite assemblies' Publish Status to Include. This solves the immediate problem but introduces two new problems. First, the Publish language is no longer very meaningful and should not be used. Recall that the Publish language has two purposes: to automatically include and exclude satellite assemblies, and to specify the ClickOnce bootstrapper culture. The first use is now obsolete because we have taken direct control over the inclusion or exclusion of satellite assemblies. The second use is not meaningful anymore because no single language works for all users of the application. If the Publish language is left as "(Default)", it defaults to the Visual Studio language. Whatever decision you make for the language of publish.htm and the ClickOnce bootstrapper, remember that it is a single language for all users, and that the language the ClickOnce dialogs use depends on the client's machine and might not necessarily be the same. The second problem that this scenario introduces is unnecessary downloads during updating. When you update your application and republish it, all users get the updated version of the application (according to your update policy). The problem is that they get all satellite assemblies, regardless of whether they want them. So the French users will also get the updates to the German satellite assemblies. Whereas each individual user might not be overly concerned about the extra download time, the cumulative effect on your server might not be so easily overlooked. Deploying All Cultures Using msbuildDeploying all cultures using msbuild is a relatively simple matter because the TargetCulture property supports the "*" wildcard: msbuild /target:publish /property:TargetCulture=* /property:PublishUrl=http://localhost/WindowsApplication1 Deploying All Cultures Individually Using Visual Studio 2005Perhaps the optimum ClickOnce solution in internationalization terms is to deploy all cultures individually. Each culture (or group of cultures) is deployed to a separate location, so the French group of cultures (e.g., French, French (France) and French (Canada)) is deployed to, say, \inetpub\wwwroot\WindowsApplication1\fr and the Spanish group of cultures (e.g., Spanish, Spanish (Spain), and Spanish (Mexico)) is deployed to, say, \inetpub\wwwroot\WindowsApplication1\es. The French deployment would use a French publish.htm and a French ClickOnce bootstrapper, and the Spanish deployment would use a Spanish publish.htm and a Spanish ClickOnce bootstrapper. Certainly, this demands the greatest deployment (and maintenance) effort, but it provides the best user experience and best update performance (because users download only those satellite assemblies that are relevant to them). Deploying all cultures individually in Visual Studio 2005 is a laborious process. You should start by considering whether to uncheck the "Automatically increment revision with each publish" check box in the Publish properties. If you uncheck this check box, all language versions will have the same publish version. This might be convenient at first, but it might not last. Bear in mind that the publish version is not the same as the build version. The build version refers to the application, whereas the publish version refers to the version of the publish operation. If you intend to update satellite resources independently of the application itself (so that typos can be fixed, for example), you will not want to republish every language when only one language changes. If this is the case, there is no value in keeping the publish version in step for all languages. The effort involved in publishing each culture depends on whether you publish groups of cultures or individual cultures. The latter is the simplest approach because you can simply leave the Publish Status of all satellite assemblies as "Auto" and set the Publish language to the culture to be published. Finally, set the publishing location (on the main Publish properties page) to a specific location, e.g., http://localhost/WindowsApplication/fr. Then repeat the process for each culture, changing the Publish language and Publish location appropriately. However, if you want to publish groups of cultures, you cannot rely on the inclusion or exclusion of satellite assemblies using the "Auto" Publish Status. Instead, you must explicitly set each satellite assembly to either Include or Exclude each time before you publish. So, for example, you would set the Publish Status of the French, French (France), and French (Canada) satellite assemblies to Include and the Publish Status of all other satellite assemblies to Exclude, and then set the Publish language to French and the Publish location to http://localhost/Windows Application/fr, and publish. Then repeat the process for the Spanish group of cultures, and so on. The result is a lot of error-prone work. Deploying All Cultures Individually Using msbuildTo publish all cultures individually using msbuild, open a .NET Framework SDK Command Prompt and, from your application's folder, run msbuild: msbuild /target:publish /property:TargetCulture=fr /property:PublishUrl=http://localhost/WindowsApplication1/fr msbuild /target:publish /property:TargetCulture=es /property:PublishUrl=http://localhost/WindowsApplication1/es These two commands publish first the French culture and then, separately, the Spanish culture. For these commands to work correctly, the satellite assemblies' Publish Status must be set to Auto so that they can be included or excluded using the TargetCulture property. This works well for including a single culture in a publish operation. Unfortunately, it is not possible to set the Publish Status of a satellite assembly from the msbuild command line. This means that it is not possible to specify whether a satellite assembly should be included or excluded from a given publish operation, so there is no built-in capability to publish a group of related cultures (e.g., French, French (France), and French (Canada)) in a single operation. You have two choices: either publish every specific culture individually (i.e., publish the French culture and then the French (France) culture and then the French (Canada) culture) or else write a utility to modify the .csproj file before each build. The .csproj file contains a list of all the files that can be published and, most important, their Publish Status. Here is the entry for the French satellite assembly: <PublishFile Include="fr\WindowsApplication1.resources"> <InProject>False</InProject> <Group> </Group> <TargetPath> </TargetPath> <PublishState>Exclude</PublishState> <FileType>Satellite</FileType> </PublishFile> Such a utility would change the PublishState element to Include for the given PublishFile. Download On DemandAnother publish and deployment scenario that you could consider is to let the user delay the decision on their choice of language until runtime. In this scenario you publish the entire application with all languages to a single location. However, in the Application Files dialog (see Figure 4.18) you set all satellite assemblies to Include. In addition you assign a Download Group name to each of the assemblies. I recommend using the culture identifier (e.g. fr, es) to identify the file group but this is only a convention; you could just as easily use the full name (e.g. French, Spanish). Figure 4.18. ClickOnce Application Files Dialog Showing Satellite Assemblies in Download Groups Any file that is part of a Download Group is not automatically downloaded by the client. Instead these files are downloaded on demand. This means that when your users download your application they will receive only the fallback assemblies initially. Your application would include a means by which the user can select their choice of language. Let's say you provide a menu with French and Spanish menu items then the French menu item would include the following code: if (!ApplicationDeployment.CurrentDeployment. IsFileGroupDownloaded("fr")) ApplicationDeployment.CurrentDeployment.DownloadFileGroup("fr"); The IsFileGroupDownloaded returns True if the given file group has already been downloaded for this version. The DownloadFileGroup downloads the files in the given file group. This solution has pros and cons. On the upside it is simple to configure and publish the application. In addition there is a single publish location that is shared across all languages and the download demand on your servers is as low as possible. On the downside the use of the ClickOnce API demands that your application is installed with Full Trust. In addition this solution is slightly intrusive in that the application must be modified in order to support the solution. A further problem is that the ClickOnce application does not automatically download previously downloaded groups when a new version of the application is downloaded. This problem can be solved by persisting the user's language preference and adding this code to the application's startup code: if (ApplicationDeployment.CurrentDeployment.IsFirstRun) { Properties.Settings settings = new Properties.Settings(); if (settings.UICulture == "fr") ApplicationDeployment.CurrentDeployment. DownloadFileGroup("fr"); else if (settings.UICulture == "es") ApplicationDeployment.CurrentDeployment. DownloadFileGroup("es"); } This code checks that the application is being run for the first time (which it will be if a new version has been downloaded), gets the user's UICulture from the application's settings and uses DownloadFileGroup to get the file group that corresponds to the user's language preference. The final problem with this solution is that there is no automated way to install a corresponding .NET Framework Language Pack on the user's machine. The problem here is that the relevant .NET Framework Language Pack can only be installed by the ClickOnce bootstrapper and the user's choice of language isn't made until the application is running, which is after the bootstrapper has run. .NET Framework Language Packs and ClickOnce PrerequisitesClickOnce enables you to add prerequisites to your deployment that are installed by the ClickOnce bootstrapper before your application is installed. Primarily, this includes the .NET Framework 2.0, but ClickOnce recognizes many other prerequisites and enables you to add your own prerequisites. An obvious prerequisite for an internationalized application is one or more .NET Framework Language Packs. By default, these do not appear in the ClickOnce prerequisites dialog (click the Prerequisites... button in the project's properties Publish tab). However, after downloading a .NET Framework Language Pack, you can add it as a custom prerequisite. To make a custom prerequisite available to Visual Studio 2005 you need to create a new folder in the %FrameworkSDK%\Bootstrapper\Packages folder containing a product.xml file and a culture specific folder containing a package.xml. You could learn the format of these files and write them by hand but a simpler solution would be to download the Bootstrapper Manifest Generator (http://www.gotdotnet.com/workspaces/work-space.aspx?id=ddb4f08c-7d7c-4f44-a009-ea19fc812545) and use it to create these files and build the resulting custom prerequisite. There are two approaches that you can take to build a custom pre-requisite product and we will cover both in this section. The first is to build a single custom prerequisite product that includes a .NET Framework Language Pack for each culture (see Figure 4.19). Figure 4.19. Bootstrapper Manifest Generator Showing One Product that Includes Many Packages In Visual Studio 2005 the pre-requisites dialog shows a single product: the .NET Framework Language Pack (see Figure 4.20). Figure 4.20. Visual Studio 2005 ClickOnce Prerequisite Showing One Product that Includes Many Packages The product is used as a group name for all of the .NET Framework Language Packs that you have included in the product. When you publish your application just one of these language packs will be included in the ClickOnce bootstrapper. The selection is made by matching the Publish language with a package for the same culture. This approach works well if you want to deploy a single .NET Framework Language Pack with your application and you use the Publish language to drive the language selection process. The second, less likely, approach is to build a separate custom pre-requisite product for each .NET Framework Language Pack. Figure 4.21 shows a single product containing the French .NET Framework Language Pack. In this example the product has a single package that is not specific to a culture. You would create a separate product for each language. Figure 4.21. Bootstrapper Manifest Generator Showing One Product that Includes One Package In Visual Studio 2005 the prerequisites dialog shows a product for each language (see Figure 4.22). Figure 4.22. Visual Studio 2005 ClickOnce Prerequisite Showing Many Products that Includes a Single Package Each In this scenario each language-specific .NET Framework Language Pack product must be selected explicitly and the Publish language plays no part in the selection process. This approach requires greater configuration during the publish stage but it allows you to select more than one .NET Framework Language Pack should this be necessary for your application. Thread.CurrentThread.CurrentCulture and ClickOnce SecurityInternationalized applications also have security considerations when deployed as ClickOnce applications. You should consider how the application's THRead. CurrentThread.CurrentCulture is set because the application requires the ControlThread flag security permission to set this property. ClickOnce applications adopt their security settings from the zone they were installed from. So if you install the application from a remote Web server, the application uses the Internet security zone settings. Similarly, if you install from a path on a file server, the application uses the Local Intranet security zone settings. Neither the Internet nor the Local Intranet security zones include the necessary permission for the application to change the THRead.CurrentThread.CurrentCulture property. Only if the application is installed using Full Trust (i.e., it is installed from a local path or from a CD, or it demands Full Trust) or if the application has a Trust License (see "Trusted Application Deployment" in the .NET Framework SDK Help) will the application have the necessary permission to allow this property to be set. The THRead.Current-Thread.CurrentUICulture does not require security permissions to set its value. You can configure your application's security requirements from the project's properties Security tab (see Figure 4.23). Figure 4.23. Configuring ClickOnce Security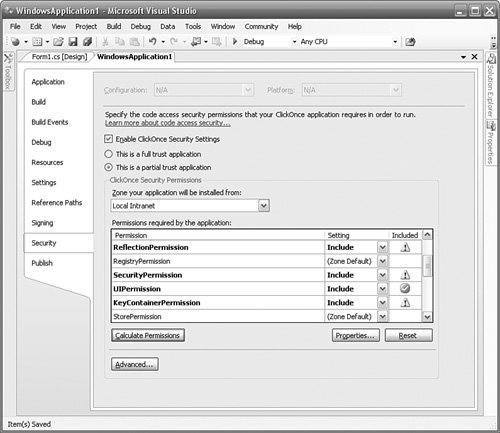 If you click the Calculate Permissions button (positioned just below the "Permissions required by the application" grid), Visual Studio 2005 runs permcalc.exe to calculate the security permissions that your application requires and then sets those permissions in the grid above the button. Notice the warning yellow triangle with the exclamation mark in the SecurityPermission line. Select this line, click the Properties... button (see Figure 4.24), and note the status of the "Enable thread control" permission. This permission is required when the CurrentCulture is set in code such as this: Thread.CurrentThread.CurrentCulture = Thread.CurrentThread.CurrentUICulture; Figure 4.24. ClickOnce Permission Settings The same issue applies to file-based resource managers created using Resource-Manager.CreateFileBasedResourceManager because these resource managers require FileIOPermission. |

EAN: 2147483647
Pages: 213