CORRECTING IMAGES
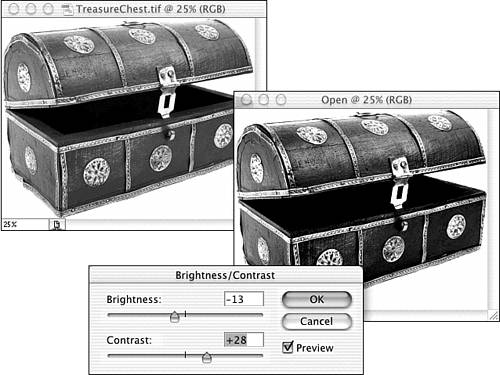
| A lot of your time working in Photoshop will be used correcting images so that they are displayed in all their splendor. Most cameras capture a decent image, but rarely do images come right off the camera in perfect contrast, brightness, and color. In traditional photography and development, even the most experienced developer might spend days or weeks developing a photo to get the desired result from the film negative. Photoshop makes these corrections much faster and provides immediate results. Brightness/Contrast and Auto ContrastThe Brightness/Contrast command is the easiest correction concept to understand, and use of the tonal adjustments is also simple. However, Brightness/Contrast is also the least flexible and the least powerful of the image-correction tools. The Brightness/Contrast dialog, shown in Figure 9.21, consists of a pair of sliders and their related numeric fields, along with OK and Cancel buttons and a Preview check box. It can be used on the active layer or on an active selection. It always affects all selected color channels equally, but you can apply it to channels individually by selecting the target channel(s) in the Channels palette. Figure 9.21. Each of the sliders ranges from 100 to +100.
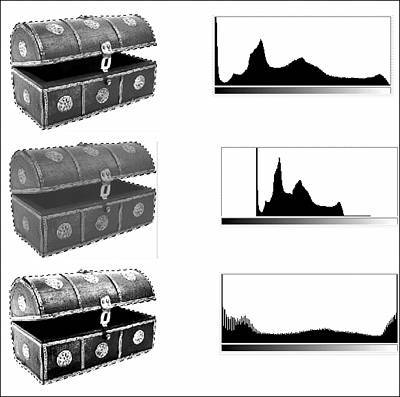
Dragging the Brightness slider to the right lightens the image (or selection), and dragging it to the left darkens the image (or selection). The Contrast slider, in effect, increases or decreases the difference between light and dark pixels. Dragging the slider to the left (reducing the contrast) makes the image more gray and consolidates the pixels' luminosity values in the midranges; dragging the Contrast slider to the right distributes the luminosity values (see Figure 9.22). Figure 9.22. The top image represents the original. In the middle, Contrast has been changed to 50. At the bottom, Contrast has been changed to +50. Note that Brightness/Contrast was applied only to the subject, not to the white background.
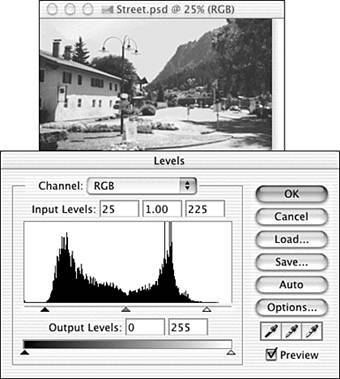
The Auto Contrast command adjusts image tonality by making light pixels brighter and shadows darker. It attempts to preserve the overall color relationship in the image while making the change. Levels and Auto LevelsThe Levels adjustment dialog, shown in Figure 9.23, works with shadows, highlights, and overall gamma (the brightness of an image's midtones) independently. It also gives you separate control over input and output values, includes special eyedropper tools for identifying the highlight and shadow areas of an image, and offers a neutral gray eyedropper for removing color casts. Figure 9.23. The image's tonal range is very compressed. Using Levels spreads the range out by moving values apart to reveal more of the image's details.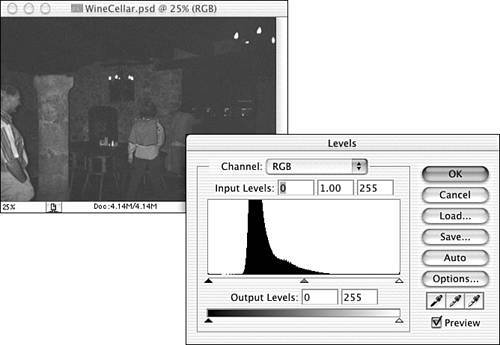 Input LevelsOne of the most common uses of Levels is to expand an image's tonal range. Typically, the left and right sliders are dragged inward to the beginning of the image data in the Levels histogram. The middle slider is repositioned under what is likely to be the "center mass" of the histogramthe average value, or mean, rather than the median (see Figure 9.24). Figure 9.24. Note that the few stray pixels at the far left and right of the histogram are ignored, and the adjustment concentrates on the bulk of the pixel values in the image.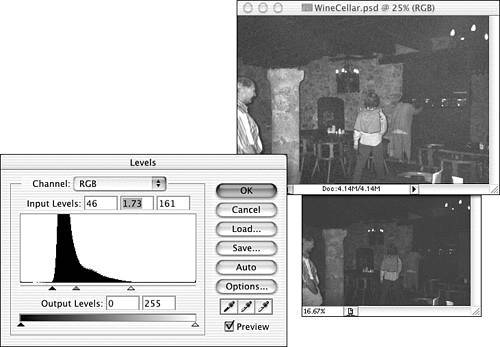 Levels works by adjusting the brightness of pixels. The left and right sliders, and their corresponding Input Levels fields, are used to define where black and white begin. For example, in Figure 9.25, the left slider is at 25, meaning that any pixels that have a brightness between 0 and 25 will be changed to 0 and become black. The right slider is at 225, so any pixels with a brightness higher than that become white (255). Figure 9.25. The middle slider, Gamma, repositions itself automatically and remains set to 1.00 as the left and right sliders are changed.
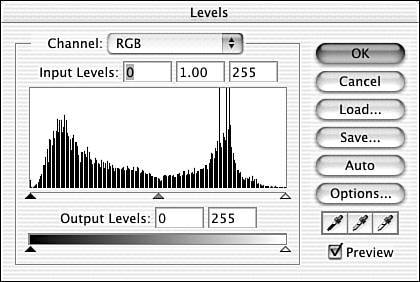
As the left and right sliders are brought closer together, the number of possible brightness values in the image decreases. In Figure 9.26, the image goes from 256 possible tones (0255) to 201 possible tones (25225). Figure 9.25 shows what the histogram looks like after the adjustment in the previous figure is applied. The 201 values that were retained in the previous adjustment (25225) are now spread over 256 total tonal values (0255). Figure 9.26. Notice the new empty columns in the histogram. Levels didn't create any new brightness values; rather, it redistributed the values that were retained in the previous adjustment.
Output LevelsThe lower slider in the Levels dialog controls the tonal range of an image from a different direction. It is used to compress the range (which reduces contrast) and to clip highlights and shadows. (Clipping occurs when multiple tonal values at either end of the tonal range are compressed into a single value.) These sliders can be used very effectively with the Gamma (middle) slider below the histogram. In Figure 9.27, the correction is being made to the foreground only. This method not only provides a more accurate histogram, it also maintains the brightness of the white background. Figure 9.27. The original image, shown in the upper right, is skewed to brightness. Changing the Output slider on the right trims the highlights, and using the middle slider below the histogram adjusts the overall gamma.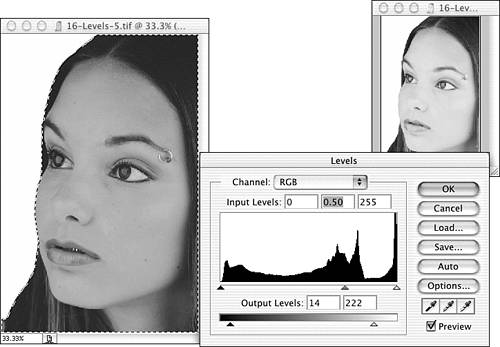 CurvesThe most powerful of Photoshop's image-correction tools is, without a doubt, Curves, although with that power comes complexity. The Curves dialog itself (see Figure 9.28), however, is not particularly complicated when you understand a few basic techniques and concepts. Figure 9.28. Photoshop offers an expandable Curves dialog, with a grid area 50% wider and taller than the default. (The expanded version is shown here.) The button in the lower-right corner toggles between the two sizes.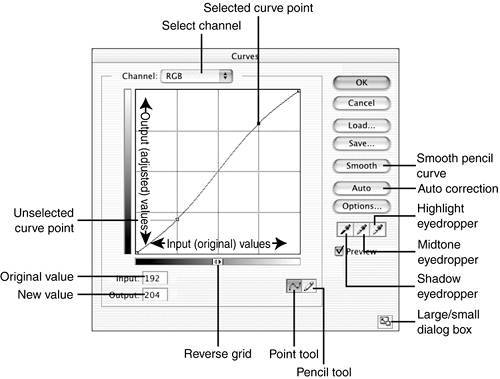 You can apply curves to a flattened image, an active layer, a channel, or a selection. Curves adjusts images much as Levels does, but it uses 256 separate values (RGB) or 100 values (other color modes) rather than just the three available in Levels. (When adjusting 16-bit images, you still see the 256 or 100 value scale.) The eyedropper tools in Curves work the same way they do in Levels.
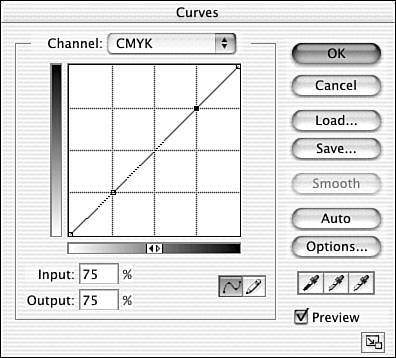
To simplify the Curves dialog in your mind, picture it without the horizontal grid lines. The vertical grid lines help you identify input values; you can drag points straight up and down and watch the Output field. Making Tonal Adjustments with CurvesImages that already look good can often benefit from some additional help to make them look even better. Typically, minor adjustments to the curve of the diagonal band are all that is needed to improve the image (see Figure 9.29). The grid is made up of vertical and horizontal lines that divide the image, and typically your adjustments originate from the lower-left quarter and the upper-right quarter of the grid. These are called quarter tones and three-quarter tones. Figure 9.29. By default, vertical grid lines appear at the 25%, 50%, and 75% levels.
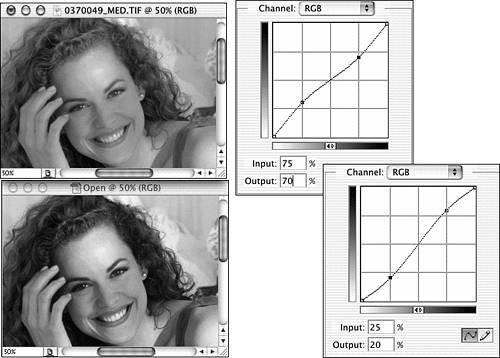
Dragging an anchor point up or down on the curve can have an effect on the entire curve. To keep a section of the curve stable, place pairs of anchor points at either end of that section of the curve. You can use two closely spaced anchor points to prevent changes from flowing past a specific value. Figure 9.30 shows a pair of common Curves adjustments. The adjustment shown in the upper figure tones down the brightest highlights and lightens dark shadows. In the lower example, the contrast of the image is increased by moving the quarters away from each other. Figure 9.30. In each example, the adjustments are small25% to 20% or 30%, 75% to 80% or 70%.
You can also make more complex adjustments, such as target specific groups of pixels in an image. Shift-clicking in the image with the Curves dialog open places color samplers on the image, and you can use them with the Info palette to track adjustments as you make them. As you can see from the smaller original in the upper-right corner in Figure 9.31, the highlights on the forehead are too light and the shadows lack detail. The Curves adjustment targets those specific areas. Figure 9.31. In the Info palette, the numbers to the left are the original color values, and those to the right are the values after the correction is applied.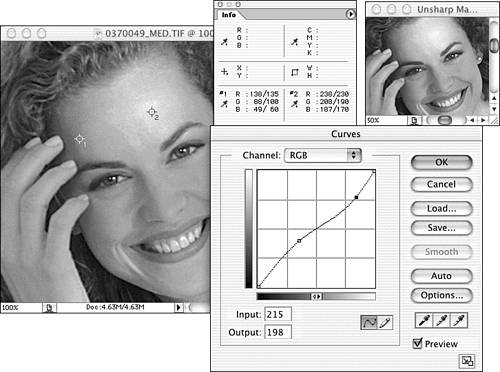
When you're working with RGB images, the Input and Output fields are calculated from 0 to 255 rather than 0 to 100. The 25% equivalent is 64, 50% is equal to 128, and 75% is comparable to 191. Hold down the Color Correction with CurvesThe Channel menu at the top of the Curves dialog enables you to target a correction to a single component color in an image. You can remove color casts by adjusting the individual channels. Keep in mind the relationship among the RGB and CMYK component colors:
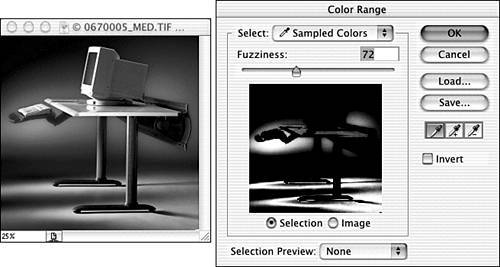
You can also use Curves with channels. In Figure 9.32, the RGB image has yellow accent lighting that is too prominent. To adjust the yellow lighting without destroying the color in the remainder of the image, you can isolate it by using Select, Color Range. Figure 9.32. Curves can be applied to a selection. Color Range is an excellent tool for creating that selection
In Figure 9.33, you can see that the red and green channels are active in the Channels palette but that all channels are visible. This allows you to work on a pair of channels and continue to monitor the overall effect on the image. In this example, the Red and Green channels are active because, combined, they are responsible for the yellow content of an RGB image. Figure 9.33. In the Channels palette, select the channels on which you'll be working before you open the Curves dialog box. The Channel pop-up menu shows RG, indicating that both the Red and Green channels are active.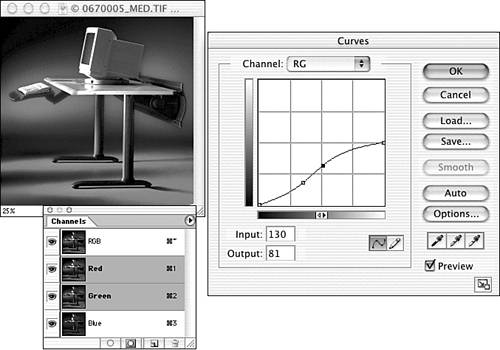 Auto ColorPhotoshop's Auto Color command is much more powerful than Auto Contrast or Auto Levels. The key to its accuracy in color correction is based on its method of evaluating an image. Instead of looking at the histogram to determine shadows, highlights, and midtones, it examines the image itself. Using the values you specify in the Auto Color Correction Options dialog, it clips the highlights and shadows, identifies the image's midtone, and neutralizes the color by balancing the component color values. You can open the Auto Color Correction Options dialog by clicking the Options button in the Curves or Levels dialog. Color BalanceThe Color Balance command is available only when the composite channel is active in the Channels palette. The selection you make in the Tone Balance section of the dialog enables you to concentrate (but not restrict) the effect in shadows, midtones, or highlights. The Preserve Luminosity option protects the image's tonality. Typically, this command is used to compensate for color casts. With Preserve Luminosity selected, moving all three sliders to the right equally has no effect on the image. Without the option, such a change would lighten the image by uniformly increasing the amounts of red, green, and blue throughout the image. Likewise, moving the three sliders equal distances to the left darkens the image when luminosity is not preserved.
If the skin tones in your image look good, make sure to exclude them from any selection before using Hue/Saturation. To exclude portions of the image inside your selection, you can choose Edit in Quick Mask Mode from the toolbox while the selection is active and paint in or erase portions of the mask as needed. You can choose Edit in Standard Mode to see how your selection has been altered. Hue/SaturationThe Hue/Saturation command actually works with hue, saturation, and lightness. It can be used to correct or add a color cast, increase (or decrease) the saturation of an image, or generally lighten or darken an image. When used in combination, the three components of Hue/Saturation can produce dramatic effects and subtle adjustments. Hue/Saturation can be used with flattened images, active layers, and selections, and you can manipulate the composite channel (all colors at once) or individually selected colors. DesaturateThe Image, Adjustments, Desaturate menu command removes the color from an image but does not convert the image to Grayscale mode. The original channels are retained. The brightness values of the pixels are retained, but the component colors RGB or CMY are equalized to create gray. Desaturate can be applied to a flattened image, an active layer, or a selection. Selective use of Desaturate can be an excellent way to simulate a spot color in an RGB or a CMYK image. Simply make a selection of an area you want to keep in color, invert the selection, and desaturate. You can invert again and use the Hue/Saturation Colorize feature as well. Shadow/HighlightThe Shadow/Highlight command is designed to give you control of the far ends of an image's tonal range (see Figure 9.34). If a flash overexposes the subject of a photo, you can adjust the highlights. If the subject is in shadow because the image was exposed for a bright background, you can adjust the shadows. Figure 9.34. The Shadow/Highlight dialog also offers a Save As Defaults button and can be minimized to show only the Shadows and Highlight sliders.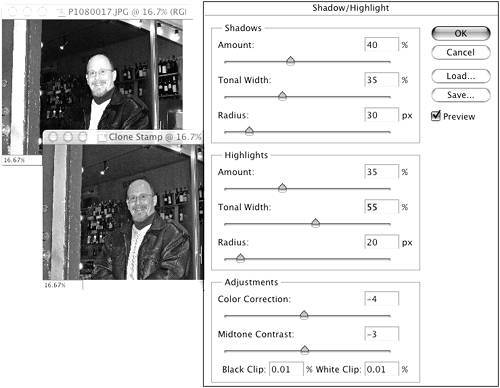 Tonal Range determines how much of the image will be considered highlight or shadow. Reducing the value prevents alteration of the image's midtones. You use the Radius slider to identify the specific pixels that will be adjusted. A low value tends to select all very dark/light pixels individually. A higher Radius value includes the surrounding pixels. When Radius is too high, the entire image is adjusted. The Color Correction slider helps remove color casts from newly lightened shadows. It affects only those pixels identified for adjustment by the Radius and Tonal Width sliders. Midtone Contrast reduces an image's contract (negative numbers) or increases the contrast (positive numbers). Clipping the shadows or highlights forces more colors to black or white. Higher clipping values can produce posterization in the shadows and highlights, causing a loss of detail. InvertInvert is used primarily to create grayscale images from scanned black-and-white negatives. It is not appropriate for use with scanned color negatives because of their orange mask. When Invert is used with a color image, each channel is calculated independently. Using the 256 possible values for each pixel in each color channel, Invert simply flips the color across the midpoint. Pixels with high values in one channel get low values, and vice versa. For example, a pixel with an RGB value of 240/130/65 changes to 15/126/190. To calculate this, subtract the beginning value from 255, and you get the resulting value. The Skinny on SkinIs there a magic formula for correcting skin tones? How can you make sure the people in your images look right? Producing accurate flesh tones is among the greatest challenges in Photoshop. One of the reasons for the difficulty is that we see and evaluate skin colors constantly: "You look a little pale." "Too much sun this weekend?" "You must be freezing!" In part because of how aware we are of the appearance of people around us, we are sensitive to the appearance of skin in images, too. There is no single color mix for skin. There is no single relationship among component colors for skin. There is a tremendous range of skin tones in nature and, therefore, in images. Remember, too, that an individual's skin has a range of colors. The top and bottom of the forearm are typically different colors, as are the area beneath the chin and the chin itself. Parts of the body exposed to sun are typically darker, and how much darker often depends on the time of year. In addition, the way an image is captured presents differences in skin tones. Because of reflections and lighting, foreheads, cheekbones, and noses might be lighter than the areas below the eyes, along the jaw, and on the neck. That having been said, here is some general guidance on skin color:
|
EAN: 2147483647
Pages: 426