USING THE SHAPE TOOLS


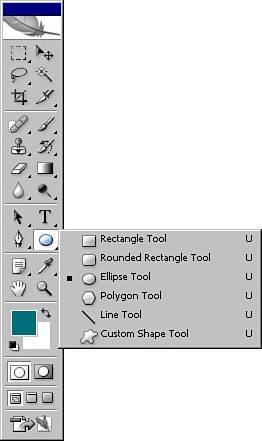
Shape tools work in three ways (see Figure 3.11): In the Options bar you can choose to create a shape layer, a path, or a Fill Pixels shape.

Figure 3.11. The Shape tools.


A shape layer is a fill layer linked to a vector mask. This means you can double-click the fill layer in the Layers palette and change the fill color of the shape. A shape layer can also be resized infinitely because of its vector properties.

Selecting Paths in the Options bar before drawing your shape creates a path from the shape you draw. This creates a colorless vector shape that can be resized later without losing quality. You have all options available from the Paths palette when creating a Paths shape.

A Fill Pixels shape uses the foreground color and creates a bitmap shape on the current layer. This is a raster shape and if used in an image layer, is flattened over the image contents.

The following is a summary of the Shape tools:

  • Rectangle (U): Creates a rectangle shape using one of the three options from the Options bar. Hold down the Shift key to constrain it to a square when drawing the shape.

  • Rounded Rectangle (U): Creates a rectangle with rounded corners. In the Options bar adjust the corner radius options to suit your needs. Hold down the Shift key to constrain the shape to a square.

  • Ellipse (U): Creates an ellipse or oval shape. Hold down the Shift key when drawing to create a perfect circle.

  • Polygon (U): Creates a polygon shape. Choose the number of sides in the Options bar to draw the polygon of your choice.

  • Line (U): Click, hold, and drag to create a straight line. Hold down the Shift key to constrain your line to a perfect horizontal, vertical, or 45-degree angle. Adjust the weight of the line in the Options bar.

  • Custom Shape (U): Choose the Custom Shape tool; in the Options bar, click the Shape pop-up menu and choose from one of the shape icons. Click the fly-out menu to load a new shape library into the options. To create your own custom shape, draw a vector path in your image. Select the path from the Paths palette, and then choose Edit, Define Custom Shape. Name your shape; it will appear in the Shapes library for later use.


Special Edition Using Adobe Creative Suite 2
ISBN: 0789733676
EAN: 2147483647
Year: 2005
Pages: 426
Authors: Michael Smick

flylib.com © 2008-2017.
If you may any questions please contact us: flylib@qtcs.net