ADDING HEADERS AND FOOTERS
| Headers and footers in Acrobat work the same way they do in any page layout or word processing program. When you open the Headers and Footers dialog (choose Document, Add Headers & Footers) you are presented with two tabs: one for headers and one for footers. Each tab has three fields to enter the contents for the left, center, and right sides of the page (see Figure 42.6). Figure 42.6. You can apply headers and footers to selected pages only or different types of headers and footers to selected parts of your document.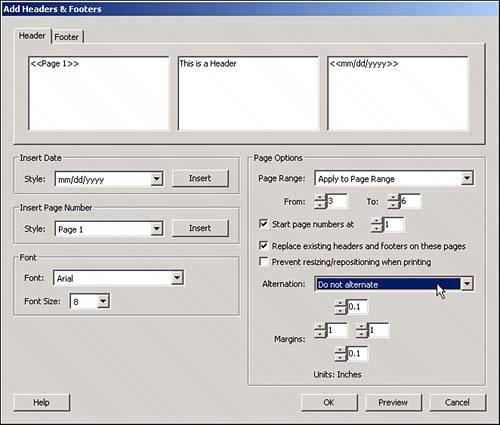 If you want to add automatic page numbering to your document, use the Headers and Footers dialog. There are special codes to insert automatic numbering and dates in several types of formatting, options for font and font size, options for placement relative to the edges of the page, and a few more. In addition to the Add Headers & Footers dialog, Acrobat has a separate Page Numbering dialog that doesn't affect the physical page order of the document but only the names that pages show in the Pages tab. The reason for these two numbering systems is that sometimes a document is prepared not only for print but for electronic distribution as well. Or both. Suppose you have a text document containing a collection of short stories. Your document has a cover page, a table of contents, and a preface. You set headers and footers to start numbering from 1 on the first actual contents page. Then you can open the Options menu at the top of the Pages tab and set individual numbering for each of the different sections and stories in your document. These numbers appear only under the page thumbnail in the Pages tab of the electronic version of your document and do not affect the numbers printed on the pages themselves (see Figure 42.7). Figure 42.7. The Page Numbering dialog affects only the page names in the Pages tab.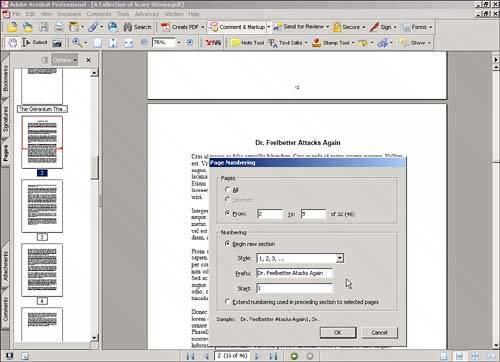 If your document already had page numbering before you convert it to PDF, these numbers are placed as regular text boxes in the PDF and lose their automatic flow capabilities. If you plan to merge several PDF documents into one or to move pages around, it would be better to avoid automatic page numbering in the originating program and do it in Acrobat after you establish the final page order. |
EAN: 2147483647
Pages: 426