CREATING TABLES OF CONTENTS, FOOTNOTES, AND INDEXES
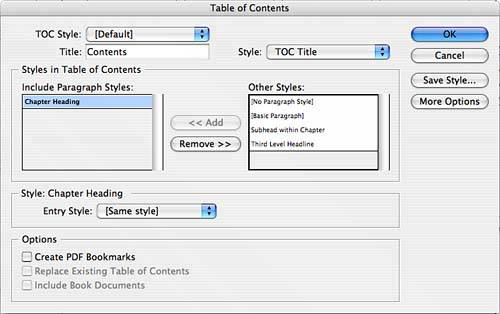
| If you are creating long documents, it may be helpful for your readers if you include an index or table of contents with the document. InDesign gives you options that help you easily add and format these references, as well as footnotes. To make it easier, let's look at each one individually, even though many of the steps and processes are similar. As with all of the sections in this chapter, these instructions are written to explain the basic process. You can check out the Adobe Help Center for more detailed instructions and explanations of all available options. Tables of ContentsTo create a table of contents, you must first create a document to hold your table of contents. If you are creating a table of contents for multiple documents, you should add the documents to a book so they can all be referenced. Refer to Chapter 25, "Understanding Document and Page Setup in InDesign," for more information about creating and working with book documents. Make sure you save your table of contents document and add it to the book as well. InDesign creates tables of contents by scanning the documents included in the book for heading styles that are defined as table of content styles. When it finds type that has been marked with these styles, it pulls that text for the table of contents. Next, define the information in your document that should be included in the table of contents. To do this, you tell InDesign what styles should be associated with entries in the table of contents:
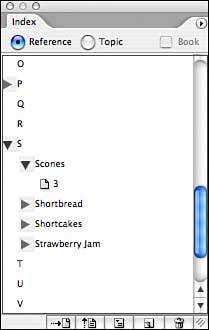
To generate the table of contents text, choose Layout, Table of Contents. Make sure all the options in the dialog are the way you want themfor example, the entry style; where the page number should appear relative to the chapter/section name and the style, if any, that should be applied to it; and what character, if any, should appear between the chapter/section name and the page number. You can also choose to sort the entries alphabetically. Click OK. A loaded text cursor appears; click it to place the table of contents on the page. FootnotesTo insert a footnote in your document, click with the text cursor where you want the footnote to appear. Choose Type, Insert Footnote. A number automatically is inserted where you click, and your text cursor will move to the bottom of the page, enabling you to type your footnote. As you add footnotes on a page, the footnote area at the bottom of the page automatically expands as needed to fit the footnote information (see Figure 32.5). Figure 32.5. Inserting footnotes in your InDesign document is very easy. IndexesAn index is text that appears, usually at the end of your document, as an alphabetical list of references within the document that people might want to look up easily. To create an index, you must do three things: mark all names or references that you want to index, create a book file with the empty file that will contain your index and all marked documents, and then generate your index. To mark references, follow these steps:
Many of your index entries may be single words or phrases that you want to appear in the index as they appear on your page. This may not be the case for proper names. You have two choices when you mark names:
To set up a book file for the index, follow these steps:
To generate your index, follow these steps:
|
EAN: 2147483647
Pages: 426