TRANSFORMING OBJECTS
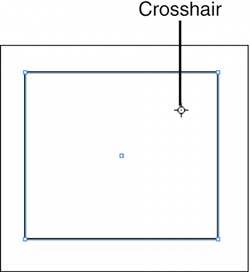
| After you have your objects on your page, there are a number of ways to transform those objects. You can use tools, palettes, or menu commands to accomplish the transformations. Transforming with ToolsThe Tools palette contains a variety of tools that can be used to transform your page objects. In fact, an entire group of tools are referred to as transformation tools. These are the Rotate, Scale, Shear, and Free Transform tools. Before you use any of the transforming tools, you must select the object you want to transform with the Selection tool. When you click on a transformation tool, crosshairs appear in the center of the shape. The crosshairs represent the point from which the object is transformed. Move the crosshairs wherever you would like to transform from that point (see Figure 26.8). Figure 26.8. All of the transformation tools use crosshairs to indicate where the object is transformed from. You can move the crosshairs anywhere on the page by dragging them.
The Rotate tool does just what you think. When you see the crosshairs, click anywhere and drag to rotate the object. The Scale tool changes the size and potentially the shape of the object. Again, drag the crosshairs to the point from which you want to scale the object. Click and drag anywhere on the page, moving across or down, to scale the object either horizontally or vertically only. Click and drag diagonally to scale the object both horizontally and vertically. As with other tools, holding down the Shift key scales the item proportionally. The Shear tool skews page objects. Drag the crosshairs to the point from which you want to skew. Click anywhere on the page and drag to skew the object. The Free Transform tool is multifunctional, enabling you to perform any transformation. As with the other tools, drag the crosshairs to the desired location:
To transform items to specific sizes or percentages, you have several options. Double-click on any of the transformation tools except the Free Transform tool and a dialog appears enabling you to enter specific transformation numbers:
Transforming with PalettesYou can also use the Control palette or the Transform palette to perform transformations on objects. Choose Window, Object & Layout, Transform to open the Transform palette. Choose Window, Control to open the Control palette. Because the options in both palettes are the same, we refer to them only once (see Figure 26.9). Figure 26.9. The Transform palette and the Control palette can be used to accomplish many of the same transformations.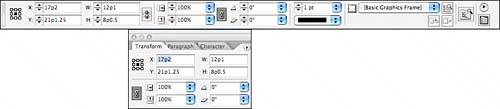 Each palette shows a proxy of the selected object with nine selectable points. Click the point that represents the part of the shape you want to transform from:
Transforming with Menu CommandsAll the transformation commands are also available under the Object, Transform submenu: Move, Scale, Rotate, and Shear. These choices open the same dialogs you see when you double-click on the transformation tools, enabling you to enter specific transformation amounts. Also under the Object menu are selections to Transform Again. If you apply a transformation or a series of transformations to an object, you can select another object and choose Object, Transform Again to apply those same transformations to the new object. The Transform Again submenu commands work as follows:
Flopping ObjectsYou can flop any page object so it becomes a reflection of itself. Click to select it and then drag a corner handle up or down over the object, or left or right over it, to flop the object (see Figure 26.10). Figure 26.10. A text frame before and after being flopped horizontally. Flop any object by dragging a handle over the object.
|

EAN: 2147483647
Pages: 426