EDITING AND RESHAPING OBJECTS
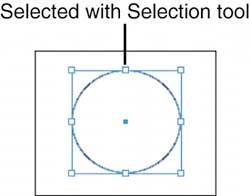
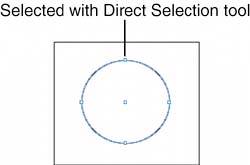
| After you draw a page element, you also have a variety of tools at your disposal to edit and reshape them. For the most part, the tools available to reshape objects are found in the same palette space as the tool used to create the object, although most tools can be used on any kind of path. The two tools at the top of the Tools palette can also be used to alter any kind of shape. It's important to learn the difference between the Selection tool (the black arrow) and the Direct Selection tool (the white arrow) early in your InDesign experience (see Figure 26.4). Figure 26.4. A shape selected with the Selection tool and the Direct Selection tool. Notice the differences in the bounding box and selection and anchor points.
When you click an object with the Selection tool, a bounding box appears. This box shows the area around the shape you selected. It is always a four-sided shape with eight selection points. For any object with a bounding box, the resulting selection points can be dragged to resize the object. When you click an object with the Direct Selection tool, the anchor points of the object appear. You will see as many anchor points as were used to create the shape. Any of the anchor points can be dragged to alter the shape of the object. The tools under the Pen tool in the Tools palette deal with a shape's anchor points:
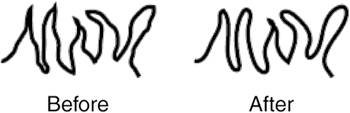
Under the Pencil tool on the Tools palette are the Smooth tool and the Erase tool. The Smooth tool can be used to make jagged paths smooth, which generally involves deleting points on the path. To use the Smooth tool:
The Erase tool removes parts of paths. To use the Erase tool, drag over the part of the path you want to remove. The area you drag over is deleted, and anchor points are added to the resulting ends of the path(s).
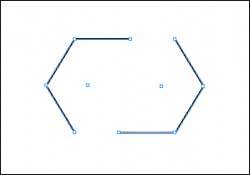
Although we're not dealing with these types of objects yet, you cannot use the Scissors tool to divide a text frame containing text, although you can use it to reshape the frame. If you use the Scissors tool to split a frame that contains a graphic, creating two frames, both frames will contain the same graphic. Select one copy of the graphic with the Direct Selection tool and delete to get rid of it. The Scissors tool is used to cut paths at their anchor points. Select the Scissors tool and click on an anchor point to cut and then use one of the Selection tools to move the anchor point (see Figure 26.6). Click on two anchor points and then click the path segment between the two cut points with one of the Selection tools to remove the area you cut. Figure 26.6. A six-sided polygon after being separated by the Scissors tool.
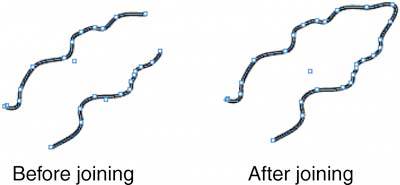
Finally, if you want to join two separate paths to create a continuous path or a closed shape, you can use the Pencil tool:
|
EAN: 2147483647
Pages: 426