| The InDesign Tool palette (see Figure 24.1) is central to the creation process. Before you start to examine it, though, it's helpful to know a couple things about InDesign. Figure 24.1. The Tool palette is the starting point for all page element creation. 
First, every page element in InDesign is considered a frame. Type, images, and graphics are all placed in frames. When you are working with elements in InDesign, you will often be able to work with the contents independently of the frame, and vice versa. Also, every line is considered a path and can be altered as such. Points can be added or subtracted, direction can be changed, and type can be placed along the path. As in all other Adobe programs, a small arrow at the lower right of a tool button indicates that there is another tool or group of tools in the same space. Click and hold the button to expose the other tools.
Following is a brief description of each of InDesign's tools: Selection tool:  Use the Selection tool to select or move and resize page elements. Use the Selection tool to alter an object's frame. Use the Selection tool to select or move and resize page elements. Use the Selection tool to alter an object's frame. Direct Selection tool: Use the Direct Selection tool to select or move and resize the contents of a frame. Position tool: When the contents of a frame, such as an image, are selected, this tool (located under the Direct Selection tool) works like a cropper to move the contents within the frame. Pen tool: 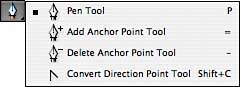 Click with the Pen tool to create anchor points. Clicking multiple times creates straight lines between anchor points. Clicking and then dragging creates a Bézier curve. To close a frame created with the Pen tool, click again on the first point of the frame. Click with the Pen tool to create anchor points. Clicking multiple times creates straight lines between anchor points. Clicking and then dragging creates a Bézier curve. To close a frame created with the Pen tool, click again on the first point of the frame. Under the Pen tool, there are three additional tools: Add Anchor Point tool: This tool creates additional points along any path. Delete Anchor Point tool: This tool deletes points when you click with it. Deleting a point joins the two points on either side. Convert Direction Point tool: If you have created curves with the Pen tool, you can click with the Convert Direction Point tool to reverse the direction of the curve.
Type tool: 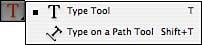 Click, hold, and drag the Type tool to create a text frame on-the-fly. You can also click inside any previously created frame to add type. Click, hold, and drag the Type tool to create a text frame on-the-fly. You can also click inside any previously created frame to add type. Under the Type tool, the Type on a Path tool allows you to type along any previously created path. Hold the tool over the path until a plus sign (+) appears and then click and type. Pencil tool: 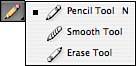 The Pencil tool is a freehand drawing tool that you can use to create a continuous path or a closed shape. You can use the Add Anchor Point tool, the Delete Anchor Point tool, or the Convert Direction Point tool to work with the points along the path. Several tools beneath the Pencil tool help you work with its paths: The Pencil tool is a freehand drawing tool that you can use to create a continuous path or a closed shape. You can use the Add Anchor Point tool, the Delete Anchor Point tool, or the Convert Direction Point tool to work with the points along the path. Several tools beneath the Pencil tool help you work with its paths: Smooth tool: Dragging this tool over a path smoothes out angles or corners. This may remove anchor points from the path. Erase tool: You remove portions of a path with the Erase tool. This may erase anchor points or break the path if you drag over more than one point. The Erase tool only works with paths created by the Pencil tool.
Line tool:  Use the Line tool to draw straight lines. Hold down the Shift key while using this tool to constrain the line to 45- and 90-degree angles. Use the Line tool to draw straight lines. Hold down the Shift key while using this tool to constrain the line to 45- and 90-degree angles. Rectangle Frame tool: 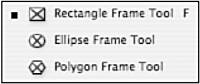 The Rectangle Frame tool draws four-sided frame shapes. Click, hold, and drag to draw frames. Hold down the Shift key while using this tool to draw square frames. With any of the frame tools selected, click the page, and a dialog opens, allowing you to enter exact measurements of the frame you wish to draw. Under the Rectangle Frame tool are two other tools: The Rectangle Frame tool draws four-sided frame shapes. Click, hold, and drag to draw frames. Hold down the Shift key while using this tool to draw square frames. With any of the frame tools selected, click the page, and a dialog opens, allowing you to enter exact measurements of the frame you wish to draw. Under the Rectangle Frame tool are two other tools: Ellipse Frame tool: This tool draws circular frames. Click, hold, and drag to draw, or hold down the Shift key while using this tool to draw perfect circles. Polygon Frame tool: This tool draws multisided frames when you click, hold, and drag. Hold down the Shift key while using this tool to draw polygons with sides having equal measurements. Double-click the tool to open a dialog that allows you to set the number of sides of the polygon you draw, as well as the star inset, if you wish.
Rectangle tool: 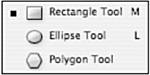 The Rectangle tool works like the Rectangle Frame tool, except that it draws four-sided shapes. Click, hold, and drag to draw the shape. Hold down the Shift key while using this tool to draw a square. With any of the tools selected, click the page, and a dialog opens, allowing you to enter exact measurements of the item you wish to draw. Under the Rectangle tool are two other tools: The Rectangle tool works like the Rectangle Frame tool, except that it draws four-sided shapes. Click, hold, and drag to draw the shape. Hold down the Shift key while using this tool to draw a square. With any of the tools selected, click the page, and a dialog opens, allowing you to enter exact measurements of the item you wish to draw. Under the Rectangle tool are two other tools: Ellipse tool: This tool draws round shapes. Click, hold, and drag to draw, or hold down the Shift key while using this tool to draw perfect circles. Polygon tool: This tool draws multisided shapes when you click, hold, and drag. Hold down the Shift key while using this tool to draw polygons with sides having equal measurements. Double-click the tool to open a dialog that allows you to set the number of sides of the polygon you draw, as well as the star inset, if you wish.
Question and Answer | Q1: | What's the difference between the frame tools and the standard shape tools? | | A1: | At the heart of it, nothing. Any shape you draw is still a frame and can be used as a container for text or graphics. Using the tools is a matter of preference. Most professional designers prefer to use the frame tools because the in the frame serves as a reminder that the shape is a container. |
|
The next set of tools work to transform any page element. Before you can transform an element, you must select it by clicking with the Selection tool. After you click with one of the transform tools, you see a crosshairs, which indicates the point from which the item will be transformed. You can freely move the crosshairs by clicking and dragging it. The following are the tools you can use to transform page elements: Rotate tool:  The Rotate tool rotates objects when you click, hold, and drag. This is a manual rotation, but you can use the Control palette or the Transform palette to see your angle of rotation. The Rotate tool rotates objects when you click, hold, and drag. This is a manual rotation, but you can use the Control palette or the Transform palette to see your angle of rotation. Scale tool:  Use the Scale tool to resize elements. Click and drag any anchor point or the side of the object to resize. The item is resized from the crosshairs, which can be moved at any time. Hold down the Shift key while using this tool to resize proportionally. Use the Scale tool to resize elements. Click and drag any anchor point or the side of the object to resize. The item is resized from the crosshairs, which can be moved at any time. Hold down the Shift key while using this tool to resize proportionally. Shear tool:  With an item selected, use the Shear tool to skew page elements. The element skews from the crosshairs. With an item selected, use the Shear tool to skew page elements. The element skews from the crosshairs. Free Transform tool:  The Free Transform tool performs several functions, including rotating, scaling, and shearing. With the item selected, when you position the tool at the corner of the frame, you see a double-ended, curved arrow. Click, hold, and drag to rotate. Scale by clicking and holding an anchor point. Hold down the Option or Alt key while scaling to scale from the center of the object. To shear an element, click, hold, and drag a side anchor point while holding down Ctrl+Alt (Windows users) or The Free Transform tool performs several functions, including rotating, scaling, and shearing. With the item selected, when you position the tool at the corner of the frame, you see a double-ended, curved arrow. Click, hold, and drag to rotate. Scale by clicking and holding an anchor point. Hold down the Option or Alt key while scaling to scale from the center of the object. To shear an element, click, hold, and drag a side anchor point while holding down Ctrl+Alt (Windows users) or  +Option (Mac users). +Option (Mac users). Eyedropper tool: 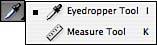 The Eyedropper tool samples either color or type style to apply to another element. Click the color you want to sample with the Eyedropper tool and then click the element to which you want to apply the sampled color. To sample text, click the type frame with the tool. Position the Eyedropper tool over the unformatted text until a small I-beam appears with the eyedropper and then drag the I-beam across the text. Color, font, and size of the sampled text are all applied to the unformatted text. The Eyedropper tool samples either color or type style to apply to another element. Click the color you want to sample with the Eyedropper tool and then click the element to which you want to apply the sampled color. To sample text, click the type frame with the tool. Position the Eyedropper tool over the unformatted text until a small I-beam appears with the eyedropper and then drag the I-beam across the text. Color, font, and size of the sampled text are all applied to the unformatted text. Gradient tool:  Select an object with the Selection tool and then click, hold, and drag the Gradient tool across it to apply a gradient. Drag with the Gradient tool in different locations and with different starting points to alter the flow and direction of the gradient. Select an object with the Selection tool and then click, hold, and drag the Gradient tool across it to apply a gradient. Drag with the Gradient tool in different locations and with different starting points to alter the flow and direction of the gradient. Button tool:  The Button tool creates elements that can be used to perform actions in an HTML or PDF document. The Button tool creates elements that can be used to perform actions in an HTML or PDF document. Scissors tool:  Use the Scissors tool to click any part of a selected path to cut the path. To break a closed path into two parts, you must cut the path in two places. You cannot cut a frame that contains text. Use the Scissors tool to click any part of a selected path to cut the path. To break a closed path into two parts, you must cut the path in two places. You cannot cut a frame that contains text. Hand tool:  The Hand tool works the same way in every Adobe program, allowing you to scroll around the currently open page. The Hand tool works the same way in every Adobe program, allowing you to scroll around the currently open page. Zoom tool:  Like the Hand tool, the Zoom tool is an Adobe standard. Click to zoom into an area of the page, or click and drag a marquee around an area on the page to zoom to that specific area. Click and hold down Option (Mac users) or Alt (Windows users) to zoom out of an area. Like the Hand tool, the Zoom tool is an Adobe standard. Click to zoom into an area of the page, or click and drag a marquee around an area on the page to zoom to that specific area. Click and hold down Option (Mac users) or Alt (Windows users) to zoom out of an area.
 | There are several important controls below the tools. The first is the Fill and Stroke control. The outline box controls the stroke of the selected object. Click the outline box to make the stroke active. The solid box controls the fill of the selected object. Click the solid box to make the fill active. Click the curved arrow to switch the application of fill and stroke. Click the fill and stroke proxy to return to the defaults. |
 | The icons below the Fill and Stroke controls allow you to set where to apply the fill and stroke. The Container button applies fill and stroke characteristics to a frame, and the Text button applies fill and stroke characteristics to individual text characters. |
 | Below these controls, the Apply Color button applies the last-selected color to the fill or stroke, the Apply Gradient button applies the last-selected gradient to the fill or stroke, and Apply None switches the color choice to none. |
 | Finally, InDesign offers several View modes to help you preview your document. The Normal View mode shows the document with all frames and guides showing. |
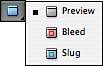 | The Preview Mode button shows the document as it will print, with guides, the edges of unselected frames, and any nonprinting items hidden. Two other view buttons beneath the Preview mode are Bleed Mode, which shows the document as it will print with bleed area showing, and Slug Mode, which shows the document as it will print with the slug area showing. See the section on document setup in Chapter 25, "Understanding Document and Page Setup in InDesign," for more information about creating a document with bleed and slug areas. |
|