| Effects (on the Effects menu) are similar to filters in visual result, with the difference being that effects are live. They do not create new objects or paths, are not necessarily permanent, and automatically update to reflect changes in the source object. Effects create appearance attribute entries in the Appearance palette and are therefore able to be saved and reapplied in graphic styles. Additionally, they may be removed simply by deleting their attribute entries in the Appearance palette, leaving the source object intact. Effects may also be nested, one applied atop another, with each one reacting to the others. Moreover, you don't have to apply effects to entire objectsyou can (and often will) apply effects to individual appearance attributes. For example, in an object with three different fills, one fill may have the Offset effect and Inner Glow applied, the second fill may have the Roughen attribute, and the third fill may be distorted using Free Transform and the Gaussian Blur effect applied solely to the distorted fill. Filters, on the other hand, may be applied only to entire objects, not to individual appearance attributes. To edit effects, do not reselect them from the Effects menu. Instead double-click the effect's attribute entry in the Appearance palette. Choosing the effect from the Effects menu will apply a second instance of the effect.
To convert Effects results to separate, editable paths and objects, select the effected object and choose Object, Expand. The Document Raster Effects Settings dialog (see Figure 20.17) determines the resolution, color model, background, and other important options used when converting objects to raster by using the Rasterize command on the Object menu as well as all raster-based effects such as drop shadow, inner glow, outer glow, feather, the SVG filters, and all the Photoshop effects. Raster effects on the Effects menu render as pixels instead of paths, though they retain their live status. Set the correct resolution for the output device prior to using any raster effects to prevent improper-quality (which is usually lower-quality) output. Figure 20.17. The Document Raster Effects Settings dialog. 
Dimmed or unavailable filters are not applicable to one or all of the currently selected objects. Illustrator Effects Caution Effects take longer to draw and redraw every time objects or the document view changes. Waiting time for several effects to render on even a few objects could become significant. If an effect is to be permanent, consider using instead the equivalent filter, which typically requires less time to render to the screen.
The Illustrator 3D effects and Warp effects are discussed in Chapter 18; the following are the rest of the Illustrator effects: Rectangle: (On the Convert to Shape submenu) Convert the selected shape(s) to a rectangle while retaining the original shape of the path. Options include setting absolute dimensions and dimensions relative to the size of the original shape (see Figure 20.18). Figure 20.18. Convert to Shape Effects, from left to right: Original image, Rectangle, Rounded Rectangle, and Ellipse. 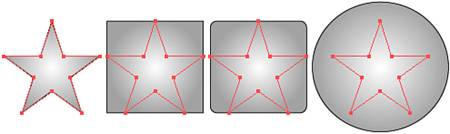
Rounded Rectangle: (On the Convert to Shape submenu) Convert the selected shape(s) to a rounded-corner rectangle while retaining the original shape of the path. Options include setting absolute dimensions, dimensions relative to the size of the original shape, and corner radius. Ellipse: (On the Convert to Shape submenu) Convert the selected shape(s) to an ellipse while retaining the original shape of the path. Options include setting absolute dimensions and dimensions relative to the size of the original shape. Free Distort: (On the Distort & Transform submenu) Reshape objects by manipulating four control points. Drag points around the Free Distort dialog to skew, flip, stretch, squish, or create false perspective (see Figure 20.19). Figure 20.19. Distort & Transform Effects, from left to right: (top row) Original shape, Free Distort, Pucker, Bloat; (bottom row) Roughen, Tweak, Twist, and Zig Zag. 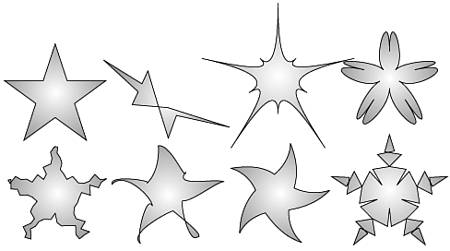
The effects on the Distort & Transform submenu are identical to their counterparts on the Filter, Distort submenu but for the fact that they are live effects (as opposed to permanent alterations) and may be applied to objects or to objects' individual appearance attributes.
Pucker & Bloat: (On the Distort & Transform submenu) Push the object's anchor points outward while curving path segments inward with Pucker; push path segments outward with Bloat. Roughen: (On the Distort & Transform submenu) Convert the object's path segments into random angles. In the Roughen dialog specify the percentage of distortion, whether the center point is relative or absolute, the amount of detail to preserve, and whether the new anchor points created by the filter are corner points or smooth points. Transform: (On the Distort & Transform submenu) Precisely transform the selected object(s) or appearance attribute by adjusting the horizontal or vertical scale, moving horizontally or vertically, and rotating or reflecting. Create multiple instances of the effect by using the Copies text box to apply the Transform Effect to each progressively. Tweak: (On the Distort & Transform submenu) Suck in or push out path segments randomly. In the Tweak dialog specify the percentage of distortion horizontally and vertically, whether the center point is relative or absolute, and whether to distort anchor points, control points leading into anchor points, and control points leading out from anchor points. Twist: (On the Distort & Transform submenu) Distort the artwork by twisting it to a provided angle. Zig Zag: (On the Distort & Transform submenu) Push out the object's path segments uniformly. In the Zig Zag dialog specify the size of distortion, whether the center point is relative or absolute, the number of ridges per path segment, and whether the anchor points are smooth or corner points. Offset Path: (On the Path submenu) Offset the object's path (and corresponding fill and stroke) by specifying the distance to offset relative to the actual path, the type of path segment joins, and the miter limit (see Figure 20.20). Figure 20.20. Path Effects, from left to right: Original object, Offset Path (demonstrated by offsetting additional fills), Outline Object, and Outline Stroke. 
Outline Object: (On the Path submenu) Outline the selected object(s). When used on type, this option has the same result as Type, Create Outline, but in live effect form that keeps type as live, editable text. Outline Stroke: (On the Path submenu) Outline the stroke of the selected object(s), creating the effect of turning strokes into filled, closed paths. SVG Filters: Raster Effect. Use various XML-based effects with images that you intend to export in Scalable Vector Graphic format. Add: (On the Pathfinder submenu) Requires multiple object selection. Combine the shapes of all selected objects. The resulting compound shape has the fill and stroke settings of the top object (see Figure 20.21). Figure 20.21. Pathfinder Effects, from left to right: (Row 1) Original artwork, Add, Intersect, and Exclude; (Row 2) Subtract, Minus Back, Divide, and Trim; (Row 3) Merge, Crop, Outline, and Hard Mix; (Row 4) Soft Mix and Trap. 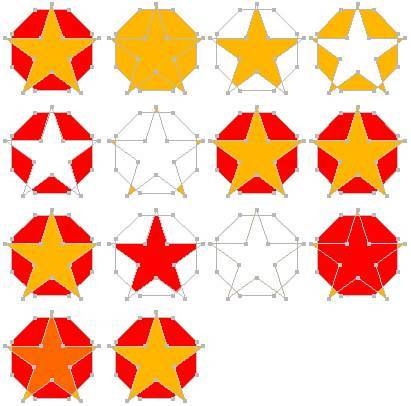
Intersect: (On the Pathfinder submenu) Requires multiple object selection. Clip or mask all selected objects to only the area of overlap. The resulting compound shape has the fill and stroke settings of the top object. Exclude: (On the Pathfinder submenu) Requires multiple object selection. Clip or mask all selected objects to omit all areas of overlap. The resulting compound shape has the fill and stroke settings of the top object. Subtract: (On the Pathfinder submenu) Requires multiple object selection. Cut out the shape of all other selected objects from the bottom object. Minus Back: (On the Pathfinder submenu) Requires multiple object selection. Knock all shapes overlapping the top object out of the area of the top object. Divide: (On the Pathfinder submenu) Requires multiple object selection. Divide all shapes by each other, resulting in new paths from each visible section of the originals, broken into new shapes at any overlap point. Trim: (On the Pathfinder submenu) Requires multiple object selection. Remove all overlapping areas from each shape. Also remove strokes assigned to any of the objects. Merge: (On the Pathfinder submenu) Requires multiple object selection. Combine the paths of any overlapping objects of the same fill color (and without strokes). Objects not of the same color are trimmed to remove overlap. Crop: (On the Pathfinder submenu) Requires multiple object selection. Remove all portions of the selected shapes that fall outside the area of the top objects. Also remove strokes assigned to any of the objects. Outline: (On the Pathfinder submenu) Requires multiple object selection. Divide the selected objects to their non-overlapping path segments. Fills are removed and strokes are preserved. Hard Mix: (On the Pathfinder submenu) Requires multiple object selection. Display the highest value colors present in any of the select objects. Soft Mix: (On the Pathfinder submenu) Requires multiple object selection. Specify a mixing rate percentage. Trap: (On the Pathfinder submenu) Requires multiple object selection. Create traps, or areas in which colors overlap to eliminate gaps caused by slight misregistration on press. In the Pathfinder Options dialog specify the trap thickness, relative height and width, tint reduction, and precision. Rasterize: Raster Effect. Convert the selected object(s) to raster (pixel-based) format. Choose resolution, background color, anti-aliasing, clipping mask, and outset. Add Arrowheads: (On the Stylize submenu) Add arrowheads or other shapes to the ends of open paths (see Figure 20.22). Figure 20.22. Stylize Effects from left to right: (first row) Add Arrowheads, Drop Shadow, and Feather; (second row) Inner Glow, Outer Glow, and Round Corners. 
Drop Shadow: (On the Stylize submenu) Raster Effect. Create a drop shadow on the selected object(s). In the Drop Shadow dialog specify the blending mode, opacity, X and Y offsets (how far away the shadow casts) in positive or negative measurements, the amount of blur, and the color (click on the color swatch to access the Color Picker). Feather: (On the Stylize submenu) Raster Effect. Soften the edges of the selected object(s) by introducing transparency-blur to the outside edges. Inner Glow: (On the Stylize submenu) Raster Effect. Create a glowing effect inside the object's fill. Specify the color, blending mode, opacity, blur amount, and whether the glow moves from the center outward or the edge inward. Click the color swatch to access the Color Picker. Outer Glow: (On the Stylize submenu) Raster Effect. Create a glowing effect exterior to the object. Specify the color, blending mode, opacity, and blur amount. Click the color swatch to access the Color Picker. Round Corners: (On the Stylize submenu) Round the corners of angled shapes such as rectangles. Scribble: (On the Stylize submenu) Create hand-drawn or sketched effects to varying degrees. In the Scribble Options dialog choose among several presets or mix new settings. Set the angle of scribble lines, path overlap (how far within or beyond the path edge scribble lines may go), variation (how different scribble lines may be from one another), stroke width, curviness and variation of curviness of scribble strokes before reversing direction, and spacing (how far apart scribble lines are from one another) (see Figure 20.23). Figure 20.23. Examples of the Scribble effect in action. 
Photoshop Effects The Effect Gallery, and the Photoshop effects within it, function exactly like the Filter Gallery and its Photoshop filters (see the "Filter Gallery" section earlier in this chapter). Also, as you might guess, other Photoshop effects on the Effects menu replicate the functions of their non-live counterparts, the Photoshop filters, but with the strengths and unique applications of live effects. |