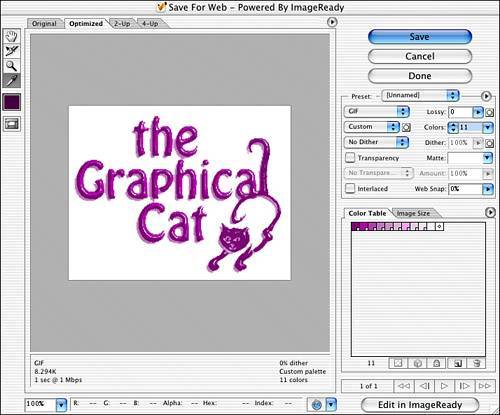
OPTIMIZING A COLOR TABLE


The more you work with GIF conversion, the more you realize that the most critical step is in mapping the original colors to a minimal yet representative table set. To most people, it sounds inconceivable that 32 colors can replace the thousands of colors in an image. Although you can do it, you must be careful about which colors you keep and which you throw away. Follow these steps to optimize a color table:

1.

In Photoshop, choose File, Open. The Open dialog appears. Select the file you want to convert to the GIF format and click Open. Choose File, Save for Web.

2.

Choose GIF from the Format pop-up menu. From the Colors pop-up menu, select the lowest number of colors without changing the file. Click the Optimized tab to review the results.

3.

Click the Color Table tab. Choose the Eyedropper tool in the Save for Web dialog and click a prominent color in the image. The corresponding color in the Color Table is highlighted.

4.

Lock the selected color by clicking the Lock button (marked with a padlock icon) at the bottom of the Color Table palette (see Figure 12.2). Locking a color prevents it from being removed or dithered. Repeat this step for any critical colors in the image. You see a small white square in the lower-right corner of the color chip, denoting that it's locked.

Figure 12.2. Select a color from the image and lock it in the color table.


5.

With the image showing on the Optimized tab, choose Sort by Luminance from the Color Table palette menu. In the color table, select a color close to a locked color and click the trash icon in the Color Table section (see Figure 12.3). The screen redraws to delete the selected color from the image. Continue deleting colors until you get a core set that represents the image well. Note that you can delete multiple colors by pressing the Shift key as you select adjacent color chips.

Figure 12.3. Click the trash icon to delete a color.


6.

With the important colors locked down, decide whether you need to change other colors. To change color swatches, double-click the color in the color table; the Color Picker dialog opens (see Figure 12.4). Change the current color, paying close attention to the web-safe icon in the picker (the three-sided box icon), which shows you the nearest web-safe color.

Figure 12.4. Double-click a color in the color table to change its value in the Color Picker.


7.

If you're working with the same kind of image, or you want a series of images to use the same color set, save the color table you just fine-tuned. Choose Save Color Table from the Color Table palette menu. In the Save As dialog that appears, type a name for the color table and click OK.


Special Edition Using Adobe Creative Suite 2
ISBN: 0789733676
EAN: 2147483647
Year: 2005
Pages: 426
Authors: Michael Smick

flylib.com © 2008-2017.
If you may any questions please contact us: flylib@qtcs.net