Using File Encryption
Do you have important documents on your computer that you don't want anyone else to see? Sure, you can set file permissions on files so that only your account can read them; isn't that enough? Unfortunately, it is not, as there are many ways that file permissions can be manipulated and your account password replaced if someone has physical access to your computer. If your computer is stolen or if someone breaks into your office or home, the only way to truly protect important data is to encrypt it.
Windows Vista includes two different levels of encryption: file level and hard drive level. The file-based encryption is a feature of the NTFS file system, whereas the drive-level method is a feature in Windows Vista called BitLocker Drive Encryption. The main difference between the two is that BitLocker Drive Encryption can encrypt your entire drive or partition so that even the file system is protected. Everything on the drive, including the operating system, is encrypted so that no one will even be able to boot up the OS if they do not have access to the device where the encryption key is stored. The security of BitLocker Drive Encryption comes at the price of performance and requires certain hardware, which is why file level encryption is often preferred. So, I am going to cover that first.
Encrypting your files
File level encryption in Windows Vista is very easy to do. However, there are some steps that are best taken before you start encrypting files to make sure that you can always decrypt your files at a later time no matter what events occur. This next section will show you why it is important to set up a Recovery Agent in Windows Vista.
Setting up a Recovery Agent
What happens to your data if some day you forget your password and someone has to set you a new one or if you are forced to reload Windows Vista because of a major Windows or hardware failure? In all of these events you will end up losing access to any files you encrypted earlier because of the way the encryption system is safeguarded. If you encrypt files on your computer, you want to make sure that they are safe and no one but you can read them. Windows needs to make sure that your encrypted files can be decrypted only by the account that wanted them protected.
If someone else has an administrator account on your computer, he has the access to set a new password for your account and then he can log on using your username and password. Typically, anyone logging on to your account has full access to all of your encrypted files; however, in the preceding scenario, to protect your files Windows removes access to them so that even your account can no longer access the files. This feature has both good and bad effects. It is very good because it is smart enough to still protect your data; however, you can also lose access to your own documents. There is, however, a solution to this dilemma: Using local group policy, you can specify a recovery agent that will give you the ability to always decrypt your own files.
This works by instructing the encryption system to add an extra certificate to a file when it is in the process of encrypting. This extra certificate belongs to what is commonly called the Recovery Agent. Setting up the Recovery Agent is two-fold. First you must generate the certificate assigned to the Recovery Agent. Then, you need to set up the encryption system to use it. Follow these steps to get your Recovery Agent up and running:
-
Log on to an account on your computer that is a member of the Administrators group.
-
Click the Start button, type cipher /r:rafile in the Search box, and then press Enter.
-
When prompted, type a password to protect the Recovery Agent certificate and press Enter. You will have to do this a second time to confirm the password was entered correctly. When the command is finished, it will have generated two files: rafile.cer and rafile.pfx. I will go into more detail on these files later.
-
You are going to use rafile.cer to set up the Recovery Agent on your computer. First, however, you need to move that file to a location that is accessible by all users on your computer. Click the Start button and then click your username on the top-right side to bring up your home folder. This is where the files generated were placed. Right-click rafile.cer and select Cut.
-
In Computer, go to your C drive and create a folder called RA. Paste rafile.cer into that folder. Now you are ready to set up the encrypted file system to use that recovery agent certificate.
-
Click the Start button again, type secpol.msc in the Search box, and then press Enter.
-
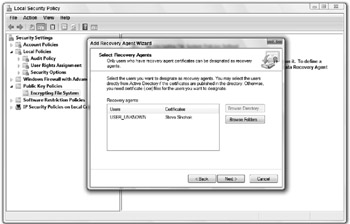
Expand Public Key Policies, right-click Encrypted File System, and then select Add Data Recovery Agent.
-
Click Next on the wizard welcome screen and then click Browse to specify the location of rafile.cer. It should now be in c:\ra\ if you followed steps 4 and 5 correctly.
-
After the file is selected, Windows will give you an error saying that it cannot determine if the certificate has been revoked. Ignore this message and click Yes. Your window should now look similar to Figure 14-8.

Figure 14-8: Adding a Recovery Agent to Windows Vista's encrypted file system -
Click Next once more and then click Finish and you are done. The Recovery Agent is now set up.
It is very important to remove the other file, rafile.pfx, from the computer and burn it to a CD or store it on a USB thumb drive. Then place the CD or USB thumb drive in a safe or safety deposit box to ensure it does not get into the wrong hands. If you ever need to decrypt your encrypted files, you will use rafile.pfx. If anyone gets a hold of that file and can then guess your password that you entered when you created it, all your files can be decrypted. That is why it is so important to remove that file from your computer and put it in a very safe place.
If you ever have a need to decrypt your own files after losing access to them for any reason, copy the rafile.pfx back to any computer that you want to decrypt your files on and double-click it. Then, just go through the wizard to import the certificate and enter your password when prompted. You will now be able to access and decrypt any files needed.
Setting files to be encrypted
Now that you have your Recovery Agent set up and the PFX file removed from the computer and placed in a safe location, you can safely and securely encrypt the files on your computer. To do so, just navigate to a file or a folder that you would like to encrypt on your machine and follow these steps:
-
Right-click a file or folder and select Properties.
-
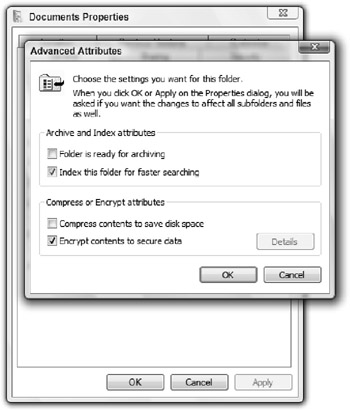
On the General tab, click the Advanced button.
-
Check the Encrypt contents to secure file box and click OK, as shown in Figure 14-9.

Figure 14-9: Encrypting files with the encrypted file system -
Click OK to exit Documents Properties and you are finished.
If you ever want to decrypt a file, just uncheck the Encrypt contents to secure file box that you checked previously and click OK.
Using BitLocker Drive Encryption
BitLocker Drive Encryption is a new feature in Windows Vista that allows you to encrypt an entire drive or partition. This drive-layer encryption even encrypts the file system and operating system files so everything is secure. BitLocker Drive Encryption is the most secure Windows security option. This feature is ideal for laptop owners who have sensitive data on their drive as well as desktop users who can't risk their information getting into the wrong hands.
BitLocker Drive Encryption works by encrypting the entire partition, including the file system, with a 256-bit encryption algorithm. Using a Trusted Platform Module (TPM) chip, USB thumb drive, or a typed-in passkey, BitLocker protects your encrypted partition. When you boot up your computer, BitLocker starts to load from a small unencrypted partition, prompting you to insert your USB key or passcode to begin booting Windows Vista. If everything checks out, BitLocker unseals the encrypted partition and starts running the normal boot code. Failure to insert the USB key or correct passcode will result in a failure and an inability to even boot Windows.
Using this new security feature of Windows Vista is not very easy and has strict hardware configuration requirements. Currently, if your hard drive is not partitioned correctly to use this feature, your only option is to reinstall Windows Vista. However, if you want rock-hard security, this may be worth it.
Hardware requirements
For the most secure setup, BitLocker Drive Encryption requires a TPM chip version 1.2 or newer built into your computer. It is possible to set up BitLocker Drive Encryption on a computer without a TPM device or using a USB drive, but your only source of protection is a pass-code and the physical USB drive.
Configuring your hard drive
BitLocker Drive Encryption works by first booting into an unencrypted partition to run the unlocking code and then boots the encrypted partition. This requires a very specific partition configuration to work properly. First, you need to have a small partition that is at least 1.5 gigabytes and is set to active that will be used for the initial boot information. Then you need a second partition that is designated for the operating system.
When I install Vista, I usually just create one partition that has the boot information on it as well as the operating system. Because BitLocker Drive Encryption requires a separate partition for the boot information, my only option is to reconfigure my partitions and reinstall Windows Vista.
Because you will need to re-install Windows Vista, you can use the diskpart utility that is part of the WinPE install environment that is on the Windows Vista installation DVD. In order to complete the next steps, you will need a bootable copy of the Windows Vista installation DVD. When you have one, follow these steps:
-
Insert the Windows Vista installation DVD into your computer and restart.
-
While the computer is starting up, press the correct key for your system to boot from the DVD. The exact key for your system is usually shown on the first screen when you turn on your computer. If you do not see any options, consult the user guide that came with your computer or contact your manufacturer.
-
When the setup loads, select your language, time and currency format, and the keyboard layout, and click Next.
-
On the next screen, click Repair your Computer.
-
System Recovery Options will show up; click Next on this screen as well.
-
On the recovery tool window, select Command Prompt.
-
In Command Prompt, type diskpart and press Enter to launch a more advanced partition editor.
-
Type select disk 0 and press Enter to select your primary hard drive.
-
Type clear and press Enter to erase the current partition table.
-
Type create partition primary size=1500 and press Enter to make the first partition that is 1.5GB.
-
Give this drive a letter. Type assign letter=b and press Enter.
-
You are almost done with this partition, but you still need to set it as active. Type active and press Enter.
-
Now you need to create the partition for the operating system. Type create partition primary and press Enter to create a new partition with the rest of the free space on the drive.
-
The last thing to do with diskpart is to assign the new partition a drive letter. Type assign letter=c and press Enter.
-
Now that you are finished with diskpart, you can exit it by typing exit and pressing Enter.
-
The last step is to format the two new partitions you just created. First, type format b: /y /q /fs:NTFS and press Enter to format the boot partition. Then type format c: /y /q /fs:NTFS and press Enter to format the operating system partition.
You are now finished configuring the hard drive to work with BitLocker Drive Encryption. Just close Command Prompt and then close the recovery options window and you will be back to the main Windows Vista installation screen. Click Install Now and install Vista to the new operating system you created. You should be able to easily find it when you select where to install to because it is the larger one of the two.
After properly configuring the hard drives and reinstalling Windows Vista, you are ready to get started using BitLocker Drive Encryption. The next section guides you through that.
Using BitLocker Drive Encryption
Using BitLocker Drive Encryption is easy when you have your hard drive configured properly and have reinstalled Windows Vista. Just follow these steps to get BitLocker up and running for you:
-
Click the Start menu and select Control Panel.
-
When Control Panel loads, click the Security heading.
-
Click BitLocker Drive Encryption.
-
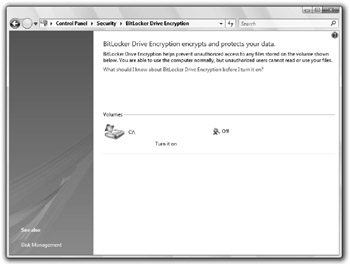
If your computer is configured properly, you should see a Turn it on link, as shown in Figure 14-10, next to your operating system drive. Click that link now.

Figure 14-10: Enabling BitLocker Drive Encryption -
Select the type of device you will be using to protect your computer and follow the onscreen steps for your method of protection.
After you complete all the steps the wizard guides you through, your computer will begin encrypting the hard drive automatically. Congratulations, your computer is now even more secure. Keep in mind that you will need to insert your USB drive every time you want to boot your computer if you choose the non-TPM option. Failure to insert it will result in your computer not booting. Make sure that you keep your emergency recovery passcode stored in a safe place, as well as your USB drive, in the event you choose to use that option.
If your computer does not have a compatible TPM chip, you can still use BitLocker Drive Encryption with a USB storage device. However, Microsoft has recently decided to hide this option from users. A local group policy change must be made to turn this option back on.
-
Click the Start button, type gpedit.msc in the search box, and press Enter.
-
When the Group Policy editor has loaded, navigate through Computer Configuration, Administrative Templates, Windows Components, and BitLocker Drive Encryption. Right-click Control Panel Setup: Enable advanced startup options and select Properties.
-
Select the Enabled option and click OK.
You can now use a USB storage device with BitLocker Drive encryption again.
EAN: 2147483647
Pages: 105