Chapter 12: Optimizing Windows Core Components
The core Windows components can be thought of as the steel beam structure of a skyscraper. This basic structure of the building provides support for all the other components. Windows Vista is a massive program that has various layers of components that support each other. This chapter is going to help you tweak the core components of Windows to increase the overall performance of your computer. Instead of a steel beam structure, Windows Vista's core components are short-term memory (RAM, a.k.a. volatile memory), long-term storage (your hard drive, a.k.a. non-volatile memory), and the CPU. All the programs that run on Windows, including Windows itself, eventually break down to these three core components.
To get started, you are going to tweak your system's short-term memory using some techniques and features of Windows Vista to increase the speed of memory operations. Then, you are going to hack another critical component, the paging system, and then speed up your hard drive and adjust how your CPU does work. These tweaks and hacks will help you speed up the overall performance of your computer.
Giving Vista More RAM
All the added features and infrastructure components to support Windows Vista require PCs to have more RAM than ever before. The new security enhancements, visual effects, and maintenance processes can eat up a big chunk of your available memory. Microsoft claims that the minimum amount of RAM required to run Windows Vista is 512MB. However, almost every advanced computer user agrees that you need to double any Microsoft recommendation on RAM for decent performance. The last few chapters covered various ways to cut down on memory usage to speed up your PC. Unfortunately, if your computer doesn't have enough RAM, 512MB or less, the tweaks and hacks in the previous chapters will help, but they will not be able to help enough.
Windows Vista and all your applications require a good amount of available random access memory (RAM) to perform at top speed. You can try very hard to cut down on the need for memory by disabling unused features and applications so you have more memory free for the applications you use daily; however, there really is no substitute for RAM. Before I go any further, let's review why RAM is so important to your computer.
RAM is the fastest type of memory on your computer. No matter what you use your computer for, RAM is always in constant use. Your computer uses RAM as a high-speed temporary storage location to store data and applications that the CPU is currently working with. Every time you launch an application, Windows has to load it from your hard drive into RAM so that the CPU can execute the code. Depending on the available memory, Windows may have to kick some other data currently in memory out. That is called paging, which is covered in greater detail later in this chapter. Paging is a slow process because it saves current memory back to the slow hard disk. It is best to avoid paging as much as possible so that as little time as possible is lost trying to make room so your applications or data can fit in memory. When you consider all the memory that Windows Vista uses on top of your normal applications, you will see why it is so important to have the right amount of high speed memory available.
Adding RAM to your computer
Sometimes your only option to add even more speed to your computer is to give it more of what it likes most, RAM. If you have a low amount of RAM in your computer-say you are right at the bare minimum requirements according to Microsoft to run Windows Vista and you have already tried all the performance enhancements in this book-I recommend upgrading your RAM as a final move. I have never seen any hardware upgrade influence the speed of a computer greater than upgrading the RAM. Upgrading the amount of RAM you have in your computer is an easy and low-cost method to jump-start the speed of your computer. Unsure if you have the skills to do it yourself? No problem-just follow the recommendations that follow for help with buying and installing your new RAM.
Buying RAM for your hardware
Picking out RAM can be very confusing because there are so many different types of it. The following are two main points that will take the complexity out of buying RAM:
-
Type of RAM your hardware requires: You can usually go to the Web site of your manufacturer, type in your model number, and find the exact type of memory that will work with your hardware. Alternatively, you can visit the manufacturer of your motherboard. I recommend writing down the type of memory your manufacturer states you need and buying the memory from a different company. Use a price comparison Web site to find the best deal on the type or RAM you need. Often the major manufacturers rip you off on the pricing of RAM. When you know what kind you need, you can get it from pretty much anywhere and usually much cheaper.
-
Number of open RAM expansion slots: In order to add memory to your computer, you need to consider the number of open RAM expansion slots you have on your motherboard. Most computers have either two or four slots and depending on your manufacturer or if you built it yourself, you may be using up all the slots. If your slots are all in use, don't worry-you can still upgrade your RAM. Pieces of RAM usually come in combinations of 256MB, 512MB, or 1GB of memory per stick. Say you have two RAM slots and they are both currently full with two 256MB RAM chips; you can still buy two 512MB chips to replace them, which doubles the amount of RAM you had.
Installing your new RAM
Once you have ordered or picked up your new RAM, it is really easy to install it yourself. Keep in mind that opening the case may void your warranty. Having fun yet? Follow these steps to pop in your new memory:
-
Unplug all the cables on the back of your computer, including the power cable.
-
Use a Phillips screwdriver or push the case release button to remove your case.
-
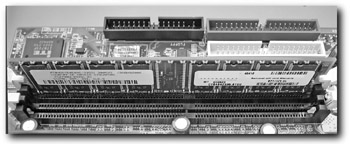
When you have access to your motherboard, locate the memory expansion slots, as shown in Figure 12-1. Attach your anti-static wristband at this time. Don't have one? No big deal. Just touch any part of the metal case frame with your hand to discharge yourself.

Figure 12-1: RAM expansion slots -
Removing any existing pieces of RAM is very simple. Push the plastic or metal clips away from the sides of the stick of RAM. This will usually cause the RAM to pop out.
-
Putting a new stick of RAM in is just as easy. While the plastic clips are open (pushed away from the sides of the slot), align the chip the correct way so it fits in the slot properly and gently push down. As the stick of RAM goes down, it will cause the plastic clips on the sides to snap in place.
Put your case back on and hook up your cables and you are now finished. If you have any errors when your reboot on your BIOS screen or if your computer does not recognize the new RAM you put in, make sure you got the right kind and that it is seated properly in the slot.
Using a USB storage device to add memory
While upgrading the amount of RAM you have in your computer is a good last resort if you are having performance issues, Windows Vista introduces a cool new way that you can assist the amount of RAM you currently have. As I mentioned earlier, any time your computer has to kick applications and data out of RAM because there is not enough room slows down your computer because it has to store that data on the slow hard drive. In Windows Vista a new feature called Windows ReadyBoost allows you to use faster solid state memory devices, such as a USB memory device, to store this data instead of your slow hard drive. This provides an instant boost to system performance without your even having to open the case.
How does it work? The concept is simple. Solid-state USB 2.0–based storage devices have a faster read and write speed than most hard drives on the market. Windows ReadyBoost, with the assistance of Windows SuperFetch, another caching technology, works with a memory management system to redirect cached data to the high-speed device. At any time you can remove the device if you need to use it for another purpose. To protect the data that is cached on your removable USB device, Windows encrypts it so that if the device is removed, your data is safe.
Setting up Windows Vista to use your USB drive to increase performance is very easy. To get started, you will need a 256MB or larger USB 2.0 drive. Then follow these steps:
-
Plug your USB drive into one of your available USB ports.
-
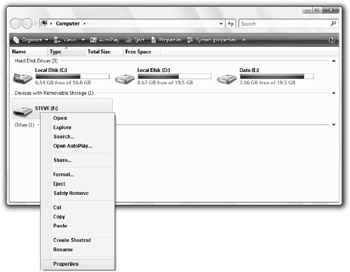
After your computer recognizes the new device and it shows up in Computer, make sure that you have at least 235MB of free space on the drive. Right-click the drive and select Properties, as shown in Figure 12-2.

Figure 12-2: Opening properties for your USB drive -
When the Properties window is shown, click the ReadyBoost tab.
-
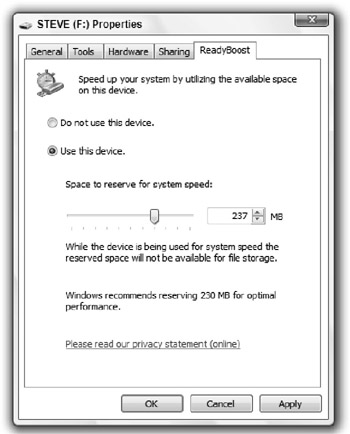
Select Use this device and adjust the slider to set the amount of space to use for ReadyBoost, as shown in Figure 12-3.

Figure 12-3: Using Windows ReadyBoost to increase performance -
Click OK when you are ready and Windows ReadyBoost is now set up on your computer.
After you set up Windows ReadyBoost on one of your USB devices, it can be removed at any time. You can disable it at any time by selecting Don't use this device on the ReadyBoost tab you worked with earlier. Also, after you set up Windows ReadyBoost on your USB device, it cannot be used for Windows ReadyBoost on another Windows Vista computer without first having Windows ReadyBoost disabled on the computer it was set up with.
EAN: 2147483647
Pages: 105