Hacking File Associations
Every time you click a file, Windows looks up in the Registry the default program to open the file. Then, Windows loads that application and tells the application which file to open. This is something that you encounter almost all the time when you're using your computer. Often, when you install many programs on your computer, programs start to compete over which is going to be the default program to open a file.
One of the most common situations for this is when you install a bunch of similar applications. For example, I primarily use Windows Media Player for playing my music. When Apple releases a new version of iTunes, however, I usually install it to check out the new features. The next time that I try to play a CD or listen to an MP3, the music always opens in iTunes. My file association for my music has been stolen by iTunes. How do I take control over my file associations again? The following two sections show you how you can customize the default launch application for any file type on your computer, as well as how your file types look.
Changing the default launch app
Windows Explorer uses information stored in the Registry to find out what application is used to open a specific file type. This information is stored in the HKEY_CLASSES_ROOT section. With the Registry Editor, it is possible to browse to that key and then find the file type that you want to change and edit some keys. However, there is a better way to do this in Windows Vista.
In Windows Vista's new Default Programs utility lies the ability to easily change file association information without having to deal with the Registry class ID junk. Just follow these steps to change the default launch app for any file type:
-
Click the Start button and select Default Programs.
-
When the Default Programs utility loads, select Associate a file type or protocol with a program.
-
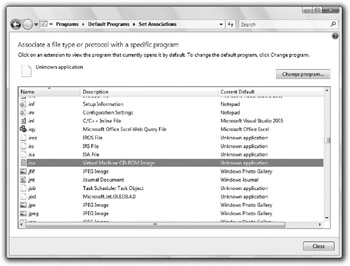
Scroll through the list and select the file type you want to change the default program for, as shown in Figure 5-4.

Figure 5-4: Changing file associations -
Click Change program.
-
The program that you want to change the file type to may be on the default Open With list. If not, just click Browse and select the program that you want to use to open the file.
-
Press OK and then Close.
Your changes to file launch apps are activated immediately after you click Close to save your changes. Now you will no longer have to worry about applications taking control over your files because you know how easy it is to fix them.
Hacking the Context Menu
What is the context menu? It's the menu that pops up when you right-click anywhere on your computer. Over the years, these menus have become more and more useful. However, with the extra entries in the context menu, they can become cluttered with options and features that you just don't need. These next few sections will shown you how you can get your menus back under control as well as how you can take advantage of the new features to make your own context menu entries.
I will start off by removing items from the context menus and then move on to adding and customizing the components of the menus.
Removing items from the context menu
Over time, your context menus can become cluttered with program entries from old programs that you may not use any more. You might experience programs that take over all of your context menus. Compression apps such as WinZip or Picozip always end up adding program entries to all the context menus. I have Picozip installed on my computer and every time I right-click any file or folder, I see five entries from Picozip giving me different compression options. This can be a convenient feature, but if you don't compress and extract zip files very often, you might not need the added convenience. Instead, you could remove these entries from your context menu, which will give your system a cleaner interface as well as a small performance boost if you have a lot of extra entries in your context menu.
Removing these programs from your context menus can be a little tricky because they can be spread in different places in the Registry. The only way to remove these types of entries is to edit the Registry directly. Follow these steps:
-
Click the Start button, type regedit in the Search box, and then press Enter.
-
When the Registry Editor appears, expand the HKEY_CLASSES_ROOT folder. You will now see a list of every file type that is set up on your computer.
-
If the entry that you want to remove from the context menu appears in all context menus, such as the preceding WinZip example, you will have to expand the * folder. Otherwise, expand the folder with the file extension you want to modify.
-
After expanding the correct folder, expand the Shellex and ContextMenuHandlers folders. Your registry path should be HKEY_CLASSES_ROOT\*\shellex\ ContextMenuHandlers.
-
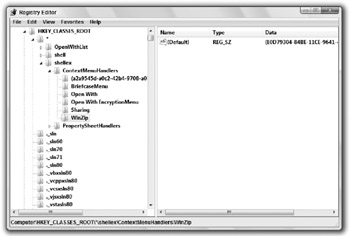
Look through the list until you find the entry that you want to remove. Right-click the entry and select Delete. You will find that identifying some of the programs is easy. For example, WinZip is labeled WinZip, as shown in Figure 5-5. However, you may run into some items that are listed using their application/class ID or a vague name. If so, do a Registry search of the class ID (Ctrl+F), which is formatted as {XXXXXXXX-XXXXXXXX-XXXX-XXXXXXXXXXXX}, to find other references that will give you clues to what the ID belongs to. If that does not work, try doing a search on Google to see if that turns up anything.

Figure 5-5: WinZip's context menu entry in the Registry -
After you are finished removing all the entries from your context menus, just close Registry Editor and you are finished. Your changes will be in effect immediately.
Modifying the Send To menu
The Send To menu is one of the features of my context menus that I use the most. The ability to right-click any file and have a shortcut of it sent to the desktop is invaluable. How would you like to make it even more useful? It is very easy to add your own items to the Send To menu, such as folders that you can send files to. Do you have a folder that you store all your music in? How about a folder that you store all your digital photos in? Just follow these quick steps to add anything you want to your Send To context menu entry.
| Tip | If you do not see any of the folders that are required in this section, you might have Hidden Files turned on. Because these folders are hidden by default, you will have to tell Windows to show all files. To do this, refer to the section on working with hidden files toward the end of this chapter. |
-
Click the Start button and select Computer.
-
Click on your Windows drive and browse through Users\ Username \AppData\ Roaming\Microsoft\Windows\SendTo.
-
You will see all the files that appear in the Send To menu. If you want to add an entry to the menu, just copy a shortcut to this folder.
-
Let's say that you want to add your Digital Photos folder to your Send To menu. Navigate to your Digital Photos folder, right-click it, and then select Send To desktop. This will create a shortcut to the folder and save it on your desktop. Next, cut and paste the shortcut that was created from your desktop into the SendTo folder.
-
If you ever want to remove items from the Send To menu, just delete them from the SendTo folder.
It is that simple. You are now finished customizing your Send To menu.
EAN: 2147483647
Pages: 105