Working with Memory Usage
|
|
You already know the drill: add more RAM. If memory is a problem on a computer system, the only true solution to the problem is to either stop using so much or add more. To stop using so much RAM, you have to stop using the computer in the same manner, which generally means using fewer applications or not as many applications at the same time. A good starting place for Windows XP is 256MB. You can use less RAM, but you’ll often find that applications run more slowly, and if you are using graphics applications, you’ll probably find that you need more than 256MB for the best optimization.
Like previous versions of Windows, Windows XP also uses virtual memory. Virtual memory allows the operating system to use a portion of the computer’s hard disk to write memory data while it is not in use. For example, let’s say you are using three applications. One of the applications is minimized. When you are not using this application, data in RAM can be written to the hard disk. When it is needed, it can be read back into RAM. This frees up more real memory, but allows you to keep more applications open without getting an “out of memory” error. The problem, though, is that virtual memory can be costly in terms of performance. In essence, virtual memory causes the computer to have to juggle items from memory to the hard disk and back again. This may not give you a readily noticeable performance hit, but once again, the old truth comes back: install more physical RAM.
You can adjust the size of the paging file, which holds the data written to the disk. However, Windows XP does a good job of managing its own virtual memory settings. You can experiment with them, but don’t expect any real performance gains, and you might even cause more performance problems by trying to adjust the settings. Still, you can work with the virtual memory settings to see if manual adjustment is helpful to you, by using the following steps.
Adjusting Virtual Memory Settings
-
Click Start | Control Panel | System.
-
On the Advanced tab, click the Settings button found under the Performance heading.
-
In the Performance Options dialog box, click the Advanced tab, then click the Change button under Virtual Memory.
-
The Virtual Memory dialog box appears, as shown in Figure 10-3. Select the desired drive and enter a desired initial size in MB and a maximum size for the page file. You can also enable the System to manage virtual memory on its own by selecting the radio button, or you can choose to use no paging file at all (which is not recommended). The recommended settings appear at the bottom of the dialog box. If you want to try to get a little more power out of the paging file, try increasing its initial size, but make sure you have enough free space on the hard disk to accommodate the size you select. Click OK when you are done.
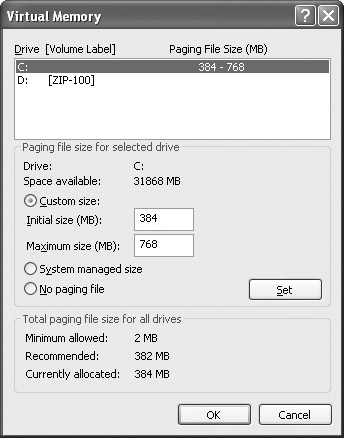
Figure 10-3: Virtual memory
| Secret | By default, the paging file minimum size that is recommended on the Virtual Memory tab is 1.5 times the amount of physical RAM installed on your computer. This should be the least amount that you use. If you have two drives installed, consider assigning the page file to the faster drive for a performance tweak. In fact, try to always install the page file on a different physical disk whenever possible, and always try to avoid placing the page file on the same drive as the operating system. |
|
|
EAN: N/A
Pages: 164