Installing and Removing Applications
|
|
Windows XP supports numerous applications, from word processing applications to spreadsheets, presentation software, antivirus software, and even games. In fact, you can find software for just about anything you might want to do with Windows XP. However, the greatest mistake users and even corporate decisions makers make is assuming that all software applications will work with Windows XP. Just because a software package says “compatible with Windows” on the box, that does not mean that the software is actually compatible with Windows XP. Software written for Windows 9x simply may not work with Windows XP at all, or if it does work, it may work intermittently. So, the number one rule of using applications on Windows XP, or any operating system for that matter, is to use applications that are written for Windows XP. This almost guarantees that you will have few if any problems, and your help desk calls will be minimized.
| Note | When you upgrade to Windows XP from a previous version of Windows, the previous operating system’s applications and programs are kept in place. However, this does not mean that they will work once the upgrade is complete. |
Unfortunately, software purchasing and distribution decisions in your networking environment may not be up to you, and you may have to support what is already deployed or being deployed. The good news is that Windows XP gives you a few tools and options that can help you manage software, even if that software is not explicitly written for Windows XP.
| Note | Windows XP is built on Windows 2000 code, and like Windows 2000, Windows XP does not allow programs to alter operating system files, which are kept in a separate folder. This feature greatly reduces system lock-ups that occurred so frequently in Windows 9x. |
Installing Software
Software is installed by launching a setup.exe program. The setup program copies the software’s files from a source to a folder on the computer’s hard drive. The setup program can be launched from an Internet download or from an installation CD. Most software sold today has an autostart feature on the CD that walks the user through the installation process. If an installation CD does not automatically start the installation, you can simply browse the CD and locate the setup program, as in the example shown in Figure 5-1.
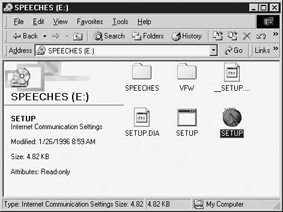
Figure 5-1: You can manually launch a program installation by double-clicking Setup.exe
| Note | In Windows XP, new programs that you have not yet opened are displayed in yellow when you look at them in Start | All Programs. Once you open a program, this “highlighting” feature is removed so you can keep track of which programs you have explored and which ones you have not. If you don’t like the highlight feature, you can remove it by accessing the Start Menu properties and removing the feature. |
As you might guess, you can also use Add/Remove Programs in Control Panel to install a program. You’ll see an Add New Programs button on the left side of the screen, shown in Figure 5-2. Once you click the button, you can click the CD or Floppy button to begin an installation from a floppy disk or CD-ROM. You can also install programs that are available from a network share as well. If you want to download something from the Windows Update site, then click the Windows Update button. Essentially, the Install option found here just looks for Setup.exe on the floppy disk or CD. To use this option, see the following step-by-step instructions.
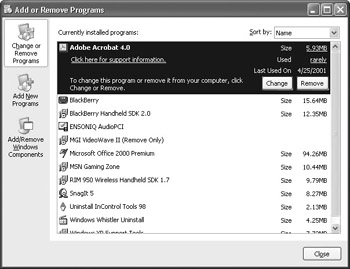
Figure 5-2: Use the Install button to let Windows XP help you install a program
Installing a Program Using Add/Remove
-
Click Start | Control Panel.
-
Click the Add/Remove Programs icon.
-
In the Add or Remove Programs window, click the Add New Programs button.
-
In the window that appears, click the CD or Floppy button.
-
The Install from Floppy Disk or CD-ROM Window wizard appears. Click the Next button.
-
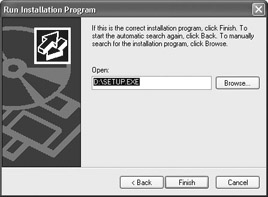
Windows searches your floppy and CD-ROM drives for the Setup.exe program and gives you the location, as shown here. If this is not correct, click the Browse button to browse to the correct location.
-
Click Finish, and installation begins. You may need to respond to other prompts, depending on the setup routine.
| Note | Users are often worried about how they should install a program. Should you install a program using its setup icon or use the Add/Remove Programs icon? In truth, there is no difference. Add/Remove Programs just launches the setup program for you so you do not have to start it yourself. Most programs today have an autostart file, so all you have to do is put the CD-ROM into your computer and the disk will tell you what to do next. If this does not happen, you can start setup yourself by double-clicking Setup.exe or by using the Install option in Add/Remove Programs. As you will find, Windows XP often provides more than one way to accomplish a task—it’s just a matter of preference. |
Just as you can install a program on Windows XP, you can uninstall the program as well. For example, suppose that you use a particular application, and at a future date, you purchase a different application to replace your older one. If the application you purchase is not an upgrade to the old one, you may want to remove the old application from Windows XP so that it does not take up space. Keep in mind, however, that any files created by the application cannot be used once the application is removed.
There are two ways to remove a program from your computer. Some programs come with their own uninstall option. You can just put the CD-ROM into the CD-ROM drive, and let it automatically begin. A window then appears that allows you to install additional components or remove existing components—or the entire program. Microsoft Office is an example of a program that utilizes this feature. Some programs also have a built-in uninstall routine. You can click Start | Programs, then point to the program’s folder; a menu pops out with an uninstall option.
If you have a program that doesn’t help you with the uninstall process, you can, once again, use Add/Remove Programs in Control Panel. When you open Add/Remove Programs, you see a list of programs. The programs listed on this window are installed on your computer. To remove one of them, simply select it and click the Change/Remove button. Follow any additional prompts that appear.
Sometimes, you end up with programs that really like you and do not want to leave your computer: There is no uninstall option on the CD-ROM, and the program is not listed in Add/Remove Programs as an option you can uninstall. Although this normally does not happen, you can still remove the program by deleting its folder. This is not a recommended action since you may experience problems by forcing an application to delete itself. For example, if other applications use the application files, those other applications may have problems after you delete the files. However, you can use this option when absolutely necessary.
-
Open My Computer, then double-click your C drive icon.
-
Locate a folder called Program Files, then double-click it. You may need to click the View All Contents link as prompted.
-
Look through the folders and find the one that has the program you want to uninstall. Typically, the name of the folder will indicate the program's name or the manufacturer's name.
-
When you have found the folder, right-click it and click Delete to remove it from your computer. Make sure you are deleting the correct folder before completing the action.
| Note | Some programs give you a Change button and a Remove button, while some only give you a Change/Remove button. If you have programs that can be upgraded or if additional parts of the program can be installed, you’ll see both Change and Remove. This allows you to install additional portions of the program, or simply remove the program from your computer. |
|
|
EAN: N/A
Pages: 164
- An Emerging Strategy for E-Business IT Governance
- Linking the IT Balanced Scorecard to the Business Objectives at a Major Canadian Financial Group
- A View on Knowledge Management: Utilizing a Balanced Scorecard Methodology for Analyzing Knowledge Metrics
- The Evolution of IT Governance at NB Power
- Governance Structures for IT in the Health Care Industry