| Of course, a new custom class does no good if you do not use it in an application. To use your new class in an application, you must create a reference from the project in which you want to use the class to the project that contains the class. We'll illustrate this point by adding a new test project to our sample class project. Solutions When you created the Class Library project earlier in this chapter, Visual Basic .NET automatically created a solution to contain that project. Simply put, a solution is a container for the projects that together comprise an application. Notice that the Solution Explorer window contains a solution named MyClasses, which was created as a container for (and named for) the MyClasses project that you created. Adding a Project to a Solution To add a new project to the current solution, choose File, Add Project, New Project from the menu system. In the Add New Project dialog box, choose the Windows Application template, give the project an appropriate name (let's use ClassTest for this example), and click OK. Note that the Solution Explorer window now includes a second project, ClassTest. The complete ClassTest test project is available for download on the Internet at www.quepublishing.com. Setting the Startup Project Notice that MyClasses is displayed in bold font in the Solution Explorer window, whereas ClassTest is not. This indicates that MyClasses is the Startup Project for the current solution. A solution's Startup Project is the project that will be executed when the application is run (either from the design environment or as a compiled program). Because a class cannot be run as a standalone application, we need to make ClassTest the Startup Project. To do so, simply right-click ClassTest in the Solution Explorer window, then choose "Set as StartUp Project" from the shortcut menu. Note that ClassTest is now bold, and MyClasses is not. Adding a Reference Even though the new ClassTest project is part of the same solution as MyClasses, you still need to add a reference before ClassTest can use the classes that make up the MyClasses class library. Add a reference as follows: -
In the Solution Explorer window, right-click the References folder under the ClassTest project, then choose Add Reference from the shortcut menu. -
In the Add Reference dialog box, click the Projects tab. -
Click the MyClasses class library project, then click the Select button to put MyClasses in the Selected Components area of the dialog box. -
Click OK. Notice that the References folder for ClassTest in the Solution Explorer window now contains a reference to MyClasses.
Declaring and Using Objects To use a class that you have defined, you need to create instances of that class in your applications. To do so, you will declare object type variables, using the new class as the variable's type, with a syntax similar to the following: Dim objEmp As New clsEmployee The New keyword actually causes an instance of the class clsEmployee to be created and stored in the object variable objEmp. However, sometimes you may want to delay the actual creation of the instance until later in the program, even though the variables are declared initially. In this case, use the New keyword when you are ready: Dim objEmp As clsEmployee ' 'Later... Set objEmp = New clsEmployee In the preceding code, the actual object instance is not created until the Set statement is executed. In the first example, the object instance is created the first time a property or method of the object is referenced. Destroying Objects Assigning Nothing to an object variable frees up resources associated with the object and causes the code in the class module's Terminate to be executed. You accomplish this feat by setting the object variable equal to the keyword Nothing: objTemp = Nothing Tip Even though the contents of objects are no longer available when a form or module containing them is destroyed, it is good programming practice to set objects equal to Nothing when you are finished with them. This ensures that all memory resources are freed and the object is destroyed.
In the following section, you will set up the sample program to use your new clsEmployee class. Using the Employee Class in the Sample Program The first thing you need to do to use the clsEmployee class in the sample program is to declare one or more instances of that class. Follow these steps to get started: -
In the Solution Explorer window, right-click Form1.vb in the ClassTest project, then choose View Code from the shortcut menu. -
You will see the Code window for Form1.vb of the ClassTest project. Type the following declaration in the Code window, just below the "Windows Form Designer generated code" area:
Dim WithEvents objEmp1 As New MyClasses.clsEmployee Note The WithEvents keyword in the Dim statement is necessary to allow the object to utilize the custom events that were created for it.
Importing the Class Library While entering that declaration, you might have expected clsEmployees to be available from the editor's Auto List Members feature when you typed the spacebar after Dim objEmp as New. Instead, you had to specify the name of the class library, MyClasses; when you typed the period after the name of the class library, then you had access to the clsEmployee class contained in it. You can make members of the MyClasses library available throughout the current class (Form1.vb) by using an Imports statement. Place the following line of code at the very top of the Code window for Form1.vb, even above the Public Class Form1 line: Imports MyClasses Now, go back and delete the objEmp1 declaration you typed previously, then start typing it again. This time, when you press the spacebar after Dim objEmp1 as New, you will be able to choose clsEmployee from the Auto List Members feature. You have eliminated the need to type the MyClasses.qualifier before members of that library.  p. 120 p. 120
After reentering the declaration for objEmp1, add two more declarations as shown here: Dim WithEvents objEmp2 As New clsEmployee Dim WithEvents objEmp3 As New clsEmployee Planning for Events Because we declared our two object variables using the WithEvents keyword, we can reasonably expect that one or more events might occur. We can write code to handle those events just like any normal event handler. In the Code window for Form1.vb, drop down the Class Name box and choose clsEmp1; then drop down the Method Name box. Notice that the DataError event we defined is available. Click it, and a shell DataError event handler is created. Add one line of code so the event handler looks like this: Private Sub objEmp1_DataError(ByVal sErrorMsg As String) Handles objEmp1.DataError MessageBox.Show(sErrorMsg, "Error!", MessageBoxButtons.OK, _ MessageBoxIcon.Warning) End Sub This code, which executes if something triggers the DataError event you coded for clsEmployee, will simply show the user a message box containing the error message that was reported by the DataError event. Add the following error handlers for the other two instances of clsEmployee: Private Sub objEmp2_DataError(ByVal sErrorMsg As String) Handles objEmp2.DataError MessageBox.Show(sErrorMsg, "Error!", MessageBoxButtons.OK, _ MessageBoxIcon.Warning) End Sub Private Sub objEmp3_DataError(ByVal sErrorMsg As String) Handles objEmp3.DataError MessageBox.Show(sErrorMsg, "Error!", MessageBoxButtons.OK, _ MessageBoxIcon.Warning) End Sub Setting Properties for the Employee Objects Here's where it all comes together. The following code sets various properties of the three clsEmployee objects we declared as the test project's main form loads. Add it to the end of Public Sub New in Form1.vb's Code window (you will have to click the plus sign next to "Windows Form Designer generated code" to see Sub New): objEmp1.LastName = "Mertz" objEmp1.FirstName = "Fred" objEmp1.DateHired = #9/20/1928.htm# objEmp1.Salary = 57000 objEmp1.Department = "Marketing" objEmp2.LastName = "Ricardo" objEmp2.FirstName = "Ricky" objEmp2.DateHired = #10/15/1951.htm# objEmp2.Salary = 71500 objEmp2.Department = "Marketing" objEmp3.LastName = "Nelson" objEmp3.FirstName = "Frank" objEmp3.DateHired = #12/4/1927.htm# objEmp3.Salary = 99124 objEmp3.Department = "Accounting" objEmp1.Supervisor = objEmp2 objEmp2.Supervisor = objEmp3 Of particular interest are the last two lines, objEmp1.Supervisor = objEmp2 and objEmp2.Supervisor = objEmp3, which sets the Supervisor property of objEmp1 and objEmp2 to two other instances of clsEmployee, objEmp2 and objEmp3, respectively. Testing the Properties Let's see whether the properties are working as expected. Try the following: -
Add a Button control to Form1.vb. Change its Name property to cmdShowInfo1 and its Text property to Show Emp1 Info. -
Add the following code to cmdShowInfo1's Click event handler: Private Sub cmdShowInfo1_Click(ByVal sender As System.Object,_ ByVal e As System.EventArgs) Handles cmdShowInfo.Click Dim sTemp As String sTemp = "Employee: " & objEmp1.FullName & vbCrLf sTemp += "Salary: " & FormatCurrency(objEmp1.Salary) & vbCrLf sTemp += "Department: " & objEmp1.Department & vbCrLf sTemp += "Supervisor: " & objEmp1.Supervisor.FullName & vbCrLf sTemp += "Instance: " & objEmp1.InstanceID sTemp += " of " & objEmp1.ClassInstanceCount MessageBox.Show(sTemp, "objEmp1 Info") End Sub -
Add a second Button control to Form1.vb. Change its Name property to cmdShowInfo2 and its Text property to Show Emp2 Info. -
Add the following code to cmdShowInfo2's Click event handler: Private Sub cmdShowInfo2_Click(ByVal sender As Object, ByVal e As_ System.EventArgs) Handles cmdShowInfo2.Click Dim sTemp As String sTemp = "Employee: " & objEmp2.FullName & vbCrLf sTemp += "Salary: " & FormatCurrency(objEmp2.Salary) & vbCrLf sTemp += "Department: " & objEmp2.Department & vbCrLf sTemp += "Supervisor: " & objEmp2.Supervisor.FullName & vbCrLf sTemp += "Instance: " & objEmp2.InstanceID sTemp += " of " & objEmp2.ClassInstanceCount MessageBox.Show(sTemp, "objEmp2 Info") End Sub -
Add a TextBox control to Form1.vb. Change its Name property to txtSalPct and clear its Text property. -
Add a Label control to the left of the txtSalPct text box. Set its Text property to Enter Salary Change Percent:. -
Add a Button control near the label and text box you just added. Change its Name property to cmdChangeSalary, and set its Text property to Change Emp1 Salary. -
Add the following line of code to the Event handler for cmdChangeSalary: objEmp1.ChangeSalary(txtSalPct.Text)
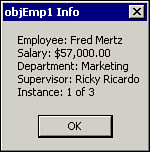
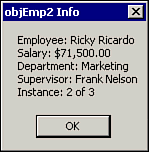
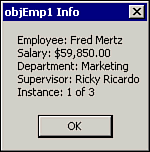
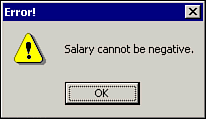
Save and run your program. When you click the "Show Emp1 Info" button, you should see a message box containing all the properties you set for objEmp1, as depicted in Figure 9.2. Notice that the FullName and Supervisor properties did their job. Figure 9.2. The first instance of the Employee class is displayed.  Click the "Show Emp2 Info" button and see the properties for objEmp2, as shown in Figure 9.3. Figure 9.3. Different instances of the Employee class have different property values.  Next, enter a number into the text box, click the "Change Emp1 Salary" button, then click the "Show Emp1 Info" button again. You should see that the first employee's salary has been modified by the percentage you entered into the text box, as shown in Figure 9.4. Figure 9.4. The Salary property for the first instance of the Employee class has been increased 5% by the ChangeSalary method.  Finally, test the DataError event by modifying the code that initially sets properties for the three instances of clsEmployee so that at least one of them attempts to set the salary to a negative number. When you run the program again, an error message like the one shown in Figure 9.5 should be displayed. Figure 9.5. Because the program attempted to set the Salary property to an invalid number, the DataError event displays an error message.  |