| One of the main advantages of object-oriented programming is code reuse; classes can be shared among programs. By using already-written classes you can save yourself a lot of work. An organizational unit containing shared code components is known as a namespace. One of the most exciting things about Visual Basic .NET is the amount of functionality available from classes built into the .NET framework. Table 5.1 lists a few examples of some namespaces provided by the .NET framework for use in your programs. Table 5.1. Examples of Namespaces| Name | Purpose |
|---|
| System.Math | Mathematical functions | | System.Drawing.Graphics | Drawing lines, and so on | | System.Windows.Forms | Windows Forms | | System.Diagnostics | Diagnostics, error log | | Microsoft.VisualBasic | VB .NET functions | | System.Net.Sockets | TCP Sockets |
Tip To see a complete list of namespaces (several pages long) search for namespaces in the Help Index. Throughout this book we will be describing many of these namespaces in detail.
Above the namespace main level is another organizational unit known as an assembly. Quoting the help file, an assembly is " . . . a reusable, versionable, and self-describing building block of a Common Language Runtime application." (For users of previous versions of Visual Basic, an assembly is like a DLL you can reference in a project.) To access namespaces in an assembly within your project, you add a reference to the assembly containing the namespace. When you start a new project, the System and Microsoft.VisualBasic namespaces are automatically available to you.  For more on adding a reference, p.75 For more on adding a reference, p.75
Using the Imports Statement As long as you have the namespace available via an assembly reference, you can use its components in your Visual Basic program by typing the fully qualified name. For example, suppose you want to declare a Socket object. The Socket object is part of the System.Net.Sockets namespace and can be referenced with the following line of code: Dim skListen As System.Net.Sockets.Socket Notice namespaces are organized hierarchically using dot notation, and can contain namespaces within themselves. Every time you type a period, you will see the list of available members at the current level. To cut down on the amount of typing to access Socket, place an Imports statement followed by the namespace name at the top of your code module. Assuming we added the line ImportsSystem.Net.Sockets to the top of the code module, the preceding assignment statement could be rewritten as follows: Dim skListen As Socket You can always use the long name, but if you want to omit the namespace name you must use an Imports statement so the compiler knows to which namespace you refer. Note If you are using namespaces with identically named members, you may need to use fully qualified names to differentiate them.
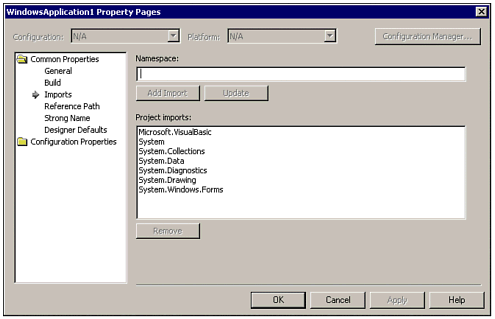
When you start a new project, Visual Studio .NET imports several namespaces by default. These are shown in Figure 5.3. Figure 5.3. The Imports in the Project Property pages can be accessed by right-clicking the project name in the Solution Explorer and choosing Properties.  There are two ways to add Imports to your project: The Project Property pages, shown in Figure 5.3. Any imports added here will be available to all forms and modules in your project. Type an Imports statement at the top of your code module. This will only affect the current code module.
Exercise: Using the System.NET Namespace We have already discussed the theory behind using namespaces, references, and the Imports statement. In this section, we create a sample function to determine your computer's IP address. One practical use for this program might be for owners of cable modems, whose IP address changes often. A friend of mine uses a similar program that e-mails him the IP address of his home PC so he can always connect to it from work. During the process you'll learn how to use Visual Studio tools such as the Object Browser, Intellisense, and the help files to effectively use namespaces. To begin, start Visual Studio .NET and create a new Windows Application. Our task at hand involves the network. From reading the help files, we know that a System.NET namespace exists that contains network-related functions. Because the System namespace is a part of a new Windows application by default, you do not need to go through the process of adding a new reference. However, an Imports statement will make it easier to access components within the namespace. Follow these steps to add a new Imports statement to your form code: -
From the Solution Explorer, right-click Form1.vb and choose View Code. -
Scroll to the very top of the form code, where you see the other Imports statements. -
Add the following new line of code after the last Imports statement:
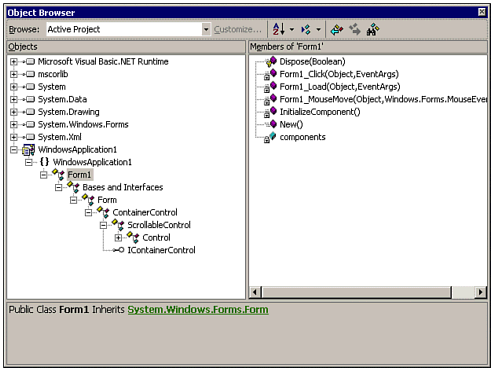
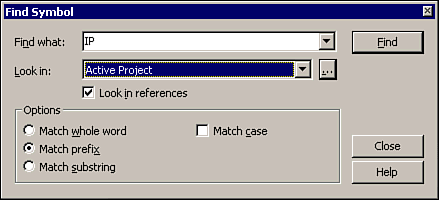
Imports System.Net Now you are ready to directly access the classes and other components within the System.Net namespace from your code. Using the Object Browser The help files provide a lot of detail about how to use the namespaces included with the .NET framework. However, at certain times you may want to explore the objects on your own to learn about their methods, properties, and events. The Object Browser window allows you to browse and search classes. To display the Object Browser, select the View menu, Other Windows, then Object Browser. You will see a window similar to the one pictured in Figure 5.4. Figure 5.4. The Object Browser window can be displayed from the View menu or by pressing Ctrl+Alt+J.  You can, of course, explore the classes listed on the left side of the Object Browser by navigating through the tree list. However, in this exercise we are looking for something specific, so we will use the Object Browser's Find Symbol button. Click the Find Symbol button, which appears on the toolbar as a binoculars icon. You will see the Find Symbol dialog box, shown in Figure 5.5. Figure 5.5. The Find Symbol dialog box allows you to search namespaces loaded in the active project, or namespaces you select through the References dialog box.  For our sample exercise, we are looking for things related to IP address, so we'll be searching for the symbol IP. However, we will need to narrow our search so that we do not find unrelated words that contain the string IP, such as Description. A reasonable guess is that the class we want begins with the letters IP, so go ahead and select the Find Prefix option. This will constrain the search to symbols that begin with IP. To begin the search, perform the following steps: -
Type IP in the Find What box. -
Choose Active Project in the Look In box. -
Click the Find button.
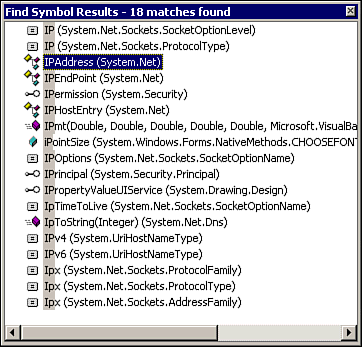
After you have clicked the Find button, you should see the results window pictured in Figure 5.6. Figure 5.6. To browse symbols returned as the result of a search, right-click the name and choose Browse Definition.  As you can see from the results, there are several promising looking classes, especially IPAddress and IPHostEntry. After looking at their definitions in the Object Browser (and the help files), you will find that the IPAddress class stores an IP address and the IPHostEntry stores a list of IP addresses for a specific host (or computer). So, to solve our problem you will need to figure out a way to discover a computer's host name. By performing another search for Host with the Object Browser, you will discover a function called GetHostName within the System.Net.DNS namespace which accomplishes just that. Writing the Sample Code Now that we have the information we need, you can start writing the code. Place a command button on the form and enter the following code in the Click event: Dim MyHostName As String = DNS.GetHostName() Dim MyHostEntry As IPHostEntry Dim MyIPAddr As IPAddress MyHostEntry = DNS.GetHostByName(MyHostName) For Each MyIPAddr In MyHostEntry.AddressList MessageBox.Show("Your ip address = " & MyIPAddr.ToString) Next MyHostEntry = Nothing MyIPAddr = Nothing When you run the program and click the button, your IP address will be displayed in a message box. As you can see, the code is fairly simple and does not require any API calls or custom controls as it might have in previous versions of Visual Basic. |