| In the Web Forms programming model, you have a choice of where to put the VB code; it can reside with the HTML in an .aspx file (as described in Chapter 17, "Using Active Server Pages.NET"), or in a separate .vb file that contains just code. Keeping the code and user interface separate is one of the great features of the Web Forms programming model, so Visual Studio .NET makes this choice for you by creating a webformname .aspx.vb file automatically when you add a new Web form to your project. This separate file is known as the code-behind file, because it contains the code "behind" the Web form interface. Visual Studio makes the fact that there are two files transparent to the developer; choosing View Code in the Solution explorer displays the .vb file, whereas choosing View Source displays the .aspx file. Internally, the files are linked together thanks to the concept of inheritance. Your code-behind file contains a class for the Web form (for example, Webform1), which inherits the Page class from the System.Web.UI namespace. The .aspx file in turn inherits the Webform1 class.Thanks to inheritance, all the objects we discussed in Chapter 17 (Request, Response, Session) are available in your Web form class, with the added benefit of Intellisense and other editing features you don't get in Notepad!  For more on ASP.NET objects, p.443 For more on ASP.NET objects, p.443
Writing Page Initialization Code Most types of applications (Windows or Web) require some initialization code. For example, if your form includes drop-down lists for the user to select his state and country name, you need to populate this list when the form is initially loaded. In the Windows environment, your form is typically only created once per application session, so you can put the initialization code in the form's New method and be confident it will only execute once. However, in the Web environment, your form may be loaded in the browser many times, depending on the number of round trips it makes before the user is finished. To accommodate program initialization, you can check the IsPostBack property in the Page Load event. Every time a Web page is loaded, the Page_Load event handler executes on the server before the page is returned to the client. When the page processor creates an instance of a Web form, it sets the IsPostBack property to True if the page has already made a round trip, or False if the page has not been previously loaded. You use this property to determine when to execute your page initialization code. Listing 18.1 shows an example of loading a drop-down list box containing state names when a Web form is initially loaded. Listing 18.1 WEBFORMTEST.ZIP Coding the Page_Load Event Private Sub Page_Load(ByVal sender As System.Object, _ ByVal e As System.EventArgs) Handles MyBase.Load 'Put user code to initialize the page here If Not Page.IsPostBack Then Call FillStateList() End If lblInfo.Text = "Company Stock: " & GetStockPrice() End Sub Private Sub FillStateList() Dim rdrPeople As SqlDataReader Dim cn As SqlConnection Dim cmd As SqlCommand Dim strState As String Dim strDesc As String lstStates.Items.Clear() cn = New SqlConnection("server=bserver\NetSDK;uid=sa;pwd=;database=Brian") cn.Open() cmd = New SqlCommand("Select state, description from statelist", cn) rdrPeople = cmd.ExecuteReader() While rdrPeople.Read() strState = rdrPeople.GetString(0) strDesc = strState & " - " & rdrPeople.GetString(1) lstStates.Items.Add(New ListItem(strDesc, strState)) End While cn.Close() End Sub Listing 18.1 calls the GetStockPrice function every time the page is loaded, which means this function will execute on each round trip. The idea behind this function is that if the page happens to be making a round trip to the server anyway, why not update the stock price. The FillStateList function, on the other hand, will be executed only during the first page load. This will eliminate the overhead of connecting to the database and the list of states. During future page loads, the view state feature described in the previous section will maintain the state drop-down list and the user's selected state automatically. Figure 18.2 shows the sample page generated by the code in Listing 18.1. Figure 18.2. The list box containing states and the stock price were populated in the Page_Load event. 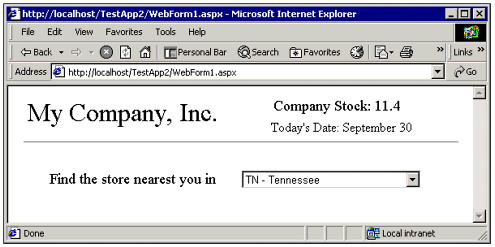 To learn more about retrieving information from a database, p.599 Note Pressing F5 or the clicking browser's Refresh button causes the IsPostBack property to be reset, as if you are loading the Web page for the first time.
Distinguishing Between View State and Session State It is important to distinguish the view state feature of ASP.NET Web Forms from the session state feature. The most important differences are View state information exists only during round-trips for the same Web form. Session state data, such as the name of the logged-in user, can be shared across all multiple forms. View state information is generally maintained automatically. The developer creates session state information explicitly through the use of session variables. Information about the current view state is carried along with each round trip and stored on the client. Session state information is stored on the server and linked to the user through an internal session ID.
As we mentioned in Chapter 17, you can maintain your own session variables by accessing the Session object. For example, if you had several Web Forms which needed to display a list of states and their abbreviations, you might retrieve them in a dataset and store the dataset in a session or application variable. In Chapter 3, we used session variables to pass parameters to the amortization form in the Loan Calculator application. For an example use of session variables with a Web form, p.49 Security and Web Forms It is worth noting that efficiency is not the only thing you should consider when thinking about state management. Remember, anything stored in HTML form fields (or cookies) is sent to the browser as plain text and available on the end user's machine. Caution As an example of poor use of HTML forms, I can recall an early online banking application that stored an account number in a hidden form field. This was extremely poor programming practice, because by simply choosing view source and editing the hidden form field, one could easily enter a new account number and gain access to someone else's information! Remember, just because your ASP code sends down the initial form to the end user doesn't mean he cannot send his own form back.
Although by no means a complete list, here are a few simple tips to remember: You don't need to be too concerned with information that the user has to key in anyway, such as a text box. In this case, using Web Form view state is perfectly acceptable. You can use view state for pick lists, drop-down lists, and hidden form fields, but keep in mind to be extra safe you need to include server-side validation to make sure the values being posted are valid. Some information you just shouldn't transmit to the client browser, such as an internal user number or password. In this case, you can use a session variable on the server, or generate a random key and store it in a cookie or hidden form field. The random key can then be used in a server-side database lookup.
These concerns do not indicate flaws in the Web architecture; people do business on the Web every day. Rather, they are intended to remind the developer to be careful when sending information over the Internet. Control Events and the AutoPostBack Property When working with ASP.NET server controls, you program event procedures just as you would in a Windows Application, but they execute on the Web server. However, not every event available in Windows control exists in the equivalent server control, and even if a particular event exists it may behave differently in the Web environment. For some events, such as the Mouse Move event, it is just not practical to raise an event on a remote server, due to the time it takes to make a round trip across the network and redraw a page. Therefore, the server controls do not have Mouse Move events. Another example is the TextChanged event of a text box, which in a Windows application fires with every keystroke. However, the TextChanged event of an ASP TextBox control only fires during a round trip, and even then only if the text in the text box has changed since it was last sent to the browser. With some server controls, you can cause additional round trips by setting the AutoPostBack property to True. To demonstrate the effect of the AutoPostBack property, create the following example: -
Start a new Web Application project. Add the following controls to the Web form, as shown in Figure 18.3: a text box, button, check box, and list box. Figure 18.3. If you set the AutoPostBack property to True, certain events may cause your Web form to be loaded again. 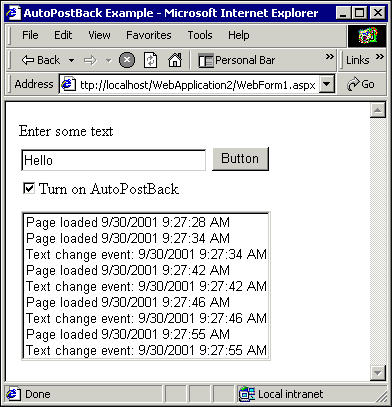 -
Add the following code to the Page_Load and TextChanged events: Private Sub Page_Load(ByVal sender As System.Object, _ ByVal e As System.EventArgs) Handles MyBase.Load ListBox1.Items.Add("Page loaded " & Now.ToString) If CheckBox1.Checked Then TextBox1.AutoPostBack = True Else TextBox1.AutoPostBack = False End If End Sub Private Sub TextBox1_TextChanged(ByVal sender As System.Object, _ ByVal e As System.EventArgs) Handles TextBox1.TextChanged ListBox1.Items.Add("Text change event: " & Now.ToString) End Sub -
Run the sample program. Enter some text in the text box and click the button to force a round trip. The list box should report that the TextChanged event fired. -
Click the check box and click the button. You have now set the AutoPostBack property to True. -
Enter some new text and press the Tab key to exit the text box field. The TextChanged event should fire without your pressing the button.
Based on the setting of the AutoPostBack property, the TextChanged event will fire either when the form is submitted or when the control loses focus. However, in either case, the event will only indicate changes made since the last round trip. In other words, suppose your text box initially contains the word Hello. If you repeatedly key in and delete one hundred different words, but change the text back to Hello before the next round trip, the TextChanged event will not fire at all. Note The setting of the AutoPostBack property on one server control can cause events to fire for other controls by forcing a round trip.
In Chapter 19, "Web Controls," we will explore other properties and events of the ASP.NET server controls in more detail. Writing Client-Side Script Code The basic model for Web Forms as we have described thus far involves only server-side code execution. No processing logic exists within the page delivered to the client. This is actually one of the strengths of a Web application, because very little is required to make your application work on an end user's machine. However, most Internet browsers also support some type of client scripting, such as JavaScript or VBScript. Note On the Web, you will encounter JavaScript more often than VBScript, because JavaScript works in both the Netscape browser and Internet Explorer. However, relying too heavily on client scripting of any kind is unwise, because it may be disabled on some users' browsers and unsupported on others.
Although you don't really need client scripting in a Web application, Web designers often add script code on the client that executes within the user's browser, typically for one of the following reasons: Client script can capture events that server code cannot, such as mouse movement. Using client script allows you to provide a more dynamic user interface, by highlighting or animating parts of a Web page. Client script code can spawn a child browser window to display multiple Web pages at the same time.
In the remainder of this section, we will demonstrate an example of opening a secondary browser window using some client-side JavaScript code. We will enhance the Loan Calculator application from Chapter 3 by making the amortization screen appear in a smaller pop-up window. To accomplish this, we will call the JavaScript window.open function. To learn how to do this, you can follow along with the example. To create the example, follow these steps: -
Load the working loan calculator project from Chapter 3. -
Display the Web Forms designer for WebForm1.aspx and choose the HTML view. -
Locate the </HEAD> tag, which indicates the end of the Web page header. Insert a new line at the end of the header by pressing Enter. This is where we will put a JavaScript function. -
Right-click on the blank line and choose to Insert Script Block, Client from the pop-up menu. <SCRIPT> tags will be inserted for you. -
Enter the following lines of code to create a JavaScript function called openamortwindow. Your screen should look similar to Figure 18.4. function openamortwindow() { window.open("frmamort.aspx","amortwindow",_ "fullscreen=no,toolbar=no, menubar=no") } Figure 18.4. The Visual Studio .NET HTML editor provides intelligent editing features and automatic event procedure stubs for client objects. 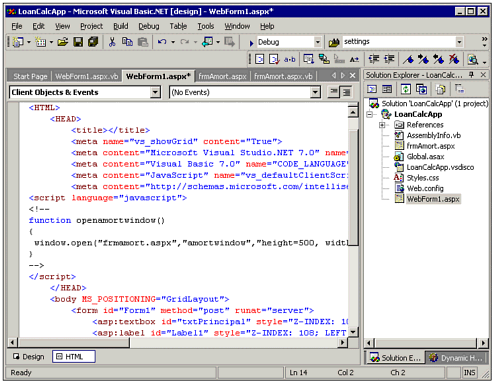
Now that we have a function to open the frmAmort.aspx in a new window, we just need to provide a way for the user to execute it at the appropriate time. In the original program, we used a server-side control to redirect the browser to a new page. However, because this function has to be called from the client, we will generate a standard HTML button that calls the openamortwindow function. To make this modification to the loan calculator, do the following: -
Switch back to design view and delete the cmdShowDetail server control from the Web form. -
Right-click WebForm1.aspx in the Solution Explorer and choose View code. -
Delete the line cmdShowDetail.Visible = True from the end of the cmdCalculate_Click procedure. -
Enter the following lines of code at the end of the cmdCalculate_Click procedure: Session.Add("Principal", txtPrincipal.Text) Session.Add("IntRate", txtIntRate.Text) Session.Add("Term", txtTerm.Text) Session.Add("Payment", txtPayment.Text) Dim strButton As String strButton = "<INPUT TYPE=""BUTTON"" VALUE=""Amort. Scheudle"" ONCLICK=""javascript:openamortwindow()"">" Response.Write(strButton)
Finally, you are ready to run the program. Click the Start button to begin, and repeat the steps used to test the program in Chapter 3. When you display the amortization schedule, it should appear in a separate browser window, as shown in Figure 18.5. Figure 18.5. JavaScript allows you to open additional browser windows and perform other client-side user interface enhancements. 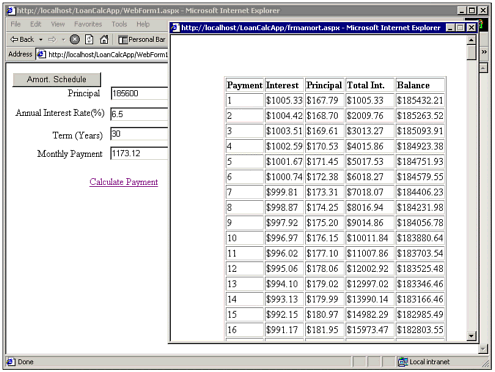 Although it works, this example is a very rudimentary demonstration. In a real application, you might want to use a placeholder or some additional HTML to make the button appear at the bottom of the screen instead of the top. In addition, session variables are probably a waste of resources in this case. It is left as an exercise to the reader to add additional JavaScript to post the field values directly to frmAmort.aspx. |
