Tools Discussed in this Chapter
|
| The website, http://www.lowth.com/LinWiz/, has an online scripting wizard for generating firewall rules for host-based firewall configurations. Additionally, this software package has absolutely fantastic documentation for getting a Linux-based NFS server to work with host-based firewall rules, and we recommend it highly. NFS: Cannot Get NFS Traffic to Traverse a NAT or IP Forwarding FirewallNFS is an RPC service that typically does not use predictable port numbers, which makes RPC services in general difficult to process effectively through netfilter. Fortunately, NFS is an exception. While it is an RPC service, it actually does use predictable port numbers, which makes it less of a chore to process through firewall rules. In this configuration, you have an NFS file server (Host-B, 10.10.10.100) on one side of the firewall (Host-A) on the network 10.10.10.0/24 and one or more clients on the other side of the firewall in the network 192.168.1.0/24. Clients cannot successfully mount exported drives from the NFS server. Figure 16.1. NFS traffic cannot traverse the firewall.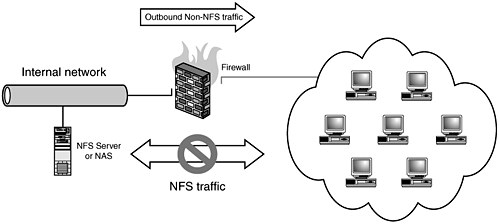 To forward or route to an NFS server firewall, we will first need to make some configuration changes to the NFS server itself to ensure that it is using the same consistent portsdue to the somewhat dynamic nature of RPC services port selection. Fortunately NFS is more "tame" than most other RPC services, so we will not need to make a great number of changes on the server itself to ensure consistent operation. This example covers two types of complex configurationsthe first assumes that the firewall is the destination for the NFS mount requests and forwards these connections to the real NFS server. The following documentation assumes you're using a Linux NFS server:
Assuming that the previous changes have been made and you are only attempting to set firewall rules on the NFS server itself, which has a default DROP policy, you will need to set the following: # where eth0 is the systems only interface, with the IP address of 10.10.10.100 $IPTABLES -A INPUT -p tcp -m tcp --dport 111 -j ACCEPT $IPTABLES -A INPUT -p udp -m udp --dport 111 -j ACCEPT $IPTABLES -A INPUT -p tcp -m tcp --dport 2049 -j ACCEPT $IPTABLES -A INPUT -p udp -m udp --dport 2049 -j ACCEPT $IPTABLES -A INPUT -p tcp -m tcp \ --dport 4000:4003 -j ACCEPT $IPTABLES -A INPUT -p udp -m udp \ --dport 4000:4003 -j ACCEPT This would allow connections from all hosts to this system. However, if we wanted to limit these connections to specific hosts192.168.1.5 and 192.168.1.6, for examplewe could use the RETURN rule and user-defined tables to accomplish this: # part 1 $IPTABLES -N NFSCLIENTS $IPTABLES -N NFSSERVER # part 2 $IPTABLES -A NFSCLIENTS -s 192.168.1.5 -j RETURN $IPTABLES -A NFSCLIENTS -s 192.168.1.6 -j RETURN $IPTABLES -A NFSCLIENTS -j DROP #part 3 $IPTABLES -A NFSSERVER -j NFSCLIENTS $IPTABLES -A NFSSERVER -p tcp -m tcp --dport 111 \ -j ACCEPT $IPTABLES -A NFSSERVER -p udp -m udp --dport 111 \ -j ACCEPT $IPTABLES -A NFSSERVER -p tcp -m tcp --dport 2049 \ -j ACCEPT $IPTABLES -A NFSSERVER -p udp -m udp --dport 2049 \ -j ACCEPT $IPTABLES -A NFSSERVER -p tcp -m tcp \ --dport 4000:4003 -j ACCEPT $IPTABLES -A NFSSERVER -p udp -m udp \ --dport 4000:4003 -j ACCEPT $IPTABLES -A NFSSERVER -j DROP The part 1 creates the user-defined chains, NFSCLIENTS, where we will stick all our allowed clients, and NFSSERVER, which is where we will contain our NFS server policy itself. part 2 defines the hosts that belong to the NFSCLIENTS allow list, using the RETURN flag. part 3 contains the policy that we're applying to the server itself. The first line in part 3 is to include the exception list of hosts from NFSCLIENTS and the ending DROP policy. Any hosts that do not match this list will be dropped by the final line in NFSCLIENTS before being processed by the remainder of the NFSSERVER chain. This next configuration assumes that the firewall is located on an internal network with internal firewalls. The "external" interface in this configuration assumes the rest of the internal network. "Internal" is for clients in that particular department, and we still create a DMZ network to host our NFS server itself. The firewall is forwarding requests for a remote NFS server but will appear to be the NFS server itself to external clients. Client requests are directed to the firewall's eth0 interface with the IP address of 172.16.10.1. These are then forwarded to the internal NFS server, 192.168.1.100. Figure 16.2. A DMZ-ed NFS server on an internal corporate network.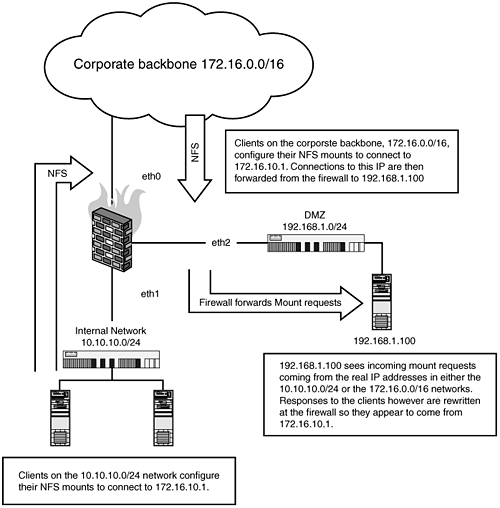 #!/bin/sh IPTABLES=/sbin/iptables #eth0 is the firewalls 172.16.10.0/16 network #interface, 172.16.10.1 #eth1 is the firewalls internal 10.10.10.0/24 network #interface, 10.10.10.1 #eth2 is the firewalls dmz 192.168.1.0/24, 192.168.1.1 EXTERNAL=eth0 INTERNAL=eth1 DMZ=eth2 EXTERNALIP=172.16.10.1 SERVER=192.168.1.100 NFSPORTS="111 2049 4000:4003" # This example for loop runs through the array $NFSPORTS, for each port we need # to allow. Otherwise, this script could be very long. for i in $NFSPORTS; do $IPTABLES -A FORWARD -i $EXTERNAL -o $DMZ -p ALL \ --dport $i -m state state \ NEW,ESTABLISHED,RELATED -j ACCEPT $IPTABLES -t nat -A PREROUTING -i $EXTERNAL \ -p ALL --dport $i -j DNAT --to-destination \ $SERVER done # Final SNAT rule on our external interface $IPTABLES -t nat -A POSTROUTING -i eth1 \ -o $EXTERNAL -j SNAT --to $EXTERNALIP # enable IP Forwarding echo 1 > /proc/sys/net/ipv4/ip_forward Unlike many of our other examples where we use NAT to allow access to a device, in this example we will show the use of IP forwarding. This requires some minor upstream topology changes from the firewall, specifically setting your gateway to understand that the route to the network lies behind the firewall. This second configuration assumes that the firewall is not using NAT and is purely routing the traffic into the 192.168.1.0/24. Furthermore, the firewall is configured with an access list to restrict what networks can access this NFS server, specifically the network 192.168.2.0/24 and the host 192.168.3.100: Figure 16.3. The use of IP forwarding rules to an internal NFS server.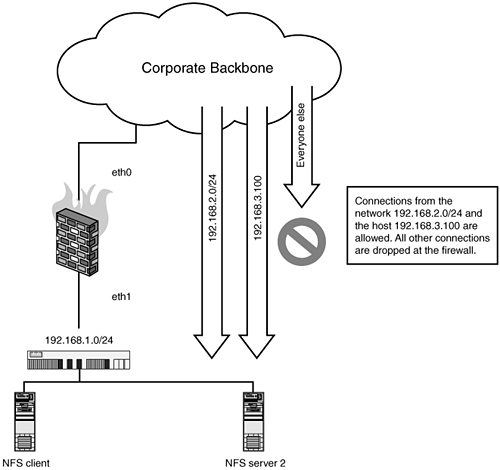 #!/bin/sh IPTABLES="/sbin/iptables" #eth0 is the firewalls backbone interface, with the IP address 192.168.10.10 #eth1 is the firewalls 192.168.1.0/24 network interface, with the #IP 192.168.1.1 EXTERNAL=eth0 INTERNAL=eth1 NFSPORTS="111 2049 4000:4003" # clear legacy rules $IPTABLES -F $IPTABLES -X # set default Deny ALL policy $IPTABLES -P INPUT DROP $IPTABLES -P OUTPUT DROP $IPTABLES -P FORWARD DROP # enable connection tracking $IPTABLES -A INPUT -m state --state ESTABLISHED,RELATED -j ACCEPT $IPTABLES -A OUTPUT -m state --state NEW,ESTABLISHED,RELATED -j ACCEPT $IPTABLES -A FORWARD ESTABLISHED,RELATED -j ACCEPT # create the user-defined access list $IPTABLES -N NFSCLIENTS $IPTABLES -A NFSCLIENTS -s 192.168.2.0/24 -j RETURN $IPTABLES -A NFSCLIENTS -s 192.168.3.100 -j RETURN $IPTABLES -A NFSCLIENTS -j DROP for i in $NFS_PORTS; do $IPTABLES -A FORWARD -i $EXTERNAL -p ALL dport $i \ -m state state NEW -j NFSCLIENTS $IPTABLES -A FORWARD -i $EXTERNAL -p ALL \ --dport $i -m state state NEW -j ACCEPT done # allow ssh to the firewall $IPTABLES -A INPUT -p tcp --dport 22 -j ACCEPT # final rule that lets 192.168.1.0/24 hosts communicate # with the rest of the network $IPTABLES -A FORWARD -i $INTERNAL -p ALL \ -d 0.0.0.0/0 -s 192.168.1.0/24 -j ACCEPT # enable ip forwarding echo 1 > /proc/sys/net/ipv4/ip_forward FTP Inbound: Running a Local FTP Server (Basic Rules)In this, the most basic host-based firewall configuration, the system Host-A is running an FTP server. The only services you want to allow to this system are FTP (TCP Port 21), and potentially SSH (TCP Port 22). The first example ruleset shows how to configure your firewall rules with a very strict default policy: # where $DNSSERVER is the IP address of your DNS server $IPTABLES -P INPUT DROP $IPTABLES -P OUTPUT DROP $IPTABLES -P FORWARD DROP $IPTABLES -A OUTPUT -m state --state NEW,ESTABLISHED,RELATED -j ACCEPT $IPTABLES -A INPUT -p tcp --dport 22 -m state \ --state NEW -j ACCEPT $IPTABLES -A INPUT -p tcp --dport 21 -m state \ --state NEW -j ACCEPT # this rule allows the server to perform DNS lookups $IPTABLES -A INPUT -A INPUT -p udp -m udp \ -s $DNSSERVER --sport 53 -d 0/0 -j ACCEPT This next example is right from the Redhat firewall rule generator; it demonstrates a completely different method that achieves a similar effect. The key difference is that the former ruleset uses netfilter's stateful filtering to control new connection, whereas the following ruleset uses a simpler and somewhat less secure method of determining if a connection is new. Specifically, the following rules use the syn rule to check the headers of the TCP packet to determine if it is part of an initial connection attempt. In theory, this would only allow new connections to the services allowed in these rules. # where $DNSSERVER is the IP address of your DNS server. $IPTABLES -N RH-Lokkit-0-50-INPUT $IPTABLES -A INPUT -j RH-Lokkit-0-50-INPUT $IPTABLES -A FORWARD -j RH-Lokkit-0-50-INPUT $IPTABLES -A RH-Lokkit-0-50-INPUT -p tcp -m tcp \ --dport 22 --syn -j ACCEPT $IPTABLES -A RH-Lokkit-0-50-INPUT -p tcp -m tcp \ --dport 21 --syn -j ACCEPT $IPTABLES -A RH-Lokkit-0-50-INPUT -i lo -j ACCEPT $IPTABLES -A RH-Lokkit-0-50-INPUT -p udp -m udp \ -s $DNSSERVER --sport 53 -d 0/0 -j ACCEPT $IPTABLES -A RH-Lokkit-0-50-INPUT -p tcp -m tcp \ --syn -j REJECT $IPTABLES -A RH-Lokkit-0-50-INPUT -p udp -m udp \ -j REJECT FTP Inbound: Restricting Access with Firewall RulesThis next ruleset shows how to perform the same as the previous section but limiting the hosts that can connect to the FTP server. In our example, the FTP server Host-A is using host-based firewall rules to restrict the clients that can connect to it. The networks 10.10.10.0/24 and 192.168.1.0/24 are allowed to connect to the FTP service on port TCP port 21. SSH connections are only allowed from the host 172.16.32.32. Our first example is a very short, basic method: # where $DNSSERVER is our DNS server. $IPTABLES -P INPUT DROP $IPTABLES -A INPUT -s 10.10.10.0/24 -p tcp \ --dport 21 -j ACCEPT $IPTABLES -A INPUT -s 192.168.1.0/24 -p tcp \ --dport 21 -j ACCEPT $IPTABLES -A INPUT -s 172.16.32.32 -p tcp \ --dport 22 -j ACCEPT $IPTABLES -A INPUT -A INPUT -p udp -m udp \ -s $DNSSERVER --sport 53 -d 0/0 -j ACCEPT This second example achieves the same effect with a bit more flexibility and overall network friendliness given that the REJECT will return an RST/ACK when a restricted host attempts to connect to the service, the previous rule uses -j DROP, which just tosses the packets to the side. While in effect this achieves the same thing, using a -j REJECT rule will make it easier to diagnose that they are being filtered out from the perspective of the client. # where $DNSSERVER is the IP address of your DNS server. $IPTABLES -N FTPCLIENTS $IPTABLES -A INPUT -N FTPCLIENTS $IPTABLES -A FORWARD -j FTPCLIENTS $IPTABLES -A FTPCLIENTS -p tcp -m tcp --dport 21 \ -s 10.10.10.0/24 --syn -j ACCEPT $IPTABLES -A FTPCLIENTS -p tcp -m tcp --dport 21 \ -s 192.168.1.0/24 --syn -j ACCEPT $IPTABLES -A FTPCLIENTS -p tcp -m tcp --dport 22 \ -s 172.16.32.32 --syn -j ACCEPT $IPTABLES -A FTPCLIENTS -j ACCEPT $IPTABLES -A FTPCLIENTS-p udp -m udp -s $DNSSERVER \ --sport 53 -d 0/0 -j ACCEPT $IPTABLES -A FTPCLIENTS -p tcp -m tcp --syn -j REJECT $IPTABLES -A FTPCLIENTS -p udp -m udp -j REJECT FTP Inbound: Redirecting FTP Connections to Another Port on the ServerIn this scenario, our FTP server Host-A is not running on the standard FTP port (TCP 21), so we will need to use a host-based firewall rule to forward queries to the port we're running the FTP server on. In this case, Host-A is running an FTP server on port 5050. This first example assumes that you have a restrictive policy, so our first rules are to allow connections to port 21 and 5050: $IPTABLES -A INPUT -p tcp --dport 21 -j ACCEPT $IPTABLES -A INPUT -p tcp --dport 5050 -j ACCEPT $IPTABLES -t nat -A PREROUTING -p tcp dport 21 \ -j REDIRECT to-ports 5050 # This final rule ensures that ftp connections that # originate locally are redirected $IPTABLES -A OUTPUT -t nat -p tcp -d $EXTERNALIP \ --dport 21 -j REDIRECT --to 5050 Note that this final rule is applied OUTPUTthis is because it's referring to traffic originating on the system itself. FTP Forward: Forwarding to an FTP Server Behind the Firewall on a DMZ SegmentThis configuration assumes that you have a front-end firewall (Host-A) and an FTP server (Host-B, 192.168.1.21) on a DMZ segment (192.168.1.0/24). Connections to Host-A on ports 21 will be forwarded to the FTP server Host-B on the DMZ segment. Figure 16.4 describes the design. Figure 16.4. Forwarding to an FTP server on a DMZ segment through the firewall.[**]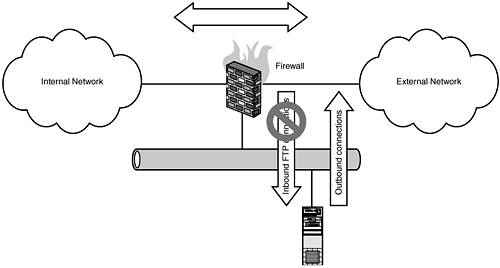
When working with this type of setup, one of the first things to keep in mind is that there are two separate netfilter kernel connection tracking modules that must be loaded to get this to work. They are ip_conntrack_ftp ip_nat_ftp These modules are both configured by default on the commercial Linux distributions, like Redhat and SuSE. If your system does not have these modules installed, or if you're using a custom kernel, ensure that you have the following configured in your kernel: Kernels 2.4.x Networking options ---> IP: Netfilter Configuration ---> Connection tracking (required for masq/NAT) <M>FTP protocol support Kernels 2.6.x Device Drivers ---> Networking support ---> Networking options ---> Network packet filtering (replaces ipchains) ---> IP: Netfilter Configuration ---> FTP protocol support This first configuration demonstrates the rules in the previous diagram using DNAT/SNAT rules, where the firewall's DMZ IP address is 192.168.1.1: # where eth0 is the external interface (Internet) # where eth1 is the internal interface (10.10.10.0/24) # where eth2 is the DMZ interface (192.168.1.0/24) EXTERNAL=eth0 INTERNAL=eth1 DMZ=eth2 SERVER=192.168.1.21 $IPTABLES -A FORWARD -i $EXTERNAL -o $DMZ -p tcp \ --dport 20:21 -m state \ --state NEW,ESTABLISHED,RELATED -j ACCEPT $IPTABLES -t nat -A PREROUTING -i $EXTERNAL -p tcp \ --dport 20:21 -j DNAT --to-destination $SERVER Note the use of dport 20:21; this is specifying a range of ports, specifically ports 20 and 21. FTP Forward: Forwarding to Multiple FTP Servers Behind the Firewall on a DMZ SegmentThis next example demonstrates the previous configuration, but with multiple FTP servers. The firewall, Host-A in this case, has multiple Internet IPs on its external interface, 11.22.33.44 and 11.22.33.45. These IP addresses are assigned to two separate internal FTP servers. Host-B (192.168.1.80) receives FTP traffic destined to 11.22.33.44, and Host-C (192.168.1.81) receives FTP traffic destined to 11.22.33.45. # where eth0 is the external interface (Internet) # where eth1 is the internal interface (10.10.10.0/24) # where eth2 is the DMZ interface (192.168.1.0/24) EXTERNAL=eth0 INTERNAL=eth1 DMZ=eth2 HOSTB=192.168.1.10 HOSTC=192.168.1.11 IP_HOSTB=11.22.33.44 IP_HOSTC=11.22.33.45 # Host-B rules $IPTABLES -A FORWARD -i $EXTERNAL -o $DMZ \ -d $IP_HOSTB -p tcp --dport 20:21 -m state \ --state NEW,ESTABLISHED,RELATED -j ACCEPT $IPTABLES -t nat -A PREROUTING -i $EXTERNAL -p tcp \ -d $IP_HOSTB --dport 20:21 -j DNAT \ --to-destination $HOSTB # Host-C rules $IPTABLES -A FORWARD -i $EXTERNAL -o $DMZ \ -d $IP_HOSTC -p tcp --dport 20:21 -m state \ --state NEW,ESTABLISHED,RELATED -j ACCEPT $IPTABLES -t nat -A PREROUTING -i $EXTERNAL -p tcp \ -d $IP_HOSTC --dport 20:21 -j DNAT \ --to-destination $HOSTC Figure 16.5. A multi-IP, multi-FTP server DMZ.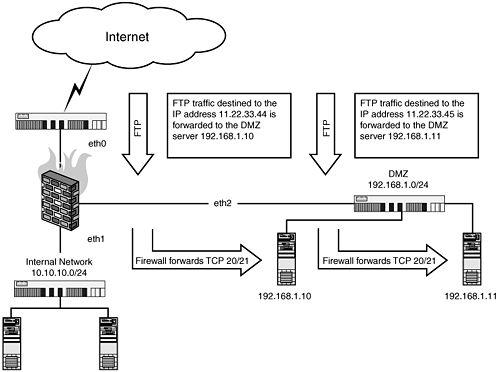 FTP Forward: From One Internet Server to Another Internet ServerWe see this particular scenario all the time when dealing with systems in the hosting space. It's a fairly migratory business with servers moving between the large hosting providers or between IP space frequently. The idea is to move your content and services to the new system and set up firewall rules on the old system to DNAT traffic from the old server to the new server. This is the case typically until all the content and users have been moved to the new server and all the DNS and registrar records have been changed to point to the new server. These rules work almost the same as a regular FORWARD rule, the main difference is that our new server is only going to communicate back through the old server when it sends traffic its way. Otherwise, it communicates as its normal IP addressthrough its normal network with no NAT-ing. In this example, we have two hosts, Host-A (11.22.33.44), which is our old server, and Host-B (22.33.44.55), our new system. We add the following rules to Host-A: #!/bin/sh IPTABLES="/sbin/iptables" EXTERNAL=eth0 OLDSERVER=11.22.33.44 NEWSERVER=22.33.44.55 # load the ip_connection tracking modules for ftp modprobe ip_conntrack_ftp modprobe ip_nat_ftp $IPTABLES -A FORWARD -i $EXTERNAL -o $EXTERNAL \ -p tcp --dport 20:21 -d $OLDSERVER -m state \ --state NEW,ESTABLISHED,RELATED -j ACCEPT $IPTABLES -t nat -A PREROUTING -i $EXTERNAL -p tcp \ --dport 20:21 -d $OLDSERVER -j DNAT \ --to-destination $NEWSERVER $IPTABLES -t nat -A POSTROUTING -p tcp -dport 20:21 -d $NEWSERVER \ -j SNAT --to $OLDSERVER # Enable IP Forwarding in the kernel echo 1 > /proc/sys/net/ipv4/ip_forward If all this seems familiar, this is because this is exactly the same thing we did for web traffic in the previous chapter, with one exceptionwe have to add a ruleset for the FTP-data channel on port 20 and make sure the ip_conntrack_ftp and ip_nat_ftp modules are loaded. FTP Forward: Restricting FTP Access to a Forwarded ServerThis next ruleset demonstrates how to limit the hosts that can connect to the forwarded FTP server. In this example, our firewall Host-A forwards connections to the internal server Host-B (192.168.1.21). The following network is allowed to connect 22.33.44.0/24 (Internet) to the FTP TCP ports 20 and 21. This first configuration demonstrates the rules needed to achieve this type of configuration using DNAT rules: #!/bin/sh IPTABLES="/sbin/sh" # where eth0 is the external interface (Internet) # where eth1 is the internal interface (10.10.10.0/24) # where eth2 is the DMZ interface (192.168.1.0/24) EXTERNAL=eth0 INTERNAL=eth1 DMZ=eth2 # Our internal DMZ servers SERVER=192.168.1.21 # load the ip_connection tracking modules for ftp modprobe ip_conntrack_ftp modprobe ip_nat_ftp # clear our old rules $IPTABLES -F $IPTABLES -X # create our Allow lists $IPTABLES -N FTPCLIENTS $IPTABLES -A FTPCLIENTS -s 22.33.44.0/24 -j RETURN $IPTABLES -A FTPCLIENTS -j DROP $IPTABLES -A FORWARD -i $EXTERNAL -p tcp \ --dport 20:21 --m state \ --state NEW,ESTABLISHED,RELATED -j FTPCLIENTS $IPTABLES -A FORWARD -i $EXTERNAL -p tcp \ --dport 20:21 - -m state \ --state NEW,ESTABLISHED,RELATED -j ACCEPT $IPTABLES -t nat -A PREROUTING -i $EXTERNAL -p tcp \ --dport 20:21 - -j DNAT --to-destination $SERVER # Enable IP Forwarding in the kernel echo 1 > /proc/sys/net/ipv4/ip_forward The use of the user defined chain FTPCLIENTS allows the firewall administrator an easier method of modifying the allow list without having to customize a large number of rules. New users can be added to the FTPCLIENTS chain quickly. FTP Outbound: Connections are Established, but Directories Cannot Be Listed, and Files Cannot Be DownloadedIn this example, internal systems on the network 10.10.10.0/24, behind the firewall Host-A, can successfully connect to FTP servers on the external side of the firewall. However, returning DATA port connections are not successfully transmitted through the firewall. The result is that commands in the FTP session appear to hang when performing commands that return data (ls, get, and so on). Figure 16.6. Outbound FTP connections are established, directories cannot be listed, files cannot be downloaded.[**]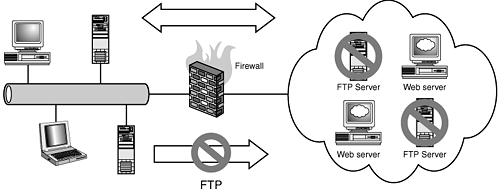
This is a very common problem that is indicative of the FTP connection tracking module either not being built into the kernel, or if this is a modular kernelnot loaded. Assuming you have a modular kernel, run the following command: modprobe ip_conntrack_ftp If you do not have this module or your kernel is compiled without module support, you will need to compile it in the following: Kernels 2.4.x Networking options ---> IP: Netfilter Configuration ---> FTP protocol support Kernels 2.6.x Device Drivers ---> Networking support ---> Networking options ---> Network packet filtering (replaces ipchains) ---> IP: Netfilter Configuration ---> FTP protocol support |
|
- ERP Systems Impact on Organizations
- The Second Wave ERP Market: An Australian Viewpoint
- The Effects of an Enterprise Resource Planning System (ERP) Implementation on Job Characteristics – A Study using the Hackman and Oldham Job Characteristics Model
- Data Mining for Business Process Reengineering
- Development of Interactive Web Sites to Enhance Police/Community Relations