Creating a Plan to Offer Remote Assistance to Client Computers
|
EXAM 70-293 OBJECTIVE 3, 5.4.1
Remote Assistance is a new feature that’s designed to allow Windows XP Professional and Windows Server 2003 users to request help from another user. The user requesting help typically sends an request for assistance using Windows Messenger or e-mail via the Help and Support Center. The request includes an attachment that contains details of how to connect to the user’s PC that the recipient will double-click to begin a Remote Assistance session with the requesting user’s PC. Once connected, the helper can view the desktop of the requesting user and chat online with him or her. The helper can also, with the user’s permission, take control of his desktop.
How Remote Assistance Works
Remote Assistance (RA) enables a user at one computer, referred to as the “Novice”, to request help from a user at another computer, called the “Expert”. The underlying technologies at work with RA are Windows Terminal Services, and the RDP protocol. Although these are the same technologies that were originally developed for thin client computing and that are used for RDA and terminal server, Remote Assistance is not designed to be a thin client solution, but rather a support and troubleshooting tool only. Another difference between RA and traditional Terminal Services is that typically a session will be initiated when a Novice sends an invitation to a Expert, soliciting their assistance. The Novice must typically be present at the machine that needs assistance in order to allow the Expert to access his or her system after the Expert receives and accepts the invitation.
A Remote Assistance request can optionally include an “expiry” (expiration) date, after which the Remote Assistance request is no longer valid. This is used to reduce the risk of unauthorized access to the user’s computer. The user requesting help can also require the helper to use a password to connect to his or her computer. The user must communicate this password to the helper. Users can review their invitations in the Help and Support Center. Figure 7.24 shows a summary of invitations that have been sent from a particular computer. Using RA, the Expert actually views and interacts with the same desktop and applications that the Novice is using, at the same time that the Novice is using it. This is very different from the other forms of Terminal Services, in which a connection is established to a unique session on the Terminal Services computer. During an RA session, both the Novice sitting at the keyboard and the remote assistant (Expert) can control the computer at the same time. With Remote Desktop for Administration or the terminal server role, a user can connect from a wide range of client systems without permission, provided the user has a valid username and password.
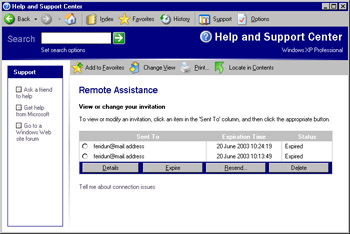
Figure 7.24: Summary of Remote Assistance Invitations
Just as with any form of Terminal Services, Remote Assistance uses the RDP protocol so that only screen updates are sent to the client (in this case, the Expert) while keystrokes and mouse movements are sent back to the server (in this case, the Novice). In this way, RA provides remote support and control of client desktops while involving very little use of bandwidth.
Using Remote Assistance
As with Remote Desktop for Administration, the Remote Assistance (RA) components of Windows 2003 are installed with the operating system. And, just as Remote Desktop for Administration needs to be enabled and configured before you can use the feature, the same is true for RA.
Two major components comprise the default RA installation: the Terminal Services service and the Remote Desktop Help Session Manager service. In addition to installing these two components, Microsoft also creates a special user account for connections involving RA, called HelpAssistant_XXXXXX. On your system, the X’s will be replaced with a unique alphanumeric code, and the account name will appear as something similar to this: HelpAssistant_e4bb43. This account will be disabled until you enable RA. As we’ve mentioned, although RA is based on and uses Terminal Services, it works very differently from Remote Desktop for Administration or the terminal server role. Let’s take a closer look at how RA works.
| Test Day Tip | Be sure that you are familiar with Remote Assistance (RA). As a new component in the Windows server family, and one that relates directly to test objectives, it is likely to be featured in one or more exam questions. |
Configuring Remote Assistance for Use
RA is relatively easy to configure; you use the same tab that is used to configure Remote Desktop for Administration. To enable RA, go to Control Panel and select the Remote tab in the System properties. Select the check box next to Turn on Remote Assistance and allow invitations to be sent from this computer, located in the Remote Assistance section of the tab.
Invitations do not stay valid indefinitely. They have an expiration time of one hour by default, but the Novice can alter the expiration time of the invitations he or she sends, from 0 minutes to 99 days. The acceptance and opening of a session in response to an invitation does not cause it to expire; it is good until it reaches the specified expiration time. In other words, if you save an invitation to a file with an expiration time of 30 days, that invitation can be used to establish RA connections as many times as desired within that 30-day timeframe. To modify the default expiration time, perform the following steps:
-
Click Start | Control Panel | System.
-
Click the Remote tab.
-
Click the Advanced… button.
-
Choose the desired number (0 to 99) and interval (minutes, hours, or days) under the Invitations section in the Remote Assistance Settings dialog box, as shown in Figure 7.25.
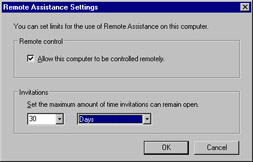
Figure 7.25: The Remote Assistance Settings Dialog Box
In addition to modifying the expiration time, the Remote Assistance Settings dialog box can be used to enable the Expert to control the Novice’s desktop and applications during an RA session, or alternately prevent them from doing so. When the Allow this computer to be controlled remotely box is checked, the Expert will be allowed to send mouse and keyboard input to the Novice’s system and interact directly with his or her desktop and applications. When it is unchecked, the Expert will be able to see the Novice’s desktop and any actions the Novice performs, but cannot control the cursor or send keyboard commands.
| Note | It is important to be aware that, when you enable Remote Assistance (RA), the Allow this computer to be controlled remotely checkbox is enabled by default. |
Asking for Assistance
A Novice can use a variety of methods to send an invitation using Remote Assistance:
-
The request can be sent using Windows Messenger.
-
The request can be sent via e-mail.
-
The request can be saved to a file.
To create an invitation, open Help and Support from the Windows Start menu. On the right side of the Help and Support Center utility, click Remote Assistance under the Support heading. In the next screen, click the Invite someone to help you link. You will then be able to select the method that you want to use in asking for assistance, as shown in Figure 7.26.
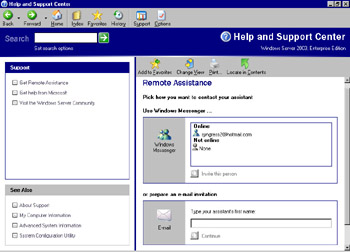
Figure 7.26: The “Pick how you want to contact your assistant” Screen in Remote Assistance
| Exam Warning | Although a Remote Assistance (RA) session can be solicited using an invitation sent in a file or via e-mail, Microsoft emphasizes sending an invitation using Windows Messaging. You should make sure you are familiar with all of the details of this method of solicitation. |
Using Windows Messenger to Request Help
Windows Messenger is a chat program available from Microsoft and installed in Windows XP by default that is similar to ICQ and AOL Instant Messenger. (MSN Messenger is a separate but related application; both use the .NET Messenger Service). When you use Windows Messenger for RA, the invitation travels through a messaging server infrastructure that can include the Internet, or can work with Microsoft Exchange Server within the LAN. Expert and Novice ”tickets” (data packets) that contain connection information are exchanged through this infrastructure. However, after these have been exchanged, the actual RDP connection attempt and subsequent session take place directly between the Novice and Expert computers.
Windows Server 2003 does not install Windows Messenger by default. If you have not installed it prior to arriving at the Remote Connection screen, you will only see a link notifying you that it is not installed and prompting you to download and install it. If Messenger is installed, the user from whom you wish to solicit help must be on the network and logged on to his or her Windows Messenger client. If this is the case, you can click the name of the contact from whom you want to solicit assistance, followed by the Invite this person link. The person you invited can then accept the invitation. A Remote Assistance dialog box will display on your screen until the person accepts, or until you click the cancel button on the dialog box.
You can also request assistance from within the Windows Messenger application, by double-clicking a contact to establish a conversation with him or her and then selecting the Ask for Remote Assistance link on the right side of the conversation window. This will add a notification to your conversation window, with a link on which you can click to cancel the request. You will also be notified in the conversation window when the person receives and accepts your request.
Remember that Remote Assistance only works on computers running Windows XP and 2003. If your invitation is sent to a person at a computer running the Windows 2000 or earlier operating system, or a non-Microsoft operating system, it will not be received.
Responding to a Request for Help Using Windows Messenger
If the Expert to whom an invitation is sent has the Windows Messaging application running, a request from a Novice for assistance will be displayed in a Conversation window on the Expert’s system. The Expert can click the Accept link in the window (or use the key combination Alt + T) to initiate the connection, or click the Decline link (or use the key combination Alt + D) to reject it. If it is neither accepted nor declined before the invitation expires, the Expert will be unable to establish a connection in response to that invitation.
Using E-Mail to Request Help
To use e-mail to send an RA invitation, you must first have a default mail client configured on the Windows Server 2003 computer. This mail client can be Microsoft Outlook Express, which is installed with Windows, Outlook (installed as a separate application or with Microsoft Office), or a third-party mail application. To create an RA invitation using e-mail, follow these steps:
-
Open the Help and Support utility from the Window’s Start menu.
-
On the right side of the Help and Support Center screen, click Remote Assistance under the Support heading.
-
On the next screen that is displayed, click the Invite someone to help you link.
-
On the next screen, under the or prepare an e-mail invitation section, type the first name of the person you want to use as an Expert in the Type your assistant’s first name: text box and click the Continue link.
-
The next screen contains two sections. The first is entitled Set the invitation to expire and contains a drop-down box for specifying a number between 0 and 99 and an interval drop-down box with selections for minutes, hours, or days. This means the possible time period during which the invitation is valid ranges from 0 minutes to 99 days.
-
The second section of this screen is entitled Require the recipient to use a password and is enabled by a check box. The check box is selected and this section is enabled by default. The intent is that, should the invitation accidentally fall into the wrong hands, a password would still be required to use it. Obviously, you should not include the password in the e-mailed invitation. Instead, you should communicate it to the person in some other manner (for example, by telephone). The password is entered twice, once in the Type password: text box and again in the Confirm password: text box.
-
After the password had been entered into each box, the Create Email Invitation button at the bottom of the screen activates and can be clicked.
-
The final screen is entitled Was the e-mail invitation successfully sent? When you clicked the Create Email Invitation button on the previous screen, your default e-mail program should have launched, with an e-mail created and ready to be sent to the person whose assistance you are requesting. This final screen alerts you to this and gives you the option to recreate the mail message in case you accidentally closed the window when it popped open. At the bottom of the screen are links to manage your outstanding invitation requests and create additional invitations. After you send the e-mail, you’ve finished the process of asking for remote assistance using the e-mail method.
Responding to a Request for Help From an E-Mail Request
When e-mail has been used to send you an invitation for remote assistance, a short e-mail message entitled “YOU HAVE RECEIVED A REMOTE ASSISTANCE INVITATION” will show up in your inbox. The message will contain a link to click, which will look something like this:
https://www.microsoft.com/remoteassistance/s.asp#1AjK8A2TD,4H8SQYYfvIpQF5prHYajr
ReyrAd2j6oHb4Qe/Eo1Ahs=,zb2.0RJ81UIfxb4Xfkp8thzdy8A=Z.
When you click the link, your browser will open to a page on Microsoft’s Web site. The entire process of the two computers finding each other using this method takes place through Microsoft’s Web site. In addition, email-based Remote Assistance depends on a downloaded control.
When you visit the site, a Security Warning dialog box will appear and you will be prompted to specify whether you wish to install the Remote Assistance Server Control. If you select Yes, the control will download and the page will load. If you are not accessing the page from a Windows XP or Server 2003 computer, a message will display, informing you that you must be running one of these operating systems to complete the connection. If you are accessing the Web page from a Windows XP or 2003 computer, you will see a button entitled Start Remote Assistance in the middle of the Web page. When you click this button, a small Remote Assistance dialog box appears, prompting you to enter the password associated with the invitation (if one was used). After you have typed in the password, click the Yes button to begin the connection.
Using a Saved File to Request Help
The third and final way of requesting assistance is to use a saved file. Obviously, if you use this method, you need to somehow transfer the file containing the invitation to the Expert. This can be done in one of several ways:
-
You can e-mail the file.
-
You can save the file to a share on the network.
-
You can create a link to the file on a Web page.
-
You can save the file on a floppy diskette and hand it to the person.
To create an RA invitation using a saved file, open the Help and Support utility from the Windows Start menu. On the right side of the Help and Support Center screen, click Remote Assistance under the Support heading. In the next screen that is displayed, click the Invite someone to help you link.
At the bottom of the next screen, click the Save invitation as a file (Advanced) link. This leads to a screen that contains two parts. The first is entitled Enter your name and it contains a text box into which you type your name. When you send someone a request using Windows Messenger or e-mail, the recipient can easily see who sent the request. This is not true with a file-based request, so this dialog box is used to embed that information into the request and make it readily available to the Expert.
The second portion of this screen is entitled Set the invitation to expire and contains a drop-down box that enables you to specify a number between 0 and 99, and an interval drop-down box with selections for minutes, hours, or days. The possible range for the duration of a valid invitation is from 0 minutes to 99 days.
After you fill in the requested information, click the Continue > button at the bottom of the screen. The following page contains a section entitled Require the recipient to use a password, which can be enabled by checking a check box. By default, the check box is selected and this requirement is enabled. Again, the intent is that if the invitation accidentally falls into the wrong hands, at least a password will be required to use it. The password must be entered twice, once in the Type password: text box and again in the Confirm password: text box.
After the password has been entered into each box, the Save Invitation button at the bottom of the screen activates and can be clicked. This displays a Save As dialog box that enables you to specify a name and location for the file. The file will be saved with an .msrcincident extension. After it is saved, the final screen is displayed. It confirms the file name and where it was saved. At the bottom of the screen, there are links to manage your outstanding invitation requests and create additional invitations. Exercise 7.12 walks you through the steps of creating a saved file to use with Remote Assistance.
Exercise 7.12: Creating a Saved File for Requesting Help
-
Open the Help and Support utility from the Windows Start menu.
-
On the right side of the Help and Support Center screen, click Remote Assistance under the Support heading.
-
On the next screen that is displayed, click the Invite someone to help you link.
-
At the bottom of the next screen, click the Save invitation as a file (Advanced) link.
-
In the Enter your name text box, type your name
-
In the Set the invitation to expire drop-down boxes, specify when the invitation should expire and then click the Continue > button.
-
Type the password you would like to use in the Type password: and Confirm password: text boxes. If you do not wish to use a password, clear the check box next to Require the recipient to use a password.
-
Click the Save Invitation button at the bottom of the screen.
-
In the Save As dialog box, specify a name and location for the file.
-
Review the information on the final screen and close the Help and Support utility.
Responding to a Request for Help that was made using a Saved File
Responding to a remote assistance request that has been saved to a file is a simple matter of double-clicking the file. When you do this, a small Remote Assistance dialog box appears, asking you to enter the password associated with the invitation if one was specified. After you type in the password, click the Yes button to initiate the connection. In the following section, we show you how to complete the connection process for each of the methods described, and demonstrate what you can do when the connection has been established.
Completing the Connection
After the Expert user accepts a request for assistance, a small Remote Assistance dialog box pops up on the Expert’s computer with a message indicating that a connection is being attempted. When the connection is established, the full Remote Assistance application opens, displaying a status message that says it is waiting for an answer from the Novice computer. When the connection is accepted by the Novice user, the status of the Remote Assistance application changes to connected.
During this time, the Novice’s system displays a small Remote Assistance dialog box that asks the user if he or she wants to allow the Expert to view the computer’s screen and chat with him or her. If the Novice clicks the No button, the connection is rejected. If the Novice clicks the Yes button, the connection is established. If too much time passes after the Expert attempts to establish the connection and before the Novice accepts it, a dialog box opens to inform the Novice that the invitation was accepted but has expired. This dialog box also states that a new invitation needs to be generated and offered. A dialog box is also displayed on the Expert’s computer, indicating that the remote connection could not be established. When a connection is successfully established, a Remote Assistance application opens on the Novice’s system.
Using the Completed Connection as the Expert
The Remote Assistance application on the Expert’s computer consists of a tool bar across the top, a chat option on the left side and a replica of the Novice’s remote desktop on the right. This is shown in Figure 7.27.
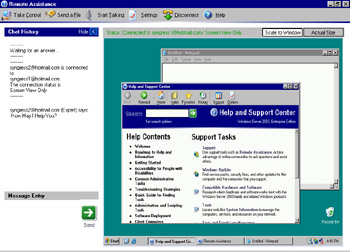
Figure 7.27: The Remote Assistance Utility on the Expert’s Computer
The buttons on the tool bar across the top include the following:
-
Take Control Initiates a request to enable the Expert to remotely control the cursor and keyboard input on the Novice’s computer. When this button is clicked, a dialog box pops up on the Novice’s computer, asking the Novice to allow or reject control by the Expert. Remote control is only possible if the Allow this computer to be controlled remotely box is checked on the Remote tab of the System properties in Control Panel. If remote control is accepted by the Novice, a dialog box appears in the Remote Assistance application on the Expert’s computer over the display of the Novice’s desktop, stating that remote control has been accepted. Either party can end the remote control at any time by using the ESC key. After remote control is established, the Remote Control button changes to read Release Control and can be clicked to end the remote control of the session without ending the RA session itself. Both the Novice and Expert can control the cursor and keyboard input for the Novice’s system, so it is recommended that only one party be using the pointing device or typing at any given time. The Expert can use Remote control by clicking on the Novice desktop that is displayed in his or her Remote Assistance application.
-
Send a File Enables you to transmit a file from the Expert’s to the Novice’s computer.
-
Start Talking Establishes an audio connection between the Novice’s and Expert’s computers for voice and/or video communication. When this button is clicked, the Audio and Video Tuning Wizard opens. The wizard enables you to specify and test your microphone, audio card, and other related settings.
-
Settings Opens the Remote Assistance Settings dialog box and enables adjustment of audio quality in accordance with the capacity of the underlying network. The Audio and Video Tuning Wizard, mentioned in the previous bullet point, can also be opened from this dialog box.
-
Disconnect Terminates the connection between the Novice’s and Expert’s computers and ends the RA session.
-
Help Displays the About Remote Assistance help screen.
The left side of the Remote Assistance application on the Expert’s computer contains a chat window. This enables the Novice and Expert to exchange text messages. In addition to chat communication, this portion of the application also contains status messages (such as the names of users who are part of the connection, whether remote control is enabled, how to stop remote control, etc.
The right side of the Remote Assistance application on the Expert’s computer displays the desktop of the Novice’s system. When the connection is initially established, the desktop appears in View Only mode. This enables the Expert to view the desktop of the Novice, but the Expert cannot interact with it. The Expert can still exchange text messages or voice communications with the Novice in this mode, and can exchange files. If the Expert and Novice agree to switch from View Only to Remote Control, the Expert can then interact with the remote desktop and applications on the Novice’s system. To do this, the Expert uses his or her pointing device and keyboard to select and input data into the desktop that is displayed on the right side of the Remote Assistance application.
Using the Completed Connection as the Novice
The Remote Assistance application on the Novice’s computer consists of a chat window on the left side and a series of option buttons along the right, shown in Figure 7.28.
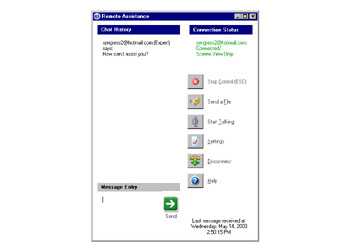
Figure 7.28: The Remote Assistance Utility on the Novice’s Computer
This application enables the Novice to send messages to and receive messages from the Expert. It also contains the following buttons:
-
Stop Control Terminates the ability of the Expert to control the cursor and keyboard input on the Novice’s computer.
-
Send a File Enables transmitting a file from the Novice’s to the Expert’s computer.
-
Start Talking Establishes an audio connection between the Novice and Expert computers for voice and/or video communication. When clicked, the Audio and Video Tuning Wizard opens. The wizard enables you to specify and test your microphone, speaker, and related settings.
-
Settings Opens a dialog box that enables the adjustment of audio quality in accordance with the capacity of the underlying network. The Audio and Video Tuning Wizard can also be opened from this dialog box.
-
Disconnect Terminates the connection between the Novice’s and Expert’s computers and ends the RA session.
-
Help Brings up the About Remote Assistance help screen.
The left side of the Remote Assistance application on the Novice’s computer contains a chat window. This enables the Novice and Expert to exchange text messages. In addition to chat communication, the left side of the application also displays status messages such as the names of users who are part of the connection, whether remote control is enabled, how to stop remote control, etc.
Managing Open Invitations
Sometimes you might want to know the names of users with whom you have active RA invitations open. You might want to cancel an invitation because you’ve solved the problem or because you want someone else to help you. Help and Support Center provides a number of options for managing open invitations.
To manage your active invitations, follow these steps:
-
Open the Help and Support utility from the Windows Start menu.
-
On the right side of the Help and Support Center screen, click Remote Assistance under the Support heading.
-
On the following screen, click the View Invitation Status (X) link. The (X) will be replaced on your screen by the number of invitations you have outstanding.
-
The next screen will show you a list of the invitations that are outstanding. The list consists of three columns: Sent To, Expiration Time, and Status. The Sent To column contains the name of the person to whom you sent the Windows
Message or e-mail. If you saved the request to a file, this column will display the word “Saved.” The Expiration Time column will show the date and time that the invitation will expire. The Status column will show whether the invitation’s status is Open or Expired. Now you can view or modify any of these invitations.
Each invitation will have a radio button next to it, as shown in Figure 7.29. You can click a radio button to select one of the invitations, and then choose an action to perform using the buttons under the list box. The buttons include:
-
Details Enables you to view to whom the invitation was sent, when it was sent, when it expires, its current status, and whether it is password protected.
-
Expire Enables you to cause an invitation to expire immediately, regardless of the expiration time that was set when the invitation was originally created.
-
Resend… Can be used only with expired invitations. When selected, this option displays a screen that walks you through the creation process for the invitation all over again. Remember that the request was originally saved to a file or sent via e-mail. Because of this, the screens and options presented are identical to those outlined earlier in the chapter.
-
Delete Enables you to permanently delete the invitation. If the invitation’s status is Open when you select to delete it, a dialog box will pop up, informing you that the invitation will not be usable for connection. If the invitation’s status is Expired, it is simply deleted and no pop-up box appears.
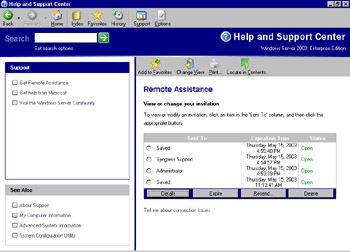
Figure 7.29: The “View or change your invitation settings” Screen in Remote Assistance
Offering Remote Assistance to your Clients
Although the usual method is for the user requesting help to initiate the Remote Assistance session, it is also possible within a domain for a helper to offer assistance. An administrator can set group policy to prevent users from requesting remote assistance, or to restrict whether users will be able to enable a helper to remotely control their computers or only view them.
To configure your clients to accept Remote Assistance offers, you must ensure that the following three conditions are met:
-
The Group Policy on the computer of the novice user must be configured to enable Remote Assistance offers.
-
The computers of the novice and expert users must be members of the same domain, or members of trusted domains.
-
Both computers must have Windows XP installed (or a newer operating system).
To configure Group Policies for Remote Assistance, you’ll need to create a list of “Expert” users from that “Novice” users can accept Remote Assistance offers from. This list must consist of Domain User groups and Domain User accounts. Exercise 7.13 describes how to configure Group Policy to allow your Expert users to offer Remote Assistance to your clients.
Exercise 7.13: Configuring Group Policy Settings
-
Start the Microsoft Management Console (MMC) Group Policy snap-in: Click Start, click Run, and then in the Open box, type: gpedit.msc. Click OK to continue.
-
Locate the Offer Remote Assistance policy under Local Computer Policy | Computer Configuration | Administrative Templates | System | Remote Assistance folder.
-
Double-click Offer Remote Assistance.
-
On the Offer Remote Assistance Properties dialog box, click Enable.
-
Select whether or not Expert users will have View Only access to the Novice user’s computer or View and Control access.
-
Click Show. The Show Contents dialog box is displayed.
-
Click Add to add the groups that Expert users will be able to offer assistance to.
-
Click OK, and then click OK again to close the Show Contents dialog box and the Offer Remote Assistance Properties dialog box.
-
Quit the MMC Group Policy snap-in.
These policies are effective immediately. You do not need to restart the client computers for the settings to take effect.
| Note | Experts attempting to offer Remote Assistance will not be able to connect to a Novice computer where Solicited Remote Assistance is disabled. |
Once you’ve configured Group Policy to allow you to offer Remote Assistance to your users, you can establish a connection using the following steps:
-
Click Start, and then click Help and Support.
-
Under Support Tasks, click Tools.
-
Under Tools in the left pane, click Help and Support Center Tools.
-
Under Help and Support Center Tools, click Offer Remote Assistance.
-
Type the name or the IP address of the computer you want to connect to, and then click Connect.
-
Follow the directions that appear on the screen.
Exam Warning Although an assistant can offer Remote Assistance without being asked, the user must give permission before the assistant can see the user’s computer. In addition, the user must give explicit permission before the assistant can control the user’s computer (if that feature is enabled).
Remote Assistance Security Issues
RA is a valuable tool, but it also contains serious security risks that must be planned for and managed. RA makes it easy for any user to ask virtually anyone using a Windows XP or Server 2003 computer to connect to his or her desktop. This person can be inside or a friend that is outside of your company. Although an outside person may be qualified to assist the user, in doing so they will likely receive full control of a client in your network.
This, of course, is unacceptable, because they could place malicious software on the system while in control of it, view sensitive company information that normally isn’t allowed outside of the organization, etc. The best way to prevent this is to use your company’s firewalls to prevent connection to RA from outside the company’s network. RA uses the same port that all Terminal Services components do, 3389. Simply blocking this port on your external firewalls prevents this type of unauthorized access.
Several other key security concerns should be addressed in your company’s remote assistance policies. E-mail and file-based invitations enable you to specify passwords. An invitation without password protection can be used by anyone that receives it by accident or intercepts it illegitimately. Because of this, always mandate the use of these passwords.
Your company may also want to protect traffic that contains RA requests. E-mail is normally sent in unencrypted form on the network. This means that the URL that is sent in the e-mail invitation is available for easy interception while it is in transit on the network. Likewise, a simple XML format is used for the invitation file. A simple pattern match could be used when monitoring the network to detect and automatically save this information to an unauthorized system while it is being sent across the network. If the e-mail or file invitations do not have passwords, they can be used immediately when they are captured in this way. Even if a password is specified, there is no limit to the number of times requests like these can be used for connection. A brute force attack could be used to attempt to break the password and successfully establish a session. For this reason, it is important that your remote assistance policy also specify a short expiration time for the invitation. Once expired, no connections are possible with it. A shorter time reduces the chances of success using a brute force attack. And if no password is specified, at least the open window for misuse of the invitation is shorter.
You should also educate your users on when it is appropriate to accept RA requests. As mentioned previously, a request saved to a file is stored in a standard XML file. These can easily be modified to perform malicious actions when run by a user on a local system. The e-mail request contains a URL to click and can also be altered. In this case it may take the user to a page that performs malicious actions on their local system, or requires the download and installation of an unauthorized ActiveX control that is designed to appear legitimate to the user. Even an unsolicited request received through Windows messaging has security worries.
The best option is to maintain a tight policy that asks users to reject RA invitations in all but a few instances. What is acceptable will relate specifically to your company. Some organizations allow acceptance only from immediate co-workers and known help desk staff. Others are more liberal and allow invitations to be accepted from any verifiable employee within the company. The most important rule is to not allow connections from outside of the organization. Again, this can be further prevented by the use of firewall rules.
|
EAN: 2147483647
Pages: 173