Planning Enrollment and Distribution of Certificates
|
EXAM 70-293 OBJECTIVE 6, 6.1, 6.2.2
For a PKI client to use a certificate, two basic things must happen. First, a CA has to make the certificate available and Second, the client has to request the certificate. Only after these first steps can the CA issue the certificate or deny the request. Making the certificate available is done through the use of certificate templates and is a topic that we discuss in detail section. As for the client, there are three methods of requesting certificates – all three of which are essential to a thorough understanding of PKI:
-
Auto-enrollment
-
The Certificates snap-in
-
The Certificates Web page
We will discuss each in more detail in the section titled Certificate Requests.
Certificate Templates
A certificate template defines the policies and rules that a CA uses when a request for a certificate is received. Many built-in templates can be viewed using the Certificate Templates snap-in (see Figure 12.17). The snap-in can be run by right-clicking the Certificate Templates container located in the Certification Authority console (described in Exercise 12.02) and clicking Manage. You can use one of the built-in templates or create your own.
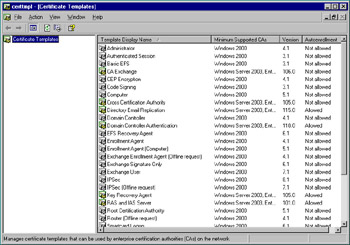
Figure 12.17: Certificate Templates Snap-In
When creating your own template, you have multiple options that will guide the CA in how to handle incoming requests. The first step in the creation process is to duplicate an existing template. You do this by using the Certificate Templates snap-in, then right-clicking the template you wish to copy and selecting Duplicate Template. On the General tab that appears by default (seen in Figure 12.18), there are time-sensitive options such as validity period and renewal period. Note the default validity period of one year and the default renewal period of six weeks. There are also general options such as the template display name and a check box for publishing the certificate in Active Directory.
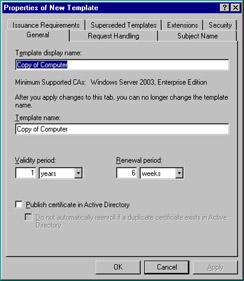
Figure 12.18: General Tab of the New Template Property Sheet
The Request Handling tab, shown in Figure 12.19, has options including minimum key size and certificate purpose. The certificate purpose can be encryption, signature, or signature and encryption. There is also an option to allow the export of the private key. Finally, you can instruct the CA how to act when the subject’s request is received and which CSPs to use.
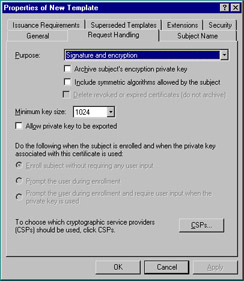
Figure 12.19: Request Handling Tab of the New Template Property Sheet
The Subject Name tab seen in Figure 12.20 gives you the choice of obtaining subject name information from Active Directory or from the certificate request itself. In the latter case, auto-enrollment (which we’ll discuss later in the chapter) is not available.
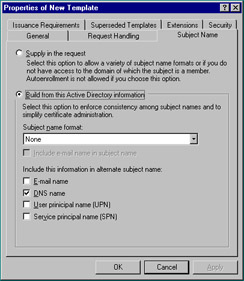
Figure 12.20: Subject Name Tab of the New Template Property Sheet
The Issuance Requirements tab seen in Figure 12.21 enables you to suspend automatic certificate issuance by selecting the CA certificate manager approval check box.
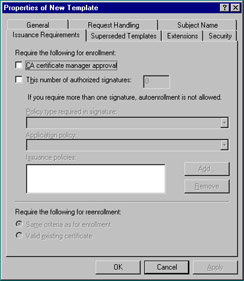
Figure 12.21: Issuance Requirements Tab of the New Template Property Sheet
The Superseded Templates tab, as shown in Figure 12.22, is used to define which certificates the current template supersedes. Usually, this tab is used to configure a template that serves several functions; e.g., IPSec and EFS. In this case, a template used only for IPSec or a template used only for EFS would be placed on the superseded templates list.
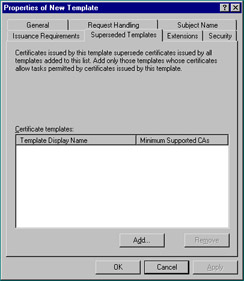
Figure 12.22: Superseded Templates Tab of the New Template Property Sheet
The Extensions tab, as seen in Figure 12.23, can be used to add such things as the Application Policies extension, which defines the purposes for which a generated certificate can be used. The Issuance Policies extension is also worth mentioning, because it defines when a certificate may be issued.
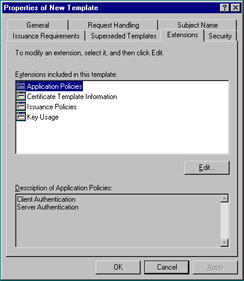
Figure 12.23: Extensions Tab of the New Template Property Sheet
The Security tab is similar to the Security tab that we saw in Exercise 12.02, except that this tab is used to control who may edit the template and who may request certificates using the template. Figure 12.24 shows the default permission level for the Authenticated Users group. For a user to request a certificate, however, the user must have at least the Enroll permission assigned to him or her for manual requests and the Autoenroll permission for automatic requests.
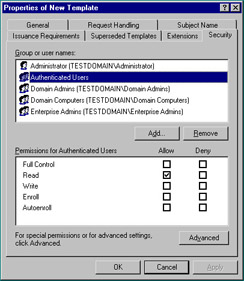
Figure 12.24: Security Tab of the New Template Property Sheet
After you have configured a particular template, the CA still cannot use it to issue certificates until it is made available. To enable a template, use the Certification Authority console and right-click the Certificate Templates container. Selecting New | Certificate Template to Issue completes the process (you will use this procedure in Exercise 12.04).
Certificate Requests
A client has three ways to request a certificate from a CA. The most common is auto-enrollment, and we’ll discuss its deployment shortly. A client can also request a certificate by use of the Certificates snap-in. Clicking Start | Run, typing in certmgr.msc and pressing Enter can launch the snap-in, shown in Figure 12.25. Note that the Certificates snap-in does not appear in the Administrative Tools folder as the Certification Authority snap-in does after installing certificate services.
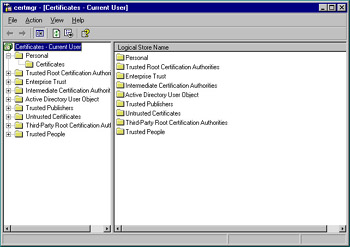
Figure 12.25: Certificates Snap-In
Next, by expanding the Personal container and right-clicking the Certificates container beneath it, you can start the Certificate Request Wizard by choosing All Tasks | Request New Certificate. After the welcome screen, the first screen of the wizard enables you to choose the certificate type. Figure 12.26 shows you the available options. You can only choose a type for which the receiving CA has a template.
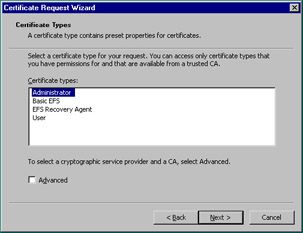
Figure 12.26: Certificate Type Screen of the Certificate Request Wizard
If you select the Advanced check box, the next screen (Figure 12.27) enables you to choose the Cryptographic Service Provider (CSP) and key length. You can also mark the key as exportable and/or enable strong private key encryption.
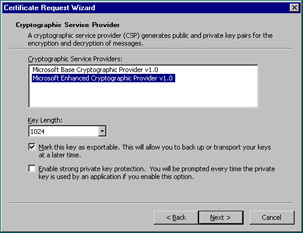
Figure 12.27: Cryptographic Service Provider Screen of the Certificate Request Wizard
Continuing with the advanced options, you can choose Browse the domain to choose a CA to which you want to send the request (Figure 12.28).
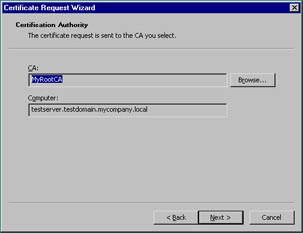
Figure 12.28: Certification Authority Screen of the Certificate Request Wizard
Finally, the wizard finishes by prompting you for a friendly name and description for the certificate.
The last method for requesting a certificate is to use a Web browser on the client machine. Note that if you use this option, IIS must be installed on the CA. Exercise 12.03 shows the steps for requesting a certificate using a client machine in this manner.
| Test Day Tip | The order of component installation can be important when dealing with CAs. If you install certificate services before you install IIS, a client will not be able to connect as in the exercise below until you run the following from the command line: certutil –vroot. This establishes the virtual root directories necessary for Web enrollment. Note also that you must have selected the Web enrollment support option during the certificate Services installation procedure that you completed in Exercise 12.01. |
Exercise 12.03: Requesting a Certificate from a Web Server
-
On any computer for which you want to request a certificate, launch Internet Explorer (version 5.0 or later) by clicking Start | Programs or All Programs | Internet Explorer.
-
In the address bar, type http://servername/certsrv, where servername is the name of the issuing CA.
-
When the screen appears, as shown in Figure 12.29, click Request a Certificate.
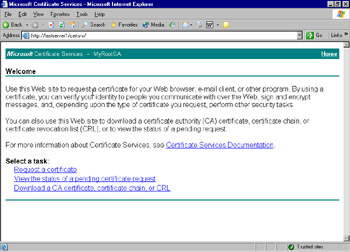
Figure 12.29: Welcome Screen of the CA’s Web Site -
Click User Certificate, then Submit when the next screen appears.
-
When the Certificate Issued page appears, click Install This Certificate. Close the browser.
Auto-Enrollment Deployment
Perhaps the most exciting new feature of the Windows Server 2003 PKI is the ability to use auto-enrollment for user certificates as well as for computer certificates. The request and issuance of these certificates may proceed without user intervention. There are, however, some strict requirements:
-
Only Windows Server 2003 clients or Windows XP clients can use auto-enrollment.
-
Windows Server 2003 Enterprise Edition or Datacenter Edition is required to configure auto-enrollment for version 2 templates.
Group policies are used in Active Directory to configure auto-enrollment. In Computer Configuration | Windows Settings | Security Settings | Public Key Policies, there is a group policy entitled Automatic Certificate Request Settings. The property sheet for this policy enables you to choose to either Enroll certificates automatically or not. Also, you will need to ensure that Enroll subject without requiring any user input option is selected on the Request Handling tab of the certificate template property sheet. Finally, be aware that doing either of the following will cause auto-enrollment to fail:
-
Setting the This number of authorized signatures option on the Issuance Requirements tab to higher than one.
-
Selecting the Supply in the request option on the Subject Name tab.
Test Day Tip Remember that auto-enrollment is available for user certificates only if the client is Windows XP or Windows Server 2003, and you must be logging on to a Windows Server 2003 domain. Machine certificates can be issued via auto-enrollment with Windows 2000.
Role-Based Administration
In a small network of one or two servers and just a handful of clients, administration is generally not a difficult task. When the size of the network increases, however, the complexity of administration seems to increase exponentially. Microsoft’s recommendations for a large network include dividing administrative tasks among the different administrative personnel. One administrator may be in charge of backups and restores, whereas another administrator may have complete control over a certain domain, and so on. The role of each administrator is defined by the tasks that he or she is assigned to, and individual permissions are granted based on those tasks. PKI administration, which can be as daunting as general network administration, can be similarly divided. Microsoft defines five different roles that can be used within a PKI to facilitate administration:
-
CA Administrator
-
Certificate Manager
-
Backup Operator
-
Auditor
-
Enrollee
At the top of the hierarchy is the CA administrator. The role is defined by the Manage CA permission and has the authority to assign other CA roles and to renew the CA’s certificate. Underneath the CA administrator is the certificate manager. The certificate manager role is defined by the Issue and Manage Certificates permission and has the authority to approve enrollment and revocation requests.
The Backup Operator and the Auditor roles are actually operating system roles and are not CA-specific. The Backup Operator has the authority to back up the CA and the Auditor has the authority to configure and view audit logs of the CA. The final role is that of the Enrollees. All authenticated users are placed in this role and are able to request certificates from the CA.
|
EAN: 2147483647
Pages: 173