Troubleshooting IPsec
|
IPsec is used on the PIX firewall for the establishment of a secure VPN tunnel between two endpoints for the purpose of securely exchanging data over IP. IPsec can be configured using IKE with RSA key exchange, IKE with CA certificates, IKE with preshared keys, or using preshared keys sans IKE (called manual IPsec). When using manual key exchange, you simply create a shared secret that is the same on both endpoints; this technique is not only a security risk, but it has scalability issues.
We focus our efforts on using the tools Cisco provides to troubleshoot IPsec problems using an IPsec with IKE preshared key configuration. Misconfigurations, mismatched parameters, keys, routing, IP addressing issues, and other problems can conspire to make IPsec fail. You need to be able to isolate and resolve these issues by first recognizing the symptoms and then using the correct tools to pinpoint the cause.
Figure 11.14 shows a simple point-to-point IPsec tunnel configured between PIX1 and PIX2. IPsec is a complicated technology and very unforgiving of errors. A single error can prevent your IPsec configuration from working at all. Therefore, you will find that the bulk of your labors will be focused on setting IPsec correctly in the first place.
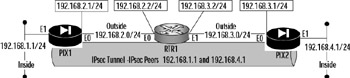
Figure 11.14: IPsec Configuration
Here we introduce several commands and procedures that you can use to check your _configuration:
! PIX1 Configuration snippets nat 99 0.0.0.0 0.0.0.0 global (outside) 99 192.168.2.10-192.168.2.254 netmask 255.255.255.0 route outside 0.0.0.0 0.0.0.0 192.168.2.2 static (inside, outside) 192.168.2.10 192.168.1.1 netmask 255.255.255.255 conduit permit ip 192.168.3.0 255.255.255.0 any isakmp enable outside isakmp policy 99 authen pre-share isakmp policy 99 encryption des isakmp policy 99 group 1 isakmp policy 99 hash md5 isakmp policy 99 lifetime 9999 isakmp identity address isakmp key cisco address 192.168.3.1 access-list 99 permit ip 192.168.0.0 255.255.252.0 any crypto ipsec transform-set FW1 ah-md5-hmac esp-des esp-md5-hmac crypto map FW1 1 ipsec-isakmp crypto map FW1 2 set peer 192.168.3.1 crypto map FW1 3 match address 99 crypto map FW1 2 set peer 192.168.3.1 crypto map FW1 interface outside ! PIX2 Configuration snippets nat 99 0.0.0.0 0.0.0.0 global (outside) 99 192.168.3.10-192.168.2.254 netmask 255.255.255.0 route outside 0.0.0.0 0.0.0.0 192.168.3.2 static (inside, outside) 192.168.3.10 192.168.4.1 netmask 255.255.255.255 conduit permit ip 192.168.3.0 255.255.255.0 any isakmp enable outside isakmp policy 99 authen pre-share isakmp policy 99 encryption des isakmp policy 99 group 1 isakmp policy 99 hash md5 isakmp policy 99 lifetime 9999 isakmp identity address isakmp key cisco address 192.168.2.1 access-list 99 permit ip 192.168.0.0 255.255.252.0 any crypto ipsec transform-set FW1 ah-md5-hmac esp-des esp-md5-hmac crypto map FW1 1 ipsec-isakmp crypto map FW1 2 set peer 192.168.2.1 crypto map FW1 3 match address 99 crypto map FW1 interface outside
There are several issues with this configuration. For starters, the IPsec peering between PIX1 and PIX2 is to their inside addresses rather than their outside addresses. Although this might work, Cisco does not recommend it as a method to deploy IPsec. Additionally, the addresses for the peering have been statically translated to an outside address. This presents a problem in that the actual source address of IPsec traffic will not match when it reaches the distant end, and the hash values will also be incorrect. Solving this problem involves disabling translation for the addresses used for establish peering (nat 0), adding a route to the internal addresses on each firewall, and permitting the addresses to enter the firewall.
IKE
The chief mission of IKE is to negotiate parameters for IPsec by establishing a secure channel over which IPsec will establish its peering. In other words, IKE does the necessary preconfiguration by establishing the security associations to protect IPsec during its negotiations and operations.
IKE peers create the necessary security association if they both agree on a common security policy, which includes using the same encryption, authentication, Diffie-Hellman settings, and hash parameters. Without this agreement, IKE peering will not take place, and IPsec peering will be unable to proceed. IKE authenticates IPsec peers, determines the encryption methods that will be used, and negotiates the various parameters to be used by IPsec, such as encryption, authentication, and keys. In order for IPsec to proceed, IKE must be configured perfectly and working.
IKE works in two phases. In Phase I (main mode), it establishes the security association necessary for two firewalls to become IKE peers. This includes the exchange and search for common security policies until both peers come to an agreement. During Phase II (quick mode), IKE establishes the security association necessary to protect IPsec during its negotiations and operations. Once Phase II is complete, IPsec can then complete its peering.
Before deploying IKE on your PIX firewall, ensure that each peer can reach the IP address of the other side. If an underlying hardware, network, or translation issue prevents the peers from reaching each other, fix it using the structured methodology presented earlier in this chapter. You can verify reachability using ping.
Cisco provides several commands that you can use to check your IKE configuration and operation; let's look at those commands. The show isakmp command shows how IKE is configured on the PIX firewall. For example:
PIX1# show isakmp isakmp enable outside isakmp key ******** address 192.168.3.1 netmask 255.255.255.255 isakmp identity address isakmp policy 99 authentication pre-share isakmp policy 99 encryption des isakmp policy 99 hash md5 isakmp policy 99 group 1 isakmp policy 99 lifetime 9999
The show isakmp or show crypto isakmp commands display the current IKE parameters configured on a PIX firewall. Notice how the key is hidden to protect its security. You should run this command on both peers and compare the resulting output to ensure that there will be agreement on at least one security policy. If you desire more detail or need more information about exactly what each parameter does, use the show isakmp policy command. This command expands on the previous command by spelling out each parameter and its current settings:
PIX1# show crypto isakmp policy Protection suite of priority 99 encryption algorithm: DES - Data Encryption Standard (56 bit keys). hash algorithm: Message Digest 5 authentication method: Pre-Shared Key Diffie-Hellman group: #1 (768 bit) lifetime: 9999 seconds, no volume limit Default protection suite encryption algorithm: DES - Data Encryption Standard (56 bit keys). hash algorithm: Secure Hash Standard authentication method: Rivest-Shamir-Adleman Signature Diffie-Hellman group: #1 (768 bit) lifetime: 86400 seconds, no volume limit
Another useful aspect of the show crypto isakmp policy command is that it shows you the default values that will be used if you do not specify any values. This information can be useful if you need to determine what a particular unspecified parameter would be if you do not configure it specifically.
IPsec cannot proceed unless IKE is working. The only exception is if you are not using IKE for IPsec—that is, you are using manually generated keys with IPsec.
If you want to watch the ISAKMP negotiation process between two IPsec peers, use the debug crypto isakmp command. This command generates a copious amount of output, so use it sparingly. You can use debug crypto isakmp to watch the IKE negotiation process and the exchange of session keys. The debug crypto isakmp command shows IKE going through Phases I and II. The entire process is triggered when interesting traffic (traffic that matches the applied crypto map) transits the IPsec protected interface. Once that happens, IKE contacts its peer, as shown in Figure 11.15. (Its source port and destination port will be UDP port 500, so you need to ensure that this port is allowed through.)
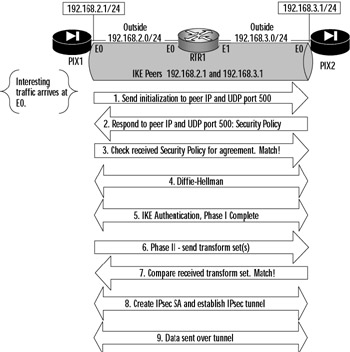
Figure 11.15: IKE Process
The first thing the peers do is validate that the hostname or IP address and key pair matches their configuration. The initiator sends its security policy parameters to the receiver, which then sends back parameters that match from its policy. Having agreed on the security policy, the IKE peers commence Phase I in earnest, completing the Diffie-Hellman and generating session keys. From there, IKE peer authentication is completed, finishing the Phase I security association. Phase II proceeds relatively quickly (hence the reason it is called "quick" mode) by negotiating the security policy that will be used to protect IPsec peer operations. Once Phase II is complete, IPsec then establishes the tunnel, and data transmission begins.
The most common problems that occur during the IKE phases are mismatched preshared keys and mismatched security policy parameters. The first step in troubleshooting IKE is to compare the configurations of each peer. You can do this with the commands we discussed previously. After you have ascertained that you have an IKE policy that will work on each firewall, initiate the IKE process after executing the appropriate debug command. That way, you can monitor its progress or lack thereof.
If you do not define an IKE security policy common to both peers or if you neglect to define a security policy at all, IKE will try the defaults for the various values. This means using DES for encryption, SHA for calculating the hash values, RSA for authentication, and Diffie-Hellman Group 1 (768 bits) with a lifetime of 86,400 seconds. Policy mismatches will be apparent when the output of the show crypto isakmp sa command shows "no state," meaning that the peers did not and could not negotiate main mode successfully due to the mismatch. The "no state" error also appears if there is key (password) disagreement between the two peers. Hash calculations will also fail, and this is something you can watch with the debug crypto isakmp command.
Cisco provides a clear crypto isakmp sa command that you can use to delete existing security associations and force a reinitialization. This command can be useful not only to clear an invalid security association, but it's also helpful in monitoring the IKE negotiation process with debug.
IPsec
After IKE successfully negotiates the parameters such as the method to be used for encryption, authentication, and the size key to use, IPsec is then ready to perform its mission of creating a VPN. IPsec requires that IKE already have negotiated the various previously identified parameters. IPsec peers compare transform sets to determine what each can support. They negotiate the authentication, encryption, and hash methods until they find agreement. If they do not find agreement, they do not become peers, and the tunnel will not be established.
To check which transform sets you have configured, use the show crypto ipsec transform-set command. Notice that this command tells you if IPsec will negotiate AH, ESP, or a combination of both. Here is an example:
PIX1# show crypto ipsec transform-set Transform set FW1: { ah-md5-hmac } will negotiate = { Tunnel, }, { esp-des esp-md5-hmac } will negotiate = { Tunnel, }, It is important for IPsec peers to have in their transform sets common parameters on which they can agree. Crypto maps are used to specify the traffic to be encrypted. Execute the show crypto map command to confirm your maps. For example:
PIX2# show crypto map Crypto Map: "pixola" interfaces: {outside } Crypto Map "pixola" 1 ipsec-isakmp Peer = 192.168.2.1 access-list 100 permit ip 192.168.2.0 255.255.255.0 any (hitcnt=1) Current peer: 192.168.2.1 Security association lifetime: 4608000 kilobytes/28800 seconds PFS (Y/N): N Transform sets={ pix, } This command also identifies the IPsec peer and the interface to which the map is applied. In this example, PIX2 has the crypto map "pixola" applied to its outside interface. It is peering with PIX1 (at IP address 192.168.2.1) and will encrypt traffic that matches access list 100. It even tells you how many matches have been made against that access list—a quick way to determine if anything is being checked for IPsec processing.
After verifying that there is agreement in the transform sets and the crypto maps are defined correctly, confirm that data is actually being protected. To verify, use the show crypto ipsec sa command shown in the following output:
PIX1# show crypto ipsec sa interface: outside Crypto map tag: pixola, local addr. 192.168.2.1 local ident (addr/mask/prot/port): (192.168.2.1/255.255.255.0/0/0) remote ident (addr/mask/prot/port): (192.168.3.1/255.255.255.0/0/0) current_peer: 192.168.3.1 PERMIT, flags={origin_is_acl,} #pkts encaps: 5, #pkts encrypt: 5, #pkts digest 5 #pkts decaps: 5, #pkts decrypt: 5, #pkts verify 5 #pkts compressed: 0, #pkts decompressed: 0 #pkts not compressed: 0, #pkts compr. failed: 0, #pkts decompress failed: 0 #send errors 0, #recv errors 0 local crypto endpt.: 192.168.2.1, remote crypto endpt.: 192.168.3.1 path mtu 1500, ipsec overhead 56, media mtu 1500 current outbound spi: 3a18fca2 inbound esp sas: spi: 0x61af4121(2451330208) transform: esp-des esp-md5-hmac in use settings ={Tunnel, } slot: 0, conn id: 1, crypto map: pixola sa timing: remaining key lifetime (k/sec): (4000159/9460) IV size: 8 bytes replay detection support: Y inbound ah sas: inbound pcp sas: outbound ESP sas: spi: 0x61af4121(2451330208) transform: esp-des esp-md5-hmac in use settings ={Tunnel, } slot: 0, conn id: 1, crypto map: pixola sa timing: remaining key lifetime (k/sec): (4000159/9460) IV size: 8 bytes replay detection support: Y outbound ah sas: outbound PCP sas: The output of this command can be very abundant. The crypto map tag identifies the crypto map being used, whereas local and remote ident show the IP addresses of the local and remote peers. The pkts counters track how many packets have been encrypted, decrypted, and compressed. So far, five packets have been sent and received encrypted. This is an earmark of successful IPsec operation.
The crypto endpt section identifies the IPsec peers. Notice that the path MTU as well as the media MTU are shown, which can be useful in determining if fragmentation will occur. The SPI is a unique identification for this tunnel. We can also view the transform set parameters being used and whether it is operating in tunnel or transport mode. The lifetime indicates the amount of time left before the SA will be renegotiated. The last section, outbound sas, verifies that both inbound and outbound SA have been established. It also indicates how many seconds and kilobits are left before the SA must be renegotiated.
Check the SA lifetime with the show crypto ipsec security-association command. For example:
PIX1# show crypto ipsec security-association lifetime Security association lifetime: 4608000 kilobytes/28800 seconds
You can use the debug crypto ipsec command to monitor IPsec negotiations, which will start once IKE is fully initialized between the peers. For ease of troubleshooting, run the two commands separately. Otherwise, you will be overwhelmed by the amount of data they produce. First perform IKE troubleshooting (which has to occur before IPsec can proceed), and then move on to IPsec troubleshooting.
If you want to reinitialize IPsec, you can do so. This is useful when you want to clear corrupted or invalid sessions or if you want IPsec to establish a new tunnel. It can also be useful if you want to monitor IPsec operations from the onset using debug commands. At any time, you can manually force an SA negotiation to occur with the clear crypto ipsec sa command. The clear crypto ipsec sa command deletes existing security associations (all of them) and forces the establishment of new associations if there is an active trigger such as a crypto map. You can get very specific with this command, such as specifying a particular peer with clear crypto ipsec sa 192.168.2.1.
|
EAN: 2147483647
Pages: 240