Inline IDS
|
An inline IDS is the latest technology in use within the intrusion prevention genre. Intrusion prevention is the next step in the evolution of intrusion detection. Whereas intrusion detection is designed to make the security administrator aware of potential attacks, intrusion prevention goes one step farther and works actively to prevent the intrusion.
The basic concept of intrusion prevention is to take the data gathered during intrusion detection and act upon it through an automated process. This provides for faster response than what could be provided by an on-call administrator. An example of intrusion prevention would be an active firewall that stops communication from a specific IP address when an attack is detected from that address.
Inline IDS acts in a manner similar to that of an active firewall, but does offer several advantages. First, as an IDS, it can be configured to respond to the latest available attack signatures. It also acts more intelligently than a firewall in that it does not simply block communication from a specific IP address or port. Inline IDS has the ability to drop the packets that contain the attack and allow normal traffic to go through.
| Warning | One major problem with "intelligent" firewalls is their ability to automatically react to attacks without administrative intervention. While this might seem like a very useful feature of the firewall, it can easily be abused. For example, let's say that you have a firewall set up and configured to block access to a specific IP address if a portscan is detected from that IP. An intruder starts probing your network and performs a portscan from one of his systems. After a few moments, the intruder sees that he is no longer able to connect to your network from that IP. This makes it obvious that you are blocking his IP by using a firewall configured to block portscans. The next step for the intruder if they want to wreak havoc on your network would be to simply spoof the IP address of your upstream router and perform a portscan using this spoofed address. The firewall will detect the portscan and believe that it is coming directly from the upstream router. Therefore, the firewall does its job and blocks access to the IP address of your network's upstream router. Now your network can no longer send or receive data from your upstream router. External communications are now down for the network, and all because your firewall reacted "intelligently" to an attack. |
Using an inline IDS affords you the capabilities of a good IDS and allows you to incorporate the data gathered from this system into an intelligent firewall. This gives you a great method of securing your network from intrusion.
Where Did the Inline IDS for Snort Come From?
Snort first had the capability of being an inline IDS because of a project called Hogwash. Hogwash is based on the Snort engine and was designed to operate inline with your Internet connection similar to a firewall. Rather than functioning like a firewall, Hogwash provides the ability to drop individual packets based on a set of rules similar to Snort's. These rules define the behavior of Hogwash and instruct it on which packets should be passed, dropped, or alerted upon.
The Hogwash implementation was designed to work at the data link layer of the OSI model (Layer 2) to offer a higher level of security to the system on which Hogwash is running. Because of this design, the machine running Hogwash does not even necessarily have to have an IP stack; therefore, it is invulnerable to IP-based attacks. This feature makes the system almost invisible to intruders.
There is now an effort underway to merge Hogwash back into the original Snort system, primarily because of the difficulties of keeping Hogwash up to date with changes in Snort. It makes more sense from a development point of view to integrate the advanced features available with Hogwash back into the base Snort application. This allows for Snort and Hogwash to be kept at the same build level without the requirement of a large maintenance effort.
This effort has led to the release of a Snort inline mode patch by Jed Haile. This patch is designed to merge the efforts of the Hogwash project back into Snort. It is currently available at www.snort.org/dl/contrib/patches/inline. More information about Hogwash is also available at http://hogwash.sourceforge.net.
Installation of Snort in Inline Mode
Before installing Snort in inline mode, you need to be aware of a few requirements. First, to run Snort in inline mode, you must give your system the ability to be inline with a network connection. This means that you'll be running your IDS as a bridge in one form or another. There are two options for this. You can either run your system as a normal network bridge, or you can bridge traffic and provide for network address translation (NAT) at the same time. For this example, we will be running our system as a normal bridge. Figure 31.2 shows a simple network with our system placed inline with a network connection to the Internet. Table 31.3 lists all of the software we'll need to install Snort in inline mode.
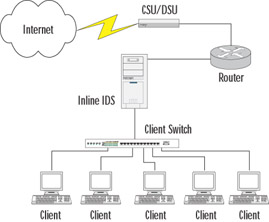
Figure 31.2: Inline Network Diagram
| Name | Location |
|---|---|
| Red Hat 8.0 Linux Distribution | ftp://ftp.redhat.com/pub/redhat/linux/8.0/en/iso/i386 |
| IPTables | www.netfilter.org/downloads.html#1.2.8 |
| libpcap | http://freshmeat.net/projects/libpcap |
| Linux bridge patch | http://bridge.sourceforge.net/devel/bridge-nf/bridge-nf-0.0.7-against-2.4.19.diff |
| bridge-utils | http://bridge.sourceforge.net/download.html |
| Snort Inline Patch | www.snort.org/dl/contrib/patches/inline |
| Snort Rules | www.snort.org/dl/rules/snortrules-current.tar.gz |
| rc.firewall Script | www.honeynet.org/papers/honeynet/tools |
Keeping with that, we will be performing our examples in this chapter on the Red Hat 9.0 distribution of Linux. One of the features of the Linux 2.4 kernel build is that IPtables is included. This is an open-source stateful (or stateless) firewalling subsystem and replaces its predecessor, IPchains. IPtables is used for examining each packet based on a series of chains that you define. We'll discuss the specific IPchains functionality that we'll be using a little later in this chapter.
Unfortunately, the Snort inline patch requires some additional library and header files for IPtables that are not included with the distribution. Therefore, you'll need to download IPtables 1.2.7a from the location listed in Table 31.3. Once downloaded, extract this file into a temporary directory. Installation is a little different and requires that you have the Linux kernel source files available. Perform the install by issuing the following commands:
make KERNEL_DIR=/usr/src/linux-2.4.18-14 make install KERNEL_DIR=/usr/src/linux-2.4.18-14 make install-devel
These commands direct the compiler to your kernel source directory, install IPtables, and install the libipq libraries required by the Snort inline patch.
| Note | Keep in mind that if you performed an upgrade to get to Red Hat 8, you might still have IPchains on your system. IPchains and IPtables are not compatible and will not run together. If you have any problems starting this IPtables service, you might have to stop the IPchains service. |
Another requirement to running Snort in inline mode is libpcap. By default, the kernel included with Red Hat 8 includes the ability to do bridging and firewalling, but not to do both at the same time. To do this, we're going to need to patch the kernel and recompile it. The Linux bridge patch can be found at the location shown in Table 31.3. Download this patch and place it in a temporary directory. Then, apply the patch using the following command:
patch -pl < bridge-nf-0.0.7-against-2.4.18.diff
While the specific methods available to configure and recompile the kernel are beyond the scope of this book, we will cover the specific changes that you need to make to enable the features that we need on the system. After applying the bridge patch, we'll need to configure the kernel. You can do this by issuing one of the following commands in your kernel source directory:
make menuconfig make xconfig
Your choice of configuration utilities will vary based on your preference for using the X Window system or a menu-based command-line tool. For our example, we'll be using xconfig, which is shown in Figure 31.3.
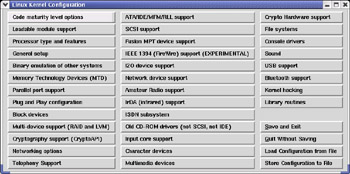
Figure 31.3: xconfig Linux Kernel Configuration
Go through the various menu options and ensure that the specific kernel options required for your system are enabled. In addition, the following options must be enabled and compiled into the kernel for our bridging firewall to work:
-
Code Maturity Level Options
-
Prompt for Development and/or incomplete code/drivers
-
-
Networking Options
-
Network packet filtering (replaces ipchains)
-
IP: Netfilter Configuration
-
All options
-
802.1d Ethernet Bridging
-
Netfilter (firewalling) support
-
Figure 31.4 shows how the Networking options section of xconfig should look when configured for Snort in inline mode. It is very important to go through these configuration options and confirm that the additional options required for Linux to run on your system are selected.
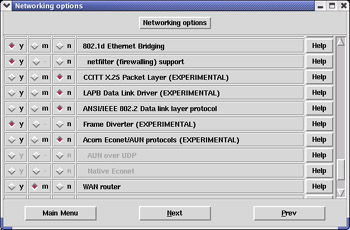
Figure 31.4: xconfig Networking Options Dialog
Your next step will be to recompile the kernel using the new patch and options. Again, this process is beyond the scope of this book, but the following syntax worked well for us and automatically placed a new entry into the grub.conf file for the new kernel:
make dep clean bzImage install modules modules_install
You'll also need the bridge-utils software to control the bridging features of your system. This software can be found at the location shown in Table 31.3. Extract the files from the source tarball into a temporary directory, and then install them using the following commands:
./configure make make install
Next, you'll need the Snort inline patch. Download this from the location shown in Table 31.3. Next, decompress this patch into a temporary directory. If you have Snort running on the system on which you are installing the patch, it is best to stop Snort first. Keep in mind that although this is labeled as a patch, it is a full Snort install; therefore, having the normal version of Snort installed is not a prerequisite. Perform the patch installation by issuing the following commands in the directory to which you extracted the patch:
./configure --enable-inline make make install
One error you might run into is the Snort inline patch being unable to find your libpcap files. If this occurs, simply copy the files extracted from the libpcap archive into a directory called pcap within your Snort inline patch temporary directory.
If you don't already have them, you'll certainly want the latest Snort rules. These can be found at the location specified in Table 31.3 and must be placed in your Snort rules directory. You'll also need Rob McMillen's rc.firewall script. This is an IPtables script used for counting and controlling outbound connections and is available at the location listed in Table 31.3. To make the best use of this script, you should configure it to start with the system, so copy the rc.firewall script to your /etc/rc.d directory and modify it using the following commands:
cp rc.firewall /etc/rc.d chmod 700 /etc/rc.d/rc.firewall
After the file has been copied, you'll need to edit your /etc/rc.d/rc.local file using your favorite text editor and add the following lines at the bottom of the file:
if [ -x /etc/rc.d/rc.firewall ]; then /etc/rc.d/rc.firewall fi
Now we need to start configuring all the software we've installed. The Snort inline installation will have to have the snort.conf file configured to suit your environment.
Next, configure the rc.firewall script. Load the script with vi or your favorite text editor. Many changes are necessary to make this script work for a normal firewall rather than a honeynet firewall. First, note any systems that should be able to access the external interface and add them to the line that reads PUBLIC_IP="192.168.1.144". Multiple addresses can be added by placing a space between each. Next, ensure that the INET_IFACE="eth0" corresponds with the network interface that is facing externally. The three variables shown below should be changed to reflect your internal network. For example, if your internal network is 10.10.10.*, then you should change the variables as shown here:
LAN_IFACE="eth1" # Firewall interface on internal network LAN_IP_RANGE="10.10.10.0/24" # IP Range of internal network LAN_BCAST_ADRESS="10.10.10.255" # IP Broadcast range for internal network
The next configuration change in the rc.firewall script will allow it to interface with Snort. Change the following setting as shown here:
QUEUE="yes" # Use experimental QUEUE support #QUEUE="no" # Do not use experimental QUEUE support
The Location of Programs Used by This Script section lower in the file will have to be changed to suit your environment. For our installation, the following changes were necessary:
############################################ # LOCATION OF PROGRAMS USED BY THIS SCRIPT # ############################################ IPTABLES="/usr/local/sbin/iptables" BRIDGE="/usr/local/sbin/brctl" IFCONFIG="/sbin/ifconfig" ROUTE="/sbin/route" MODPROBE="/sbin/modprobe"
It is very important that you use the correct location for each of these, as you might have different versions loaded in different locations. For example, the Red Hat 8.0 Linux install has a binary for iptables located in /sbin, but this is an older version.
We also need to change the way in which the rc.firewall script uses IPtables. We will be using one simple IPtables command to cause Snort to be in charge of all packets being forwarded through the system. This command has to used instead of all of the current rc.firewall IPtables commands:
$IPTABLES -A FORWARD -j QUEUE
If you want to see what the script is doing when you start it, simply go back to the beginning of the file and remove the # symbol from the beginning of the #set –x line. This should complete the modifications necessary to the rc.firewall script, but you can also do some optional things such as auto-starting Snort. The following code shows what the completely modified rc.firewall script should look like and includes commands to start Snort automatically (based on the snort.sh script from www.honeynet.org):
#!/bin/bash # # rc.firewall, ver 0.6.1 # http://www.honeynet.org/papers/honeynet/tools/ # Rob McMillen <rvmcmil@cablespeed.com> # # CHANGES: # 14 Feb 2003: Modified extensively to support Snort Inline mode for # a bridging firewall. Snort controls all packet decisions # and IPTABLES simply queues everything. – J. Faircloth #### If you want to see all the commands or which command is giving your # problems, remove the comment below. set -x #************************************************************************* # USER VARIABLE SECTION #************************************************************************* ############### # COMMON VARS # ############### # The MODE variable tells the script to #setup a bridge HoneyWall # or a NATing HoneyWall. #MODE="nat" MODE="bridge" # A space delimited list of honeypots IPs (public IP) # If you are in "bridge" mode, this is the list of your # honeypot IP's that will be behind the bridge. If you are # in "nat" mode, this is the list of public IPs you will # be using for IP address translation. Still confused? Its # the list of IPs the hackers will attack. PUBLIC_IP="10.10.11.100" ### Variable for external network INET_IFACE="eth0" # Firewall Public interface ### Variables for internal network LAN_IFACE="eth1" # Firewall interface on internal network LAN_IP_RANGE="10.10.11.0/24" # IP Range of internal network LAN_BCAST_ADRESS="10.10.11.255" # IP Broadcast range for internal network ### IPTables script can be used with the Snort-Inline filter ### You can find the current release at ### http://www.snort.org/dl/contrib/patches/inline/ QUEUE="yes" # Use experimental QUEUE support #QUEUE="no" # Do not use experimental QUEUE support PID=/var/run/snort_eth0.pid # Location for Snort's PID DIR=/var/log/snort # Logging Directory DATE=`date +%b_%d` # Date for creating log directories ###################### # END OF COMMON VARS # ###################### ########################## # VARIABLES FOR NAT MODE # ########################## # You use these variables ONLY if you are using NAT mode. # If you are in bridging mode, then these variables will # not be used. # ALIAS_MASK="255.255.255.0" # Network mask to be used alias HPOT_IP="192.168.0.144" # Space delimited list of Honeypot ips # NOTE: MUST HAVE SAME NUMBER OF IPS AS # PUBLIC_IP VARIABLE. ############################# # END OF NAT MODE VARIABLES # ############################# ###################################### # VARIABLES FOR MANAGEMENT INTERFACE # ###################################### # Interface for remote management. If set to br0, it will assign # MANAGE_IP to the bridge logical interface and allow its use # as a management interface. If you do not want to use a # management interface, set it to "none" #MANAGE_IFACE="br0" #MANAGE_IFACE="eth2" MANAGE_IFACE="none" MANAGE_IP="192.168.0.104" # IP of management Interface MANAGE_NETMASK="255.255.255.0" # Netmask of management Interface # Space delimited list of tcp ports allowed into the management interface ALLOWED_TCP_IN="22" # IP allowed to connect to the management interface # If set to "any", it will allow anyone to attempt to connect. # The notation ip/mask or a space delimited list of ips are # allowed. #MANAGER="any" MANAGER="10.1.1.1 172.16.1.0/24" #################### # END OF MANAGE VARS #################### ########################################################## # VARIABLES THAT RESTRICT WHAT THE FIREWALL CAN SEND OUT # ########################################################## # This variable will limit outbound Firewall connections # to ports identified in the ALLOWED_TCP_OUT and # ALLOWED_UDP_OUT variables. If set to yes, it will # restrict the firewall. If set to no, it will allow all # outbound connections generated by the firewall. # NOTE: There must be a management interface in bridge # mode in order to have a firewall interface to restrict. #RESTRICT="yes" RESTRICT="no" ALLOWED_UDP_OUT="53 123" ALLOWED_TCP_OUT="22" ########################## # END RESTRICT VARIABLES # ########################## ############################################ # LOCATION OF PROGRAMS USED BY THIS SCRIPT # ############################################ IPTABLES="/usr/local/sbin/iptables" BRIDGE="/usr/local/sbin/brctl" IFCONFIG="/sbin/ifconfig" ROUTE="/sbin/route" MODPROBE="/sbin/modprobe" SNORT="/usr/local/bin/snort" #################### # END OF PROG VARS # #################### #************************************************************************* # END OF USER VARIABLE SECTION (DO NOT EDIT BEYOND THIS POINT) #************************************************************************* ######### # First, confirm that IPChains is NOT running. If # it is running, clear the IPChains rules, remove the kernel # module, and warn the end user. lsmod | grep ipchain IPCHAINS=$? if [ "$IPCHAINS" = 0 ]; then echo "" echo "Dooh, IPChains is currently running! IPTables is required by" echo "the rc.firewall script. IPChains will be unloaded to allow" echo "IPTables to run. It is recommened that you permanently" echo "disable IPChains in the /etc/rc.d startup scripts and enable" echo "IPTables instead." ipchains -F rmmod ipchains fi ######### # Flush rules # $IPTABLES -F $IPTABLES -F -t nat $IPTABLES -F -t mangle $IPTABLES -X echo "" ########## # Let's setup the firewall according to the Mode selected: bridge or nat # if [ $MODE = "bridge" ] then echo "Starting up Bridging mode." ######### # Let's clean up the bridge. This will only work if this script # started the bridge. # $BRIDGE delif br0 ${INET_IFACE} 2> /dev/null $BRIDGE delif br0 ${LAN_IFACE} 2> /dev/null $IFCONFIG br0 down 2> /dev/null $BRIDGE delbr br0 2> /dev/null ######### # Let's make sure our interfaces don't have ip information # $IFCONFIG $INET_IFACE 0.0.0.0 up -arp $IFCONFIG $LAN_IFACE 0.0.0.0 up -arp ######### # Let's start the bridge # $BRIDGE addbr br0 $BRIDGE addif br0 ${LAN_IFACE} $BRIDGE addif br0 ${INET_IFACE} # Let's make sure our bridge is not sending out # BPDUs (part of the spanning tree protocol). $BRIDGE stp br0 off if [ "$MANAGE_IFACE" = "br0" ] then $IFCONFIG br0 $MANAGE_IP netmask $MANAGE_NETMASK up else $IFCONFIG br0 0.0.0.0 up -arp fi elif [ $MODE = "nat" ] then echo "Starting up Routing mode and enabling Network Address Translation." i=0 z=1 tempPub=( $PUBLIC_IP ) for host in $HPOT_IP; do # Bring up eth aliases $IFCONFIG $INET_IFACE:${z} ${tempPub[$i]} netmask ${ALIAS_MASK} up # Ensure proper NATing is performed for all honeypots $IPTABLES -t nat -A POSTROUTING -s ${host} -j SNAT --to-source ${tempPub[$i]} $IPTABLES -t nat -A PREROUTING -d ${tempPub[$i]} -j DNAT --to-destination ${host} let "i += 1" let "z += 1" done fi # Let's figure out dns if [ $DNS_HOST -z ] then if [ $MODE = "bridge" ] then DNS_HOST=$PUBLIC_IP else DNS_HOST=$HPOT_IP fi fi ######### # Load all required IPTables modules # ### Needed to initially load modules /sbin/depmod -a ### Add iptables target LOG. $MODPROBE ipt_LOG ### Add iptables QUEUE support (Experimental) if test $QUEUE = "yes" then # Insert kernel mod $MODPROBE ip_queue # check to see if it worked, if not exit with error lsmod | grep ip_queue IPQUEUE=$? if [ "$IPQUEUE" = 1 ]; then echo "" echo "It appears you do not have the ip_queue kernel module compiled" echo "for your kernel. This module is required for Snort-Inline and" echo "QUEUE capabilities. You either have to disable QUEUE, or compile" echo "the ip_queue kernel module for your kernel. This module is part" echo "of the kernel source." exit fi echo "Enabling Snort-Inline capabilities, make sure Snort-Inline is" echo "running in -Q mode, or all outbound traffic will be blocked" fi ### Support for connection tracking of FTP and IRC. $MODPROBE ip_conntrack_ftp $MODPROBE ip_conntrack_irc ### Enable ip_forward echo "1" > /proc/sys/net/ipv4/ip_forward ### Queue everything and let Snort figure out what to do with each packet. $IPTABLES -A FORWARD -j QUEUE ########## # Kill off old Snort and start a new instance ### Kill snort if [ -s $PID ]; then PRO=`cat $PID` echo "" echo "Previous version of Snort running" echo "Killing Snort, PID $PRO" echo "" kill -9 $PRO fi # Make directory based on date, if already exists do nothing. if [ -d $DIR/$DATE ]; then : else mkdir $DIR/$DATE fi # Snort options explanation # -c configuration file # -d log packet details # -D daemon mode # -l log directory # -i interface in our case eth0, this option is required when using # the -Q option. # -Q (used ONLY with Snort-Inline for QUEUE mode) ### Start snort for the Honeynet $SNORT -D -d -c /etc/snort/snort.conf -Q -l $DIR/$DATE Now, change to the /etc/rc.d directory and run the script by issuing the following commands: cd /etc/rc.d ./rc.firewall You'll see a lot of data scroll across the screen as the script sets up the bridging functions and configures the firewall if you enabled set –x in your rc.firewall file. You'll probably want to scroll through this data just to make sure everything worked properly. At this point, you should have a functioning firewalling bridge.
If everything appears to be functioning correctly, it's time to reconfigure Snort. The primary change we're going to make is in the rules files. All of the default rules are set to Alert. For our inline IDS to function, we'll need to change the actions on some or all of the Alert rules to Drop rules, depending on your needs. This will cause Snort to drop the packet rather than issue an alert. Which rules you set to drop will differ based on the purpose of your IDS and the structure of your network. If you are running a honeynet, a good list of drop rules can be found at www.honeynet.org.
Modifying your rules files can be done manually by editing each rule file using vi or your favorite text editor. This will have to be done for any rules that you want to use as drop rules. The rules that you modify will depend on the needs of your network environment. If you use vi, you can issue the following command to quickly replace all instances of Alert with Drop:
:%s/alert/drop/
At this point, you should be ready to run Snort in inline mode. We'll need to restart Snort for the rules to take effect, so simply rerun the rc.firewall script using the following command:
/etc/rc.d/rc.firewall
Snort should successfully start and begin monitoring the network traffic going across the bridge. Hopefully, you have an operational Snort inline installation at this point. If you run into any problems with the installation of software or their configuration, refer to the Web site from which the software was gathered. Moreover, don't forget some of the invaluable resources available on the Web for specific help in setting up an IDS or Snort. Table 31.4 lists some of the Web sites that we found to be very helpful in setting up Snort in inline mode.
| URL | Description |
|---|---|
| www.snort.org | The main source for Snort information and documentation. |
| http://groups.google.com | A search engine for newsgroups that can help you find a great deal of help on any subject. |
| www.honeynet.org | Information on honeynets and the configuration of an IDS for honeynets. |
| www.redhat.com | Information on the Red Hat Linux distribution. |
Using Inline IDS to Protect Your Network
Now that we have a functioning inline IDS, we need to test it and see how it can be used to protect our network. We will continue to use the network diagram shown in Figure 31.2 for example purposes. This will allow us to configure some basic rules and see how the IDS reacts to them.
To recap, we have configured the Linux system to function as a bridge. The system has two network cards, with one facing the external network and the other facing the internal network. IPtables is being used to bridge between the network cards and route the traffic to a queue for processing. The Snort inline patch has been installed and configured to monitor this queue and determine the fate of all packets crossing the bridge. By configuring the rules files with drop statements, we can set specific packets to be dropped and not routed between the interfaces.
For our first test, we will set up a Web server on one of our client systems. This Web server will be configured without SSL and will be listening on port 80. To test this, we will need access to a system outside the protected network. For the purposes of this test, we will be using a freely available online port scanning site at www.securitymetrics.com/portscan.adp. If you run this test from the system hosting the Web server, you will receive a response similar to the one shown in Figure 31.5.
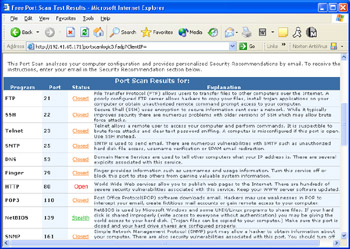
Figure 31.5: Portscan from Web Server
As you can see in Figure 31.5, port 80 has been detected as Open, which means that this port can be detected from an outside system. To prevent this, we're going to add a rule for Snort to drop packets destined for port 80 on the internal network.
Open the file local.rules in your rules directory using your favorite text editor. Add a rule similar to the following to configure Snort to drop traffic destined for this port:
drop tcp any any -> 10.10.10.0/24 80
This simple rule will make your IDS drop any traffic destined for port 80 on your internal network. Ensure that the local.rules line has been uncommented in your snort.conf file, and then restart Snort to make this rule take effect. If you repeat the portscan from the remote system, you should receive the result shown in Figure 31.6.

Figure 31.6: Portscan from Web Server with Snort Filtering
As you can see, it is extremely easy to configure Snort to drop packets after the software has been properly configured. A more complex example would be to make Snort drop packets based on both their port and their content. This is just as easy to do and, as previously mentioned, can be accomplished by simply changing the current Snort rules to Drop instead of Alert. For example, the following rule would drop any packet going across the bridge via an established TCP connection containing the text "nudie pictures":
drop tcp any any -> any any (msg:"Adult Content"; content:"nudie pictures"; nocase; flow:to_client,established;)
The basic change in the rule definitions is that you use the drop command instead of alert. There's more detailed information on Snort rules in the book Snort 2.0 Intrusion Detection available from Syngress Publishing (ISBN: 1931836-74-4).
Is Inline IDS the Tool for Me?
Inline IDS is not always the best protection for your network. If you are working in a large corporate environment, running an inline IDS can slow your network traffic to an unacceptable level. In addition, if the IDS has not been configured properly or is malfunctioning, the possibility exists that the IDS could interrupt normal network functionality. Valid traffic could be mistakenly dropped, or communications in their entirety could be stopped. The proper use of tools such as this is an important skill for a security administrator to learn.
If you are running a typical corporate network, chances are that you have one or more high-speed Internet connections going into your network. These are typically protected by a powerful firewall that is designed to handle the amount of data received from these high-speed connections. To provide an acceptable quality of service to the users on the network, these firewalls are typically configured with rules that process traffic quickly and efficiently. In the case of inline IDS, the rules can be very complex, and the actions performed by the IDS might take longer than what is acceptable for your network.
One option to consider with the use of an inline IDS is a honeynet implementation. A great deal of information on honeynets can be found at www.honeynet.org. There are occasions when you might want to set up a honeynet beside your normal network connection to see what new attacks are being performed or to allow you to tune your firewall. In a situation such as this, an inline IDS would be very appropriate to both protect your network from devastating attacks and to keep your network from being used as a staging area to launch further attacks.
There is a great deal of liability in setting up a honeynet, and you need to ensure that an intruder cannot use your honeynet to attack other systems. An inline IDS can help to prevent this by blocking outgoing malicious packets or by rewriting outgoing packets.
Another useful purpose for an inline IDS would be to implement it in a position where only a specific portion of a network is behind the IDS. This can provide an extra layer of security to systems containing highly confidential data. By using the content of the packets as a guide, you can configure your IDS to ensure that confidential data can only be accessed by specific entities that are explicitly granted access to the data.
Whatever your intentions, put some thought into both the advantages and disadvantages of installing an inline IDS onto your network. There are many situations in which this type of security device can be very useful, but just as many where it can be devastating to your user community.
|
EAN: 2147483647
Pages: 240