Configuring Mail Services on the Internal Network
|
Configuring Mail services Exchange Server publishing configuration on the internal network is much easier than trying to get it to work on the ISA server. Many of the same principles we applied when publishing the Exchange server on the ISA server will work when publishing an Exchange server that sit on the internal network.
In this section, we'll cover the steps required to publish an Exchange server on the internal network. You'll find that almost all of the details are the same as those when you publish the Exchange server on the ISA server, except that you won't run into so many problematic IIS, ISA, and Exchange Server interactions. There is one major difference between publishing an Exchange server on the internal network and publishing an Exchange server on the ISA server: you can use Exchange RPC publishing rules to allow external network clients to connect to the Exchange server on the internal network.
In the section, we'll cover the following topics:
-
Publishing Exchange Server services
-
Exchange RPC publishing rules
-
Publishing Outlook Web access
-
Using the Message Screener on the Exchange server and configuring the Message Screener on an SMTP relay
-
Using GFI Software's MailSecurity instead of or in addition to the SMTP Message Screener
Note You may want run your mail server on the DMZ instead of on your internal network. This buys you a bit more protection for your internal network by not allowing anyone on an untrusted network to access anything internally.
Publishing Exchange Server on the Internal Network
In the first part of this chapter, we went through the procedures required to publish Exchange Server services on the ISA server. Here we will look at how to publish Exchange Server services when the Exchange server is on the internal network. There are ways to publish Exchange Server services: you can manually create server publishing rules, or use the Secure Server Publishing Wizard.
We wanted you to get a better understand of how publishing rules work by walking you through manually creating publishing rules in the first part of this chapter. You can accomplish the same tasks, and get them done faster, by leveraging the automation provided by the Secure Mail Server Publishing Wizard. The Secure Mail Server Publishing Wizard is an ideal way to publish an internal Exchange server.
The Secure Mail Server Publishing Wizard automatically creates the NNTP, SMTP, POP3, IMAP4, and RPC publishing rules for you. It will also enable the SMTP filter on the ISA server so that you can screen messages on the ISA server before they reach the Exchange server on the internal network. Note that while the wizard will enable the SMTP filter for you, you must install the Message Screener if you want the Message Screener to run on the ISA server. The Message Screener on the ISA server would work together with an SMTP relay on the ISA server when you have an Exchange server on the internal network.
The first step is to install the Exchange server on the internal network. You can install Exchange on a domain controller, or you can install it on a member server in your domain. If you install the Exchange Server on a member server, make sure you install the Exchange System Manager on the domain controller so that you get the Exchange 2000 related tabs and features included in your Active Directory Users and Computers console.
In this discussion, we will assume that the Exchange server is on the domain controller. There are no differences in the configuration when the Exchange server is on a domain controller or a member server, except for the log on locally requirement for OWA, so you don't have to do anything different in terms of publishing rules or ISA Server configuration. Just remember that if you do put the Exchange server on the ISA server, you will need to change the log on locally user right if you want to publish its OWA site.
Perform the following steps to publish Exchange Server services on the internal network using the Secure Mail Server Publishing Wizard:
-
First, you have to disable socket pooling on the ISA server, or disable the IIS services on the ISA server. Follow the instructions provided earlier in the chapter on how to disable IIS services or disable socket pooling. If you do disable socket pooling, make sure that you configure IIS services to listen only on the internal interface, and then restart the IIS services.
-
Open the ISA Management console, expand the server name, then expand the Publishing node.
-
Right-click the Server Publishing Rules node and select Secure Mail Server.
-
Click Next.
-
Select the protocols you want to publish on the Mail Services Selection page (Figure 28.15). The Default Authentication column creates publishing rules that do not support secure SSL connections. The SSL Authentication column creates server publishing rules that support secure SSL connections. Note that when you select the Incoming SMTP option, it enables the Apply content filtering dialog box. If you have already enabled the SMTP filter, this dialog will be checked, but grayed out. In this example, we'll select all of the options except the Apply content filtering and Incoming Microsoft Exchange/Outlook options. We'll cover secure Exchange RPC publishing and using the SMTP Message Screener later in this chapter. Make your selections and click Next to continue.
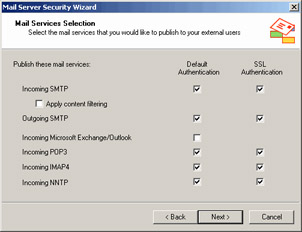
Figure 28.15: The Mail Service Selection Page -
On the ISA Server's External IP Address page, click Browse and select the IP address on the external interface of the ISA server you want to listen to incoming messages for your internal Exchange server. Click Next.
-
On the Internal Mail Server page, enter the IP address of the internal network Exchange server in the At this IP address text box. Note that if you select the On the local host option, the wizard will create packet filters instead of publishing rules. This is why we did not use the Secure Mail Server Publishing Wizard when configuring Exchange services publishing on the ISA server. Click Next to continue.
-
Click Finish.
-
Click the Server Publishing Rules node and you'll see a number of server publishing rules created by the wizard. Click the Protocol Rules node and you'll see that an SMTP and SMTPS protocol rule has been created for the SMTP server so that it can communicate with external network SMTP servers
The wizard works almost perfectly except for one problem. Your SMTP server will probably need to resolve MX domain names using DNS queries. If you use an internal DNS server for MX domain name resolution, you don't have to create a DNS protocol rule for the Exchange server. If you want the Exchange server to resolve MX domain name records, then you should create a DNS Query and a DNS Zone Transfer protocol rule that allows the Exchange server to resolve Internet mail domain names.
The non-SSL publishing rules work right away. You'll need to follow the instructions provided earlier in this chapter regarding certificate assignment and secure connection configuration for the Exchange services if you want to users to connect to the Exchange server using secure SSL connections.
Exchange RPC Publishing
You have the option to publish Exchange RPC services when the Exchange server is on the internal network. This is one of the most compelling reasons for getting the Exchange server off the ISA server and onto an internal network server.
Why would you want to create an Exchange RPC server publishing rule? Here are some advantages:
-
The RPC link can be secure.
-
Data encryption can be enabled between the Outlook client and the Exchange server.
-
Exchange RPC server publishing is easy.
-
External client access is limited to mail services only. The client has no access to any other services on the network.
-
Users continue to use their familiar Outlook 2000/XP client.
There is an impression that RPC connections are not secure. While in many circumstances this might be the case, it is not true when you use the Exchange RPC filter to publish Exchange servers. The RPC filter handles connections between the Internet Outlook client and the internal Exchange server; it creates dynamic packet filters that can be used only by specific Outlook clients that establish the connection. Only Exchange RPC UUIDs are available, so you don't have to worry about other RPC services being exposed to the Internet.
You can configure Outlook to encrypt data over the RPC link. If you do a Network Monitor trace, you'll find that even when the data isn't encrypted, there is nothing meaningful in the ASCII decode (in Network Monitor). You are assured a very high level of security for data transferred between the Outlook client and the internal Exchange server when you add data encryption to the connection
Exchange RPC publishing is easy. A single server publishing rule allows your Outlook MAPI clients to access the internal Exchange server. There are no special configuration requirements on the Exchange server, and when the network infrastructure is configured correctly, no configuration changes are required on the Outlook client.
The only other way to connect your external Outlook MAPI clients to an internal network Exchange server is to allow them to establish a VPN link into the internal network. While this option is a viable one for your network administrators and other trusted accounts, you do not necessarily want all of your users (which might include contractors and temps) to have free reign over the corporate network from remote locations. VPN connections are wholly inappropriate for Exchange hosting scenarios. Exchange RPC server publishing gets around this problem by allowing users access only to the Exchange server and nothing more.
End users balk when they have to switch applications to get the same job done. This is especially the case with mail client software. If you have standardized users on Outlook 2000/XP, those users want to use Outlook while at home or on the road. Exchange RPC publishing allows them to use the same familiar interface they use at work, at home, or on the road.
How Exchange RPC Publishing Works
The typical "on the road" Outlook client first establishes a connection to the Internet through a local ISP. The client might also be on a remote network and connects to the Exchange server via a Network Address Translation (NAT) server on the remote network. When the user opens Outlook, the following communications take place:
-
Outlook establishes a connection to TCP port 135 on the external interface of the ISA server.
-
The ISA server's Exchange RPC filter intercepts the request and forwards the request to the internal network Exchange server. The internal network Exchange server responds to the request by sending a port number on which the Outlook client can send its messages. The Exchange RPC filter on the ISA server intercepts this response and opens a dynamic packet filter on its external interface. The dynamic packet filter assigns a port on the external interface of the ISA server on which only this particular Outlook client can communicate. Any other Internet host will not be able to use that port for inbound access. The ISA server maps this port on its external interface to the port number the Exchange server expects to receive messages from the Internet Outlook client. In addition, when the Outlook client logs on, it registers a port on which it can receive new mail notification messages from the Exchange server. The ISA server RPC filter also registers this port number, creates a dynamic packet filter, and passes the new mail notification messages from the Exchange server to the Internet Outlook client.
-
The ISA server forwards the response from the Exchange server. The Outlook client receives the port number on the external interface of the ISA server to which it can send its messages to the Exchange server.
-
The Outlook client establishes a connection to the mapped port on the external interface of the ISA server and through that port connects to the internal network Exchange server.
Figure 28.16 depicts this sequence of events.

Figure 28.16: Establishing an Exchange RPC Connection
Preparing the Infrastructure for Exchange RPC Publishing
You need to take care of a few things before your RPC server publishing rule works correctly:
-
Creating the supporting DNS infrastructure
-
Creating the DNS and SMTP protocol rules
-
Configuring the Authentication method
-
Supporting clients behind NAT servers/ISA servers
Creating the Supporting DNS Infrastructure
DNS issues crop up constantly on the ISAserver.org message boards and newsgroups. If your DNS infrastructure isn't in place and working properly, the ISA server rules won't do what you want them to do. If your DNS infrastructure is already set up and working, great! If it's not, you need to come to terms with it and get it fixed.
The ideal DNS configuration is referred to as a split DNS. In the split DNS configuration, you maintain two separate zones, one for internal network clients to use and one for external network clients to use. These two zones service the same domains, but the resource records on the internal DNS server have the private IP addresses for your network clients, and the external DNS server has the public IP address for your published network resources.
| Warning | Note that when we use the terms internal and external DNS server, we're not referring to the physical location of these DNS servers. The internal and external DNS server can be located on the internal network. The external DNS server on the internal network is published using a server publishing rule, allowing external network clients to resolve your public domain resources to the external interface of the ISA server. The internal network DNS is always on the internal network because only internal network clients use this server. |
For example, a common problem is that users can access the published Web server www.domain.com from external network hosts, but can't access the site when they're on the internal network. The problem is that internal network clients are trying to connect to the published server via the external interface of the ISA server because internal network clients are using the same host records as the external network clients for name resolution. When you create an internal DNS server that internal network clients use, the internal network clients receive the private IP address of the published server and therefore connect directly to the server.
Now, in regard to our Exchange RPC publishing situation, you need to make sure that the host name of the internal network Exchange server is the same as the host name used to access the server from the Internet. This requirement makes the split DNS configuration even more important, since the split DNS allows the transition between the internal and external network to be transparent to the users.
For example, if the server name is exchange.domain.com on the internal network, you need to ensure that exchange.domain.com is also accessible from the external network. You can accomplish this with a split DNS configuration by creating a Host (A) record on your external DNS server for exchange.domain.com to point to the external interface address on the ISA server that you are using in the Exchange RPC publishing rule.
The reason why you must configure the Host (A) record is that the name of the Exchange server is returned to the Outlook client when it makes the RPC connection. The Outlook client must be able to communicate with the name received from the Exchange server, which is the Exchange server's NetBIOS name. Note that only the host name portion of the FQDN will appear in the Outlook configuration dialog box after the name is resolved. For example, when you configure Outlook to use the Exchange server, you type in the name of the Exchange server as exchange.domain.com. When the client successfully connects to the internal network Exchange server via the RPC publishing rule, the name in the configuration dialog box will change to EXCHANGE.
If your organization does not use the same naming conventions for internally and externally accessible resources, you can still access the Exchange server via the RPC publishing rule. In this case, all you need to do is create a HOSTS file entry with the NetBIOS name of the computer. You do not need to include the FQDN of the Exchange server in the HOSTS file; just the NetBIOS name is required to make it work.
| Note | It is best practice to use the same name for both the computer DNS host name and NetBIOS name. We have not tested the configuration with a disjoint NetBIOS and DNS host name configuration, so we cannot guarantee that it will work if you maintain a disjoint NetBIOS/DNS namespace. |
Creating the DNS and SMTP Protocol Rules
The Exchange server needs to forward mail it receives from the Outlook client to SMTP servers on the Internet. You need to create two protocol rules:
-
A DNS Query and DNS Zone Transfer protocol rule
-
An SMTP protocol rule
The DNS Query and Zone Transfer protocol rules allow the Exchange IIS SMTP service to resolve the MX domain name records for the outgoing mail. You can configure the protocol rule to allow only the Exchange server access, or you can configure it to allow all machines on the network to use it. Access control on the DNS Zone Transfer protocol rule depends on which machine is resolving the MX domain names. You might want to forward the queries to an internal DNS server and let it take care of name resolution.
Make sure you create a client address set for the servers that you want to have access to this DNS protocol rule. The servers, whether Exchange or DNS servers, will not have logged-on users, or will not have the Firewall client installed on them. The only way to allow outbound access control for SecureNAT clients is via client address sets. Create a client address set for all servers that need access to the rule, and assign the client address set to the rule.
The SMTP protocol rule is required for the Exchange server to send out mail to external mail domains. Access controls on the SMTP protocol rule depend on what machine actually sends mail to external SMTP servers. Allow only the Exchange server access to the SMTP protocol rule if the Exchange server sends mail directly to Internet SMTP servers. Allow the SMTP relay access to the SMTP protocol rule if you use an SMTP relay server for outbound mail. If you are using a mail relay, make sure that the SMTP relay server has access to the DNS protocol rule as well. The exception would be when you are allowing an internal DNS server to resolve Internet mail domains for the relay.
Configuring the Authentication Method
When Outlook logs on to the Exchange server, the Exchange server instructs the Outlook client to authenticate with an Active Directory domain controller. The problem is you do not want to open the ports responsible for authentication through the ISA server. To get around this problem, you can configure the Exchange server to perform authentication on the behalf of the Outlook client.
To configure the Exchange server to proxy authentication requests for the Outlook client, navigate to the following Registry key:
HKLM\System\CurrentControlSet\Services\MSExchangeSA\Parameters
Add the following:
-
Value No RFR Service
-
Type REG_DWORD
-
Data 1
Note that the value does have spaces in it. At first we thought that this might have been a typo, but we confirmed that the spaces should be included. After adding the value, restart the Exchange server. Note that you do not need to add this value if the Exchange server is also a domain controller.
Clients Behind NAT Servers/ISA Servers
If the Outlook client is behind a NAT server or an ISA server, it will not be able to receive new mail notification requests. The reason is that these new mail notification requests are not part of the existing RPC connection between Outlook and the Exchange server. The NAT server and ISA server drop the packet because the new mail notification message is seen as an unsolicited inbound request.
This doesn't mean that you won't ever get any new mail. If you send mail to the Exchange server, a new mail notification message is sent through the active RPC channel between the Outlook client and the Exchange server when the message is sent. However, RPC wasn't designed for use over the Internet. If there is an error in any of the RPC packets carrying the new mail notification, the notification message will not go through. You can get around this by forcing synchronization with the F9 key in Outlook 2000, or set up the Exchange account to carry out an automatic send/receive every few minutes in Outlook 2002. The exception to this is when you encrypt the data connection between Outlook and the Exchange server. In that case, e-mail notification never works, and you have to click on a folder to initiate the connection.
The good news is that everything else works fine when Outlook is behind the NAT server. If you use the Windows 2000 RRAS NAT, no further configuration is required for the NAT routing protocol. If there is an ISA server in front of the Outlook client, you will need to configure an RPC protocol definition and configure the client as a Firewall client. You must use the Firewall client configuration because SecureNAT clients do not support secondary connections.
You need to create the following protocol definition (Figure 28.17):

Figure 28.17: Outbound RPC Protocol Definition
-
Primary connection TCP 135 Outbound
-
Secondary connections TCP 1025-65534 Outbound
The initial connection takes place on TCP 135. The remote ISA server (the one publishing the Exchange server) sends back to the local ISA server (the one in front of the Outlook client) the port number on which the Outlook client needs for subsequent requests. Since this new outgoing connection is part of the original RPC conversation, a secondary connection to an ephemeral (high number) port is required outbound from the local ISA server to the remote ISA server. Once you create the RPC protocol definition, create a protocol rule using this protocol definition.
Creating the Exchange RPC Server Publishing Rule
The Exchange RPC server publishing rule uses a protocol definition provided by the RPC application filter. If you disable the application filter, you lose the protocol definition. Perform the following steps to create the server publishing rule:
-
In the ISA Management Console, expand the server or array name and the Publishing node.
-
Right-click the Server Publishing Rules node and select New | Rule.
-
On the page, enter a name for the rule and click Next.
-
On the Address Mapping page, enter the IP address of the internal Exchange server and the IP address on the external interface you want external network clients to use to access the Exchange server. Click Next.
-
On the Protocol Settings page, select the Exchange RPC Server rule and click Next.
-
On the Client Type page, select Any Request and click Next (it's unlikely you'll be able to identify a client address set to assign the external Outlook clients).
-
On the final page of the wizard, click Finish.
The rule will take effect soon after you click Finish. If you want the rule to apply right away, restart the Firewall service.
| Warning | Configuring the Outlook client is beyond the scope of this book, and the procedures vary depending on the version of Outlook you're configuring. Both Outlook 2000 and Outlook 2002 (XP) can use the Exchange RPC publishing rule to access the Exchange server on the internal network. It is important to note that you can force the client to use an encrypted RPC connection when connecting to the ISA server. There is one drawback to using an encrypted channel: you will never receive notifications of new e-mail. In fact, you won't receive notification of new e-mail even if you schedule an automatic Send/Receive or press F9, depending on the version of Outlook. To receive new e-mail notification messages, you must click on an existing message or folder to initiate a connection with the Exchange server . If you are using Outlook 2000, do not install Office Service Pack 2. There appears to be an undocumented issue preventing Outlook 2000 SP2 clients from connecting to an Exchange 2000 server published using the RPC server publishing rule. This problem appears to be specific to the server publishing rule, because if you bring the client onto the internal network, you can log on to the Exchange server without problems. |
Publishing Outlook Web Access on the Internal Network Exchange Server
The same procedures used to publish OWA on the ISA server are used when you publish OWA on the internal network Exchange server. The only difference is that you don't need to worry about disabling socket pooling on the ISA server because you'll choose to disable the IIS W3SVC on the ISA server for security purposes.
As a review, here are the basic procedures required to publish the OWA site on the internal network Exchange server:
-
Configure the OWA Web site on the Exchange server Configure folder permissions, obtain and assigning a certificate for the Web site, configure a port for SSL connections on the default Web site, and configure the sites to require an SSL connection.
-
Configure the Incoming Web Requests listener on the ISA server Create the individual listener, export the OWA Web site certificate and import it into the ISA Server's machine certificate store, and bind the certificate to the Incoming Web Requests listener.
-
Create the Web publishing rule Create the destination set used for the OWA Web publishing rule, create the Web publishing rule, and configure the rule to bridge SSL connections as SSL.
-
Configure the OWA client Web browser Improve performance for the OWA client by installing a client certificate on all browser clients.
For details of this configuration, check the relevant sections on how to publish OWA on the ISA server. The only difference is that you use the internal IP address of the Exchange server rather than the IP address of the internal interface of the ISA server for the redirect.
| Note | There is a good chance that by the time you read this book, Microsoft will have released the ISA Server Feature Pack. One of the features included in the major update to ISA Server is an Outlook Web Access Publishing Wizard. The wizard will greatly simplify publishing of OWA sites. However, like all wizards, it will have its limitations. Check www.isaserver.org/shinder for updates on this feature of the ISA Server Feature Pack and other important ISA Server news and articles. |
Message Screener on the Internal Network Exchange Server
You can install the Message Screener on the internal network Exchange server. The difference between the installations is that when the Message Screener is on the ISA server, the entire ISA Server software package is installed on the ISA/Exchange Server computer. In contrast to the "all but the kitchen sink" approach we covered earlier, when the Exchange server is on a dedicated server, all you need to install is the SMTP Message Screener. You don't need to install any other component of the ISA Server software.
Run the ISA Server installation program as you usually would to install only the Message Screener component on the internal network Exchange server. Select the Custom installation option and then deselect the ISA Services and Administration tools options in the Custom Installation dialog box (Figure 28.18).
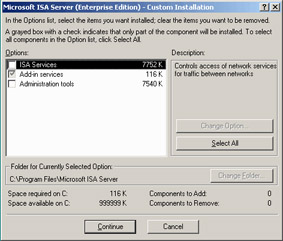
Figure 28.18: The Custom Installation Dialog Box
Select the Add-in services option and click Change Option. Remove the Install H.323 Gatekeeper Service option (Figure 28.19). The only component you want is the Message Screener. Make sure that the Message Screener option is selected and complete the installation on the Exchange server computer. You won't see any new configuration interfaces or Start menu items related to the Message Screener on the Exchange server. Configuration of the Message Screener is done via the SMTP filter on the ISA server.
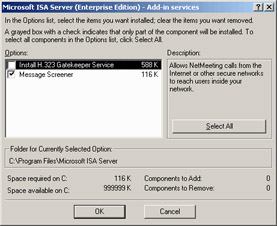
Figure 28.19: Selecting the Message Screener
The next step is to configure credentials that the Message Screener software will use to communicate with the SMTP application filter on the ISA server. Credentials are configured using the SMTPCRED tool, which is installed in the Program Files\Microsoft ISA Server folder on the Exchange server's hard disk after running the Message Screener installation.
Open the SMTPCRED tool by double-clicking it. In the Message Screener Credentials dialog box (Figure 28.20), enter your ISA server name, the Username of the person who installed the ISA server, the Domain to which that user account belongs, and the Password of that user. Note that you do not need to use the credentials of the user who installed the ISA server, but it does streamline the process and reduces troubleshooting issues encountered with the Message Screener by an order of magnitude. Click OK after entering the information.

Figure 28.20: The SMTPCRED Tool
The last thing is to configure DCOM permissions. The Message Screener communicates with the SMTP application filter via DCOM. While this isn't an issue when the ISA server and the Exchange server are on the same machine, it does become an issue when they are on different machines.
Perform the following steps to configure the DCOM permissions:
-
Select Start | Run and type dcomcnfg.exe in the Open text box. Click OK.
-
Click the Applications tab and select VendorData class | Properties (Figure 28.21).
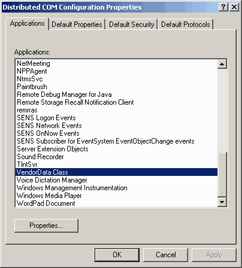
Figure 28.21: The DCOM Configuration Properties Dialog Box -
On the VendorData Class Properties dialog box, click the Security tab (Figure 28.22). Select the Use custom access permissions and click Edit. Figure 28.22 The VendorData Class Properties Dialog Box
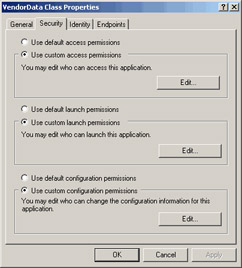
Figure 28.22 -
Add the Everyone group by clicking Add and selecting the Everyone group (Figure 28.23). Click OK.
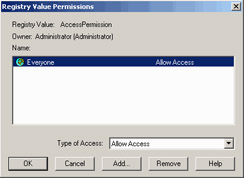
Figure 28.23: Adding the Everyone Group -
Repeat steps #3 and #4 to edit the Use custom launch permissions and Use custom configuration permissions options.
-
Click OK.
-
Restart both the ISA server and the Exchange server. We suggest restarting the ISA server first.
The remainder of the configuration is the same as when you run the Message Screener on the ISA/Exchange server computer. You will be able to screen for incoming and outgoing messages, but you will have the same limitations regarding Outlook MAPI clients sending SMTP messages to the Internet. The solution is the same: create a second virtual SMTP server and have the default SMTP virtual server forward mail to the second SMTP virtual server. The Internet-bound messages sent by Outlook clients will be exposed to the SMTP Message Screener when they are forwarded to the second SMTP virtual server.
|
EAN: 2147483647
Pages: 240
- The Effects of an Enterprise Resource Planning System (ERP) Implementation on Job Characteristics – A Study using the Hackman and Oldham Job Characteristics Model
- Context Management of ERP Processes in Virtual Communities
- Distributed Data Warehouse for Geo-spatial Services
- Data Mining for Business Process Reengineering
- Healthcare Information: From Administrative to Practice Databases