Configuring an IKE VPN
|
We will use the same assumptions that we have two gateways, both managed by the same management station. As before, be sure to define network objects for the networks that will be participating in your VPN domain. We will use Local_Net and Remote_Net again for these networks.
Defining Objects
For any site-to-site VPN, you will need to create and properly configure certain network objects, including both gateways and the networks or group objects representing your VPN domains.
Local Gateway
Under the VPN tab of your gateway's Workstation Properties window, select the IKE encryption scheme and click Edit. The IKE Properties dialog comes up (see Figure 16.6). Notice that you have more encryption and data integrity choices with IKE than with FWZ. Select any and all of the encryption and data integrity methods you want your gateway to support, and check Pre-Shared Secret under Support authentication methods (you would check Public Key Signatures if you were using certificates). You will not be able to edit this secret until you define your remote gateway's encryption properties.
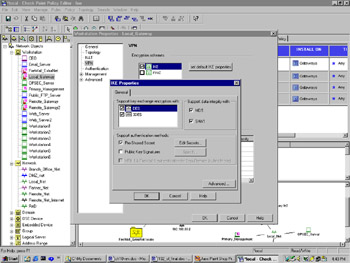
Figure 16.6: IKE Properties Dialog
Next, open the Topology tab of the Workstation Properties window (see Figure 16.2). This is where you will define the VPN domain for your local gateway. Under VPN Domain, select Manually Defined, and choose your local network from the drop-down list.
Remote Gateway
Configuration of the remote gateway is nearly identical—you just need to make sure that you support the same methods of encryption and data integrity as you did on the local gateway. When you check Pre-Shared Secret this time, you can click on Edit Secrets, where you should see your peer, the local gateway, in the Shared Secrets List window (see Figure 16.7). You can edit the shared secret by highlighting the peer gateway in the list and clicking Edit. Enter the agreed-upon shared secret in the Enter secret text field, and click Set to define it. Don't forget to define your VPN domain under the Topology tab, by opening the Topology tab of the Workstation Properties window (see Figure 16.2). Under VPN Domain, select Manually Defined, and choose your remote network from the drop-down list.
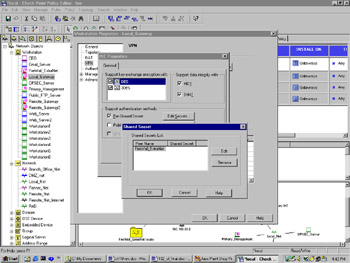
Figure 16.7: Shared Secret Configuration
Adding VPN Rules
You will want to modify your rule base so that traffic between Local_Net and Remote_Net is encrypted. As in the section on FWZ encryption, this is done with the addition of two rules to your rule base (see Figure 16.8).
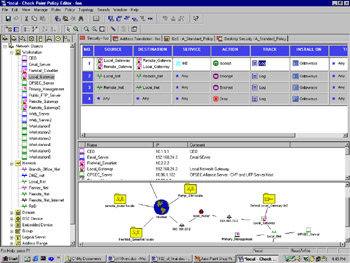
Figure 16.8: IKE Encryption Rules
One rule specifies the following:
-
Source: Local_Net
-
Destination: Remote_Net
-
Service: Any
-
Action: Encrypt
-
Track: Log
While the other specifies the following:
-
Source: Remote_Net
-
Destination: Local_Net
-
Service: Any
-
Action: Encrypt
-
Track: Log
Rule 1 allows key exchange to occur between the two gateways by allowing the predefined service "IKE" to be accepted bidirectionally. This rule is only necessary if you have Accept VPN-1 & FireWall-1 control connections unchecked in your security policy's Global Properties window (see Figure 16.5). This is checked by default, so in most cases you won't need a rule 1 as shown previously. Note that the "IKE" service is included in the "FireWall1" service group, so you can use the same rules here that you used earlier, under FWZ encryption. Specifying only the IKE service here gives you more control over exactly what traffic you want to allow between gateways, and is especially important when your peer gateway is not managed by you. See the next section for more considerations of this sort.
If you double-click on the Encrypt action in either encrypt rule, you will open the Encryption Properties dialog, from which you select IKE and click Edit (see Figure 16.9).
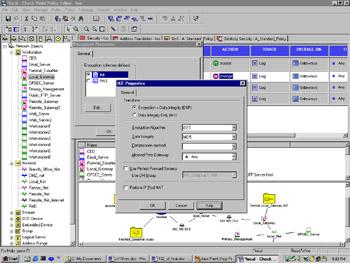
Figure 16.9: IKE Properties Dialog
You have more choices here than you did when you used FWZ encryption. Go through the options given here one at a time:
-
Transform Determines how each packet is encapsulated prior to being transmitted to the peer gateway. "Encryption + Data Integrity (ESP)" is the default, and is probably what you want in most cases. The other option, "Data Integrity Only (AH)," does not provide encryption, only authentication.
-
Encryption Algorithm Choose an encryption algorithm from the list. Strong encryption is available with IKE (for example, Triple-DES or AES).
-
Data Integrity Choose the hash method used to provide authentication. SHA1 is available here, in addition to MD5.
-
Compression Method Normally, only "Deflate" is available here. This specifies the method used to compress IP datagrams. Select None if you do not want the added CPU overhead.
-
Allowed Peer Gateway Specifies exactly which gateways this one is prepared to establish a VPN with. Defaults to "Any," meaning that you will allow VPN traffic from or to any gateway if the packets source or destination IP address is in the other gateway's VPN domain.
-
Use Perfect Forward Secrecy (PFS) PFS adds an added measure of security to key exchanges, with some additional overhead.
-
Use DH Group This enables you to select which Diffie-Hellman group you would like to use for encryption. Selecting a "longer" group means better key security.
-
Use IP Pooling Allows the use of a predefined "Pool" of IP addresses that are assigned to incoming VPN connections. This is typically used to prevent or fix asymmetric routing conditions where inbound and outbound VPN traffic follow different routes.
Testing the VPN
Once the configuration is complete, install the security policy on both gateways. Try to establish a connection from a host in your local VPN domain to a host in the remote gateway's VPN domain. You should see packets with a local source address and a remote destination address being encrypted on the way out the local gateway, and corresponding packet decryptions on the remote gateway (see Figure 16.10). If this is not immediately apparent, or if you see errors in the log, then see the next section for some troubleshooting tips.
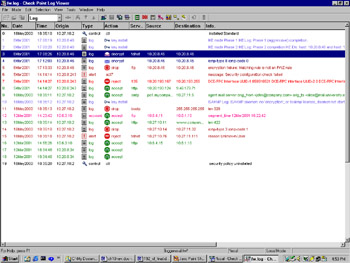
Figure 16.10: Log Viewer Showing Encrypts, Decrypts, and Key Exchanges
Debugging VPNs
Troubleshooting VPNs has traditionally been rather difficult. There are certain steps you can take to make troubleshooting and testing of VPN deployments easier:
-
Enable implied rule logging in the security policy Global Properties window.
-
Under the security policy Log and Alert tab in the Global Properties window, enable all the three encryption-specific log events: VPN successful key exchange, VPN packet handling errors, and VPN configuration and key exchange errors.
-
Disable NAT (Network Address Translation) by adding one or more manual rules to the NAT rule base that force traffic between opposing VPN domains to be "Original," or un-NATed. NAT can be used with VPNs; however, disabling it allows for cleaner testing (see Figure 16.11).
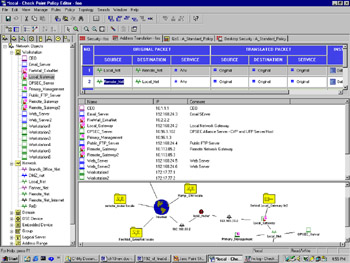
Figure 16.11: Address Translation Disabled between VPN Domains with Manual Rules -
Be aware that the gateways participating in the VPN and perhaps the management stations need to communicate prior to the VPN tunnel being established (key exchange, protocol negotiation, etc.). You may need a rule in your rule base explicitly allowing this communication (see the previous FWZ and IKE encryption rule base examples). Be aware of where in your rule base your stealth rule is, and how this might impact such communication. Implied rule and VPN logging, discussed earlier, will show you such communication in a default installation.
-
Remember to test traffic from VPN domain to VPN domain, not from gateway to gateway. Normally, gateways are not included in VPN domains, and so they cannot provide a platform for reliable tests.
-
Be aware that using just ICMP (ping) tests may not tell whether a VPN is working correctly. This especially applies if you don't have control over the other VPN endpoint. Administrators are often leery of allowing ICMP through their firewall and/or border routers, and may be dropping it with implicit or explicit rules before any encryption can take place. A better test, and one that works on any platform with a "telnet" binary, is to telnet to a port other than the traditional port 23, using one that you know is open. For example, if your VPN peer has a DNS server in her VPN domain, "telnet <IP of DNS server> 53" would show you that you could establish a TCP connection through your VPN tunnel.
-
Your gateway may attempt to encrypt packets even if key exchange is not complete, causing you to wonder why a VPN is failing to work if encryption is taking place. If you filter your Log Viewer for Key Install under the Action column, you will see key exchange as it occurs. The Info field of each log entry in this case may contain useful error messages relevant to key exchange errors.
-
For every "encrypt" action on your gateway, your partner's firewall should show a corresponding "decrypt" action. You may or may not have access to those logs, so the preceding tips can help you test in that case.
Considerations for External Networks
It is important that all encryption rules have the same exact parameters defined under their respective Encryption Properties dialog. Your VPN will fail if they do not. This is easy to check when you manage both the local and remote gateways, but can be harder to verify when the remote gateway is managed by another management station, or even another company. Typically, this coordination is done via telephone, agreed upon ahead of time as in "We will use IKE with 3DES encryption, SHA-1 data integrity, key exchange for subnets, and no perfect forward secrecy." Most VPN failures are a result of someone changing his or her respective VPN parameters, causing key exchange, encryption, or decryption to fail.
|
EAN: 2147483647
Pages: 240