13.5. Database and Table Space Recovery Using the RESTORE DATABASE Command You can restore the backup image obtained by the BACKUP DATABASE command using the RESTORE DATABASE command. You can choose to recover the entire database or just the individual table space(s). 13.5.1. Database Recovery You can restore a database backup image into a new or existing database. You need SYSADM, SYSCTRL, or SYSMAINT authority to restore into an existing database, and SYSADM or SYSCTRL authority restore to a new database. This syntax of the RESTORE command is: RESTORE DATABASE source-database_alias { restore_options | CONTINUE | ABORT }
You can use one or more of the following for restore_options: [View full width] [USER username [USING password]] [{TABLESPACE [ONLINE] | TABLESPACE (tblspace-name [ {,tblspace-name} ... ]) [ONLINE] | HISTORY FILE [ONLINE] | COMPRESSION LIBRARY [ONLINE] | LOGS [ONLINE] }] [INCREMENTAL  [AUTOMATIC | ABORT]] [{USE {(TSM | XBSA) [OPTIONS ("option string" | @ filename)]} [OPEN num-sess SESSIONS] | FROM dir/dev [ {,dir/dev} ... ] | LOAD shared-lib [OPTIONS ("option string" | @ filename)] [OPEN num-sess SESSIONS]}] [TAKEN AT date-time] [TO target-directory] [INTO target-database_alias] [LOGTARGET directory] [NEWLOGPATH directory][WITH num-buff BUFFERS] [BUFFER buffer-size] [DLREPORT file-name] [REPLACE EXISTING] [REPLACE HISTORY FILE] [REDIRECT] [PARALLELISM n] [COMPRLIB name] [COMPROPTS string] [WITHOUT ROLLING FORWARD] [WITHOUT DATALINK] [WITHOUT PROMPTING][LOGTARGET] [AUTOMATIC | ABORT]] [{USE {(TSM | XBSA) [OPTIONS ("option string" | @ filename)]} [OPEN num-sess SESSIONS] | FROM dir/dev [ {,dir/dev} ... ] | LOAD shared-lib [OPTIONS ("option string" | @ filename)] [OPEN num-sess SESSIONS]}] [TAKEN AT date-time] [TO target-directory] [INTO target-database_alias] [LOGTARGET directory] [NEWLOGPATH directory][WITH num-buff BUFFERS] [BUFFER buffer-size] [DLREPORT file-name] [REPLACE EXISTING] [REPLACE HISTORY FILE] [REDIRECT] [PARALLELISM n] [COMPRLIB name] [COMPROPTS string] [WITHOUT ROLLING FORWARD] [WITHOUT DATALINK] [WITHOUT PROMPTING][LOGTARGET]
To perform a restore of the sample database, use this syntax:
RESTORE DATABASE sample (1)
FROM C:\DBBACKUP (2)
TAKEN AT 20040428131259 (3)
WITHOUT ROLLING FORWARD (4)
WITHOUT PROMPTING (5)
Indicates the name of the database image to restore. Specifies the location where the input backup image is located. If there is more than one backup image in the directory, this option identifies the specific backup based on the timestamp, which is part of the backup file name or directory structure. If a database has archival logging enabled, a restore operation puts the database in roll forward pending state, regardless of whether the backup was online or offline. If restoring from an offline backup, you can choose not to roll forward. This option tells DB2 not to place the database in roll forward pending state. When restoring from an online backup, the "without rolling forward" option cannot be used, as you must roll forward to at least the time that the backup completed. Specifies that the restore is to be performed unattended. Action that normally requires user intervention will return an error message. When using a removable media device, such as tape or diskette, you will be prompted when the device ends even if this option is specified.
Note that there is no keyword OFFLINE in the syntax, as this is the default mode. In fact, for the RESTORE utility, this is the only mode allowed for databases.  | In section 13.4.2, Database Backup, we mentioned that in Version 8.2 a new option, INCLUDE LOGS in the BACKUP DATABASE command, allows you to back up the logs needed for roll forward recovery. If you specified this option, you need to provide a location to restore the log files with the LOGTARGET option. Or you can choose to only restore the log files without restoring the backup image. |
For example, on Windows, to restore the SAMPLE database from a backup image residing in the C:\DBBACKUP directory and restore the log files to C:\DB2\NODE0000\SQL00001\SQLOGDIR directory, issue: RESTORE DATABASE sample FROM C:\DBBACKUP LOGTARGET C:\DB2\NODE0000\SQL00001\SQLOGDIR
To restore just the logs, issue: RESTORE DATABASE sample LOGS FROM C:\DBBACKUP LOGTARGET C:\DB2\NODE0000\SQL00001\SQLOGDIR
13.5.2. Table Space Recovery You can restore table spaces either from a full database backup or from a table space backup. Table space recovery requires some careful planning, as it is easy to make mistakes that can put your data into an inconsistent state. The following is an example of a table space restore:
RESTORE DATABASE sample (1)
TABLESPACE ( mytblspace1 ) (2)
ONLINE (3)
FROM /db2tbsp/backup1, /db2tbsp/backup2 (4)
where: Indicates the name of the database image to restore. Indicates that this is a table space restore, and specifies the name of the table space(s) to restore. Indicates this is an online restore. Note that for user table spaces, both online and offline restores are allowed. As mentioned earlier, only offline restores are allowed for databases. Specifies the location where the input backup file is located.
13.5.3. Table Space Recovery Considerations After a table space is restored, it is always placed in roll forward pending state. To make the table space accessible, the table space must be rolled forward to at least a minimum Point In Time. This minimum PIT ensures that the table space and logs are consistent with the system catalogs. For example: Say at time t1 you took a full database backup that included table space mytbls1. At time t2 you created table myTable in the table space mytbls1. This set the minimum PIT for recovery of the table space mytbs1 to t2. At time t3 you decided to restore only table space mytbls1 from the full database backup taken at t1. After the restore is complete, table space mytbls1 will be placed in a roll forward pending state. If you were allowed to roll forward to a point prior to the minimum PIT, table space mytbls1 will not contain the table myTable, but the system catalog would say that the table does exist in mytbls1. To avoid inconsistencies like this, DB2 forces you to roll forward at least to the minimum PIT when you restore a table space.
A minimum PIT is updated when DDL statements are run against the table space or against tables in the table space. To determine the minimum PIT of recovery for a table space you can do either of the following: In offline mode, the system catalog table space (SYSCATSPACE) must be rolled forward to the end of logs. We discuss more about the ROLLFORWARD command in the next section. 13.5.4. Performing RESTOREs with the Control Center You can use the Restore Data Wizard to perform restores. In the Control Center, expand your database folder, right-click on the database name you want to restore, and select Restore. The Restore Data Wizard is launched. Figure 13.8 shows that you have the options to restore to an existing database, a new database, or only the history file. The Restore Data Wizard guides you through the restore command options. (We will discuss the history file in section 13.7, Recovering a Dropped Table.) Figure 13.8. The Restore Data Wizard 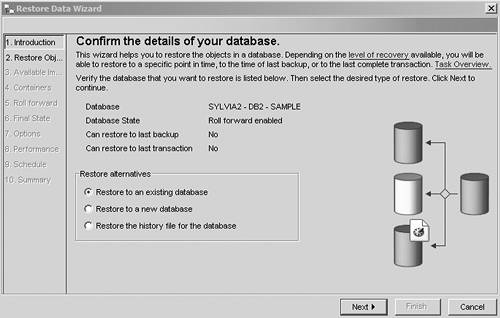
13.5.5. Redirected Restore We mentioned earlier that a backup file includes information about the table spaces and containers. For example, let's say one of the table spaces, TS2, has a file container /database/ts2/cont1. This information is stored in the backup image. When you restore this backup image to a different server, DB2 will try to create exactly the same container. If the directory /database does not exist, DB2 will try to create it. But most likely this will fail because DB2 does not have the proper authority. In this case, a regular restore will not work. However, a redirected restore solves this problem. During a redirected restore, you can specify new paths for the table space containers, and data will be restored to the new containers. To change the container definitions during a redirected restore, you need to obtain the current container definitions on the source database. Use the LIST TABLESPACES command to list all the table spaces including their table space IDs, and then use the LIST TABLESPACE CONTAINERS FOR tablespace ID command to obtain the container definition for each table space. Once you have this information, you can proceed with the redirected restore operation. A redirected restore is performed in three steps: 1. | Start the restore operation, but pause it so that you can change the table space definitions. To do this, include the REDIRECT keyword as part of the RESTORE command. The following shows an example of the command and output:
[View full width] RESTORE DATABASE DB2CERT FROM C:\DBBACKUP INTO NEWDB REDIRECT SQL1277N Restore has detected that one or more table space containers are inaccessible, or has set their state to 'storage must be defined'. DB20000I The RESTORE DATABASE command completed successfully.
| 2. | Specify the container definition for any table space you want to change.
SET TABLESPACE CONTAINERS FOR 0 USING (FILE "d:\newdb\cat0.dat" 5000) SET TABLESPACE CONTAINERS FOR 1 USING (FILE "d:\newdb\cat1.dat" 5000) ... SET TABLESPACE CONTAINERS FOR n USING (PATH "d:\newdb2")
In this example, n represents an ID of one of the table spaces in the backup. When using redirected restore, you cannot change the type of the table space from DMS to SMS or vice versa. The types must stay the same.
| 3. | Restore the data itself into the new containers by including the keyword CONTINUE:
RESTORE DATABASE DB2CERT CONTINUE
|
You can also use redirected restore to add containers to SMS table spaces. As discussed in Chapter 7, Working with Database Objects, SMS table spaces cannot be altered to add a container. Redirected restore provides a workaround to this limitation by redefining the containers. |