Ripple Versus Roll: Trimming Without Trim Mode
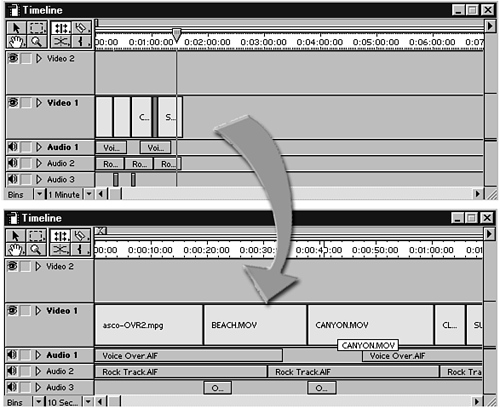
| After you have become familiar with the concept of trimming and how trim mode works, you will probably be ready to save time by trimming your shots without entering trim mode. (After all, this book is designed to teach you how to improve your projects and save time.) Premiere allows you to trim directly in the timeline for fast, easy editing. author's note When performing any kind of edit directly in the timeline, especially trimming, expand or enlarge your view of the timeline. Look at Figure 4.12. Which timeline view makes more sense to you for performing precise trimming and editing? Figure 4.12. Expand your timeline display for more accurate trimming.
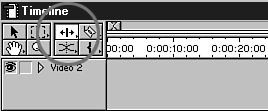
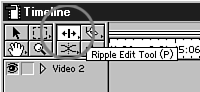
warning Trimming complex sequences and multilayered timelines can be difficult whether you're trimming directly in the timeline or in trim mode. It becomes very easy to knock out of sync segments that occur later in the timeline. I recommend creating backup sequences at first, until you get the hang of trimming. This way, you can always go back to an older version that is in sync with little hassle. The History Palette might not be able to take you back far enough by the time you realize your sequence was knocked out of sync. After you've edited a few clips together, you can fine-tune your edit points by trimming these clips directly in the timeline. Several types of trim features are available when you trim in the timeline window (see Figure 4.13). They are discussed in the following sections. Figure 4.13. Trimming tools available directly in the timeline.
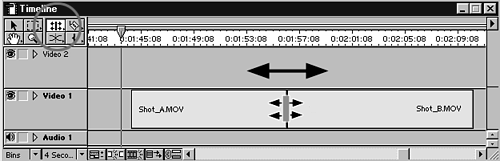
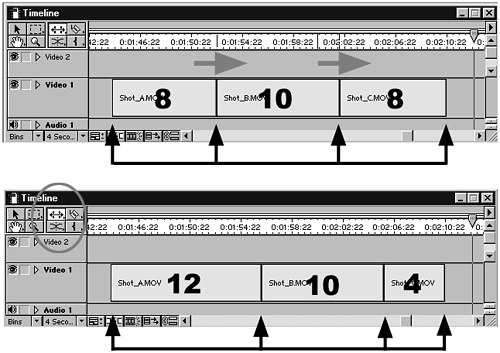
Rolling EditThis feature trims both sides of an edit point equally. However many frames are added to one side are equally reduced on the other side of the edit. This type of edit does not affect the overall duration of your movie, yet it does alter the duration of each segment that is affected (see Figure 4.14). Notice that when you trim with a positive value (to the right), the edit point between Shots B and C, the length of Shot B increases (displaying an out point that occurs later in time from the original source clip), and the length of Shot C decreases (changing the clip's starting frame to one that occurs later in time in the original source clip). Figure 4.14. Equally trimming both sides of an edit point does not affect your timeline's overall duration.
To use the Rolling Edit feature, do the following:
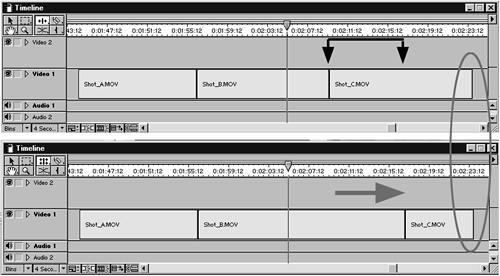
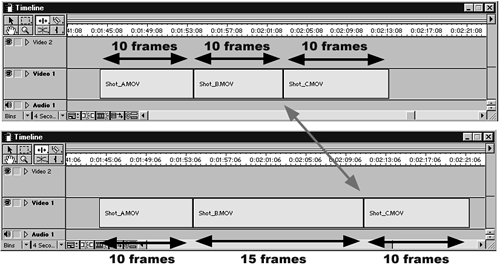
Ripple EditThis feature trims the selected clip, altering its overall duration, but it does not alter the duration of any other clips in the timeline. This technique alters where in time all other clips placed on the same track wind up after the clip being trimmed (see Figure 4.16). Notice that each clip in the timeline in Figure 4.16 is exactly 10 seconds long. If you use the Ripple Edit feature to extend Shot B, its duration changes to 13 seconds. The other shots are still 10 seconds in length, with their original starting and ending frames, but they appear later in time in the timeline's overall sequence, thus altering the duration of your entire movie (and potentially disrupting synchronization with segments on other audio or video tracks). Figure 4.16. Ripple Edit trims the selected clip without changing the duration of other clips in your timeline.
To use the Ripple Edit feature, do the following:
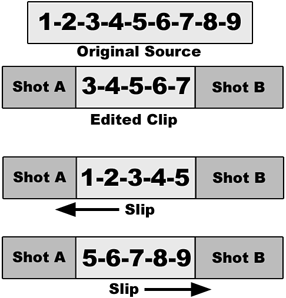
tip Open the Info Palette to display the timecodes of the starting and ending frames. This helps make trimming in the timeline more precise. Slip EditThis is a unique and extremely handy way of trimming a single clip inside a timeline without affecting anything about the clips next to it in the timeline. With a slip edit, the starting frame or in point of the selected clip is trimmed; at the same time, the last frame or end point of that clip is trimmed for the same relative value. This feature works extremely well when the following are true:
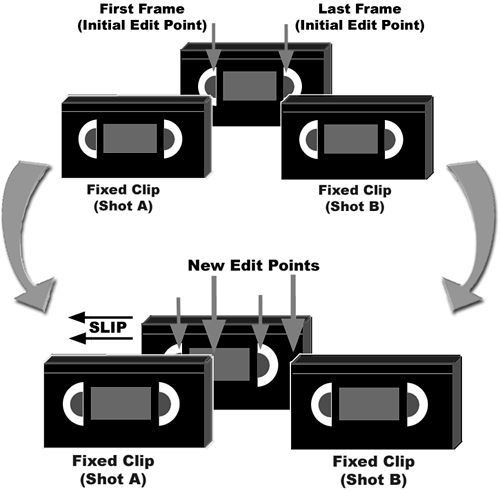
Therefore, based on the these scenarios, if you slip Shot B to have an earlier start frame (because you chopped off the beginning portion of the scene in your rough edit), the in point is adjusted back by the number of frames you choose (see Figure 4.18). Accordingly, the end frame is adjusted the same number of frames earlier in the clip than its original out point. Figure 4.18. "Slipping" a clip trims the beginning and end frame by the same number of frames.
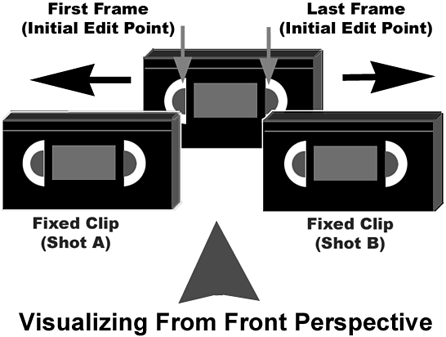
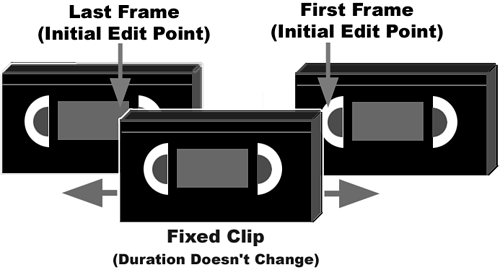
Think of my roller analogy when imagining how slipping a shot works. Picture a roller on the inside portions of a clip you are adjusting, with nothing affecting the clips on either side of it in the timeline (see Figure 4.19). As you trim the clip's in point (either releasing some of the handles from the original source material to show earlier portions of the clip or reeling up the footage to show a later portion of the clip as the new start frame), the opposite trim effect is taking place at the other end of the clip in the timeline. Therefore, if you go back earlier in time (to the left) at the starting frame using slip, the system automatically tightens the rollers at the other end, going back in time the same number of frames. If these two techniques did not function properly at the same time, there would be extra "slack" in the line (which in Premiere terms means extending the clip's duration something you don't want to happen). Figure 4.19. Slipping is the technique of trimming both ends of a single clip.
Try this as an example: A great way to visualize what is happening when slipping a shot in your timeline is to set up three videotapes on your desk (see Figure 4.20). Imagine that the front two tapes are the shots on each side of the clip you are slipping, and the back tape is the shot that is being altered. As you move the tape in the back side-to-side, you'll notice that the theoretic "in point" and "out point" are changing without affecting the two other clips in your timeline (see Figure 4.21). Figure 4.20. Use props (such as videotapes) to help visualize what is happening while trimming and slipping shots.
Figure 4.21. Notice how the clip's in and out points change when slipped, but this doesn't affect the rest of the timeline.
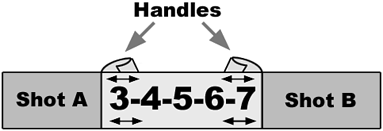
note You can only trim, slip, or slide footage for a maximum duration of the handles that exist for the clip from the original source footage. If no handles exist, you cannot adjust the clip. Slide EditA variation of the slip edit technique, this function allows you to move a clip around in your timeline, or "slide" it along the top of other clips in the sequence. The slide technique works by trimming the shots on both sides of your selected shot, changing the position of the selected shot in the timeline without altering its in and out points or its duration. This feature works well when the following are true:
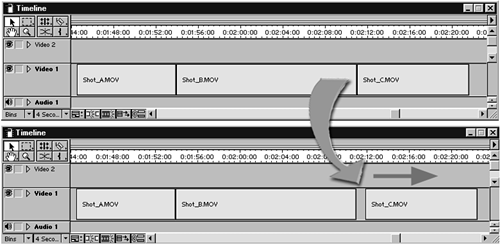
Let's use the roller theory again. This time, imagine the rollers on the outside of your selected clip. This means that they affect the end frame of the outgoing clip and the starting frame of the next incoming clip (see Figure 4.22). What essentially happens when you slide a shot in your timeline is the selected clip winds up covering a portion of the clip in the direction you are sliding, decreasing the duration of that particular shot. If you simply moved the selected clip in the timeline with the arrow tool instead of sliding, you would wind up moving portions of the clip in the direction you are shifting (the same as with sliding), but you would wind up with a hole in your timeline, as shown in Figure 4.23. What's so unique about the slide feature is that it automatically fills in the gap from where the selected clip was originally positioned. The "roller" on the outside of the selected clip unravels footage from that shot's original source footage. Figure 4.22. Sliding a clip affects its position by changing the incoming and outgoing frames of the clips around it.
Figure 4.23. Moving a clip sometimes leaves a hole in the timeline.
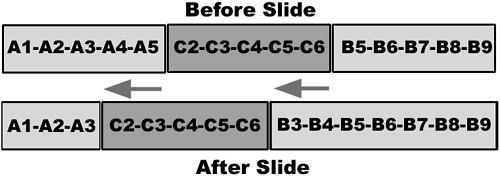
If you slide Shot B forward in your timeline 20 frames, two trims take place simultaneously to Shots A and C (see Figure 4.24). The starting frame of Shot C is trimmed ahead in time by 20 frames, shortening the clip's duration. The last frame of Shot A is trimmed ahead in time, extending the length of that shot by revealing portions of the original source clip (also called handles) that were beyond the initial out point. If Shot A did not have any extra "handle" frames, you would not have been able to slide Shot B forward in the timeline. Figure 4.24. Sliding adjusts both edit points at the same time.
tip To remove a hole left in your timeline, select the empty space to highlight it and then select Ripple Delete from the timeline menu. tip If the Slip tool is selected in the Timeline Tools Palette, hold down the Alt key (Windows) or the Option key (Macintosh) to toggle to the Slide tool and vice versa. Let's use the three videotapes example to help visualize how slipping and sliding are different. To understand what happens when you slide a shot, set up the three tapes as shown in Figure 4.25. The two back tapes represent the outgoing clip prior to the shot you will be sliding (Shot A) and the incoming clip after the selected shot (Shot C). Shot B in the front represents the clip you will be sliding in your timeline. Shot B always maintains the same in and out points, as well as its duration. The only aspect that changes for Shot B is its position in the timeline (at what point in time the shot becomes visible). As you slide Shot B to the left or right in your timeline, notice what happens to Shots A and C. If you slide Shot B to the left, Shot A becomes much shorter while revealing earlier portions of Shot C. Sliding Shot B to the right reveals more source footage at the end of Shot A while changing the in point and shortening the duration of Shot C (see Figure 4.26). Figure 4.25. The center tape is in front of the other two tapes during the sliding example.
Figure 4.26. Sliding a clip repositions the placement in your timeline without changing the clip's duration, starting frame, or ending frame.
note Slipping and sliding work only as long as each of the affected clips has enough source material digitized to manipulate the trim in the appropriate direction. note Premiere does not allow you to slip or slide audio clips directly. However, any linked audio adjusts accordingly when you slip or slide related video clips. |