Examining the Data Source Controls
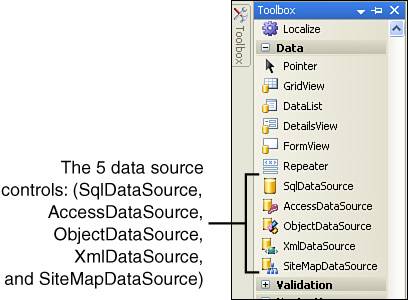
| ASP.NET contains a myriad of Web controls, which we grouped into various categories in earlier hours. For example, in Hour 8, "ASP.NET Web Controls for Displaying Text," we looked at those Web controls designed for displaying text content on an ASP.NET page; in Hours 10, "Using Text Boxes to Collect Input," and 11, "Collecting Input Using Drop-Down Lists, Radio Buttons, and Check Boxes," we looked at Web controls designed to collect user input. In this hour we'll examine a new class of Web controlsones designed for accessing database data. This class of Web controls, referred to as data source controls, can be found in the Toolbox in the Data section (see Figure 14.1). Figure 14.1. The Visual Web Developer Toolbox contains a number of data source controls. With the data source controls, you can access database data by simply dragging and dropping the appropriate data source control onto an ASP.NET page. You will then be prompted to specify what database you want to connect to and, from that database, what data you want to retrieve. All of this configuration can be accomplished through the ASP.NET page's Design view without having to write a single line of code.
Five data source controls ship with ASP.NET. Each data source control, shown in Figure 14.1, has a name that ends in DataSource, like SqlDataSource, AccessDataSource, and so on. Each data source Web control is designed for working with data from a different type of source. For example, SqlDataSource is designed to retrieve data from databases; XmlDataSource can be used to access data from an XML file; SiteMapDataSource is used to query a site map and return the website's navigational structure so that it can be displayed in a TreeView or Menu Web control.
In this hour we are interested only in accessing data from a database, namely the SQL Server 2005 Express Edition database created in Hour 13, "An Introduction to Databases." Therefore, we will be using only one data source control in this hour, SqlDataSource. Working with the SqlDataSource ControlTo practice using the SqlDataSource control, we'll need an ASP.NET website with a database. To save time in creating a new website and database, let's just use the website and database from Hour 13. Start by creating a new ASP.NET web page named AccessingData.aspx. Next, go to the Design view and, from the Toolbox, drag on a SqlDataSource control. Each data source control, when on the Design view, is rendered as a gray box with the data source control type followed by its ID value. As Figure 14.2 shows, after we add a SqlDataSource control to the page, the gray box says SqlDataSource SqlDataSource1. Here, SqlDataSource1 is the ID of the control. Figure 14.2. A SqlDataSource control has been added to the ASP.NET page.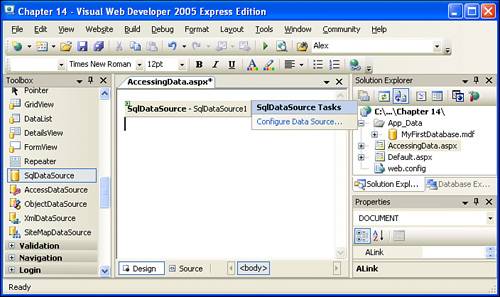 In addition to this gray box, there's also a smart tag. A smart tag is a list of common tasks that can be performed from the Web control. For the data source controls, the smart tag contains a single option, at first: Configure Data Source. Clicking on this link starts the Configure Data Source Wizard, from which we'll specify what data we want to retrieve from the database. To be able to work with a database's data, the SqlDataSource control needs to know two bits of information:
The SqlDataSource control's wizard prompts you to provide these two vital pieces of information and does so in a very intuitive and developer-friendly manner. Let's start examining the SqlDataSource control's wizard! Go ahead and click the Configure Data Source link. Step 1: Choose Your Data ConnectionThe first step of the Configure Data Source Wizard is to select what database you want to work with. A drop-down list contains those databases listed in your Database Explorer and should include the MyFirstDatabase.mdf database we created in the preceding hour. Go ahead and select this database from the drop-down list (see Figure 14.3). Figure 14.3. Select the MyFirstDatabase.mdf database from the drop-down list.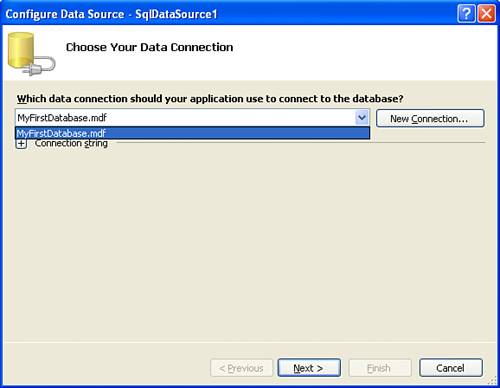 Beneath the drop-down list of available databases is a Connection string label with a plus next to it. If you click this plus, it will display the connection string used to access the database data. A connection string is low-level information required by ASP.NET that provides the specific details for connecting to the database. In previous versions of ASP.NET, you'd have to craft this connection string yourself; with Visual Web Developer, however, the connection string is automatically generated for you based on the database you select from the drop-down list.
If this is the first time you've used a data source control to connect to this database, you'll be prompted to save the connection information in the web application's configuration file (see Figure 14.4). Because ASP.NET needs the database connection string to communicate with the database, this information must be present in the ASP.NET page in one form or another. If you choose to save the connection string information in the web application's configuration file, which I heartily recommend, a new setting will automatically be inserted into the web.config file that associates the name provided with the connection string. Then, in your ASP.NET pages that use this database, rather than specifying the connection string, there will simply be a reference to the connection string's name in the web.config file. Figure 14.4. You can save the connection string in your website's configuration file.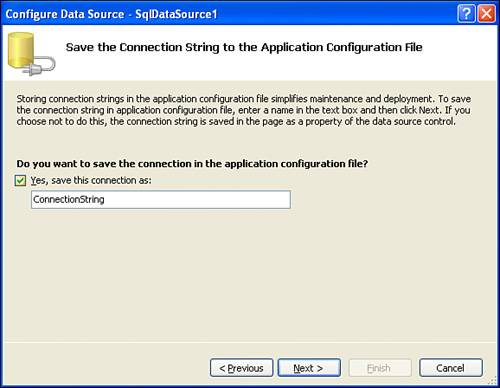 The benefit of saving the connection string information in the web application's configuration file is that it adds a level of indirection in your application, which makes responding to changes easier. For example, imagine that you are using the MyFirstDatabase.mdf file and have created a dozen ASP.NET pages that work with this database's data. Furthermore, assume that you have decided not to save this information in web.config. That implies that in each of these 12 ASP.NET pages, the database's connection string is present. Now the gotcha: Imagine that your database's connection string changes. Perhaps you've renamed the file, or your boss has created a new database file that he wants you to use instead. With the connection string hard-coded into each of the dozen ASP.NET pages, you'll have to go into those pages and update the connection information through the data source controls' wizards. Had you stored the connection string information in web.config, however, you would have had to modify the connection string in only one placethe web.config file. Because the data source control's wizard will handle adding the connection string setting in web.config automatically, there's no reason not to store the connection string there. Therefore, leave the check box in Figure 14.4 checked and click Next to proceed to the next step. Step 2: Configure the Select StatementAfter you specify the database to use and, if needed, store the connection string information in the web application's configuration file, the next step is to specify what data you want to retrieve from the database. With the SqlDataSource Wizard, you can select data in one of two ways:
Regardless of what approach you use, the result is the same: the SqlDataSource control concocts some SQL statement that is sent to the database to retrieve the data. Recall that SQL is the language used by modern database systems used for running queries. With the first option, you can pick the table and specify the columns to retrieve through the wizard. With the second option, you'll need to spell out the precise SQL query to use. We'll examine the basics of SQL later in this hour in the "A Look at SQL, the Language of Databases" section. For now, let's practice with using the first option. In the Configure the Select Statement step of the wizard, you can choose whether you want to select a database table or specify your own SQL query. You make this decision by choosing the appropriate radio button. To pick a table, select the Specify Columns from a Table or View radio button (see Figure 14.5). Figure 14.5. Pick the table whose data you want to retrieve.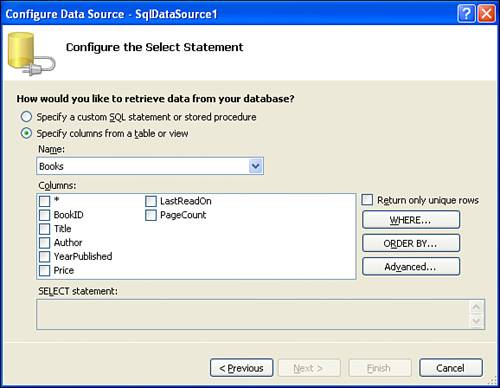 The tables in the database are listed in the drop-down list, with the selected table's columns listed underneath. Because there is only one database table in our databaseBooksit's the only option in the drop-down list. The area beneath lists the columnsBookID, Title, Author, YearPublished, Price, LastReadOn, and PageCount. There's also a * option list. This represents all columns. We need to check those columns that we want returned from the Books table. If you want to retrieve all column values, select the * option, or check each of the individual columns. Sometimes, however, you may need only a subset of the columns. For example, we might have an ASP.NET page that lists just the titles of the books, omitting other information. For this page we could have the database query return only the results from the Title column. For this example, though, let's return all columns. Check the * check box, which indicates that you want to retrieve all columns from the Books table. After you check this, a SELECT query appears at the bottom of this dialog box. Specifically, you'll see the query syntax: SELECT * FROM [Books] This statement is called a SELECT query, and is the syntax used in SQL to retrieve information. There are many parts to the SELECT query, some of which we'll examine further in this chapter. For now, don't worry about the intricacies of the SQL syntax. Instead, focus on how the table data is selected through the SqlDataSource control's wizard. Now that we've specified the data we want returned from the Books table, click the Next button to proceed to the final wizard step. Step 3: Test the QueryThe final step in the SqlDataSource control's wizard is the Test Query screen. The Test Query screen allows you to run the query to see what data, exactly, is returned. As Figure 14.6 shows, the SELECT * FROM [Books] SQL query returns all records from the Books table, with each record containing all of the table's columns. Figure 14.6. All columns from all rows are returned from the query.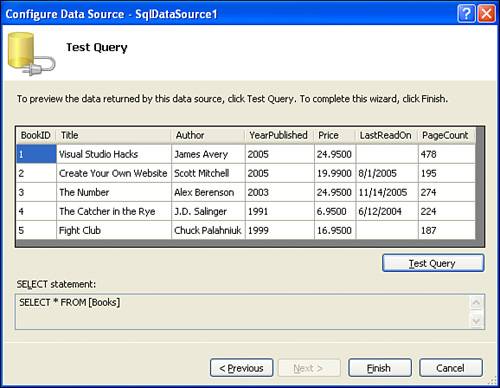 If you received the database results you expected, click the Finish button to complete the wizard. If something is awry, you can click the Previous button and adjust the query as needed.
Examining the SqlDataSource Control's MarkupWhile Visual Web Developer makes it easy to add Web controls and static content through a page's Design view, there is always a corresponding markup presented in the Source view. Let's take a moment to examine the markup generated in the Source view by the SqlDataSource control's wizard. After clicking the Finish button in the wizard, click on the Source tab to view the HTML content of the ASP.NET page. You should find a SqlDataSource control declaration like so: <asp:SqlDataSource runat="server" ConnectionString="<%$ ConnectionStrings:ConnectionString %>" SelectCommand="SELECT * FROM [Books]"> </asp:SqlDataSource> As you can see, the SqlDataSource control has three property values at this point:
At this point, the SqlDataSource's declarative markup is pretty simple; it's just three property values, after all. However, as we get into more involved examples that include interactive user filtering and updating, inserting, and deleting database data, the declarative markup generated by the SqlDataSource will quickly balloon. The lesson to take away from this discussion is that the SqlDataSource control's wizard is helpful in two ways: First, it helps us construct the appropriate SQL statements, rather than having to enter them ourselves by hand; and second, it saves a lot of tedious and cryptic typing of markup in the Source view. |
EAN: 2147483647
Pages: 233