Quick Start: A Simple Web Browser
|
|
| For you to get a sense of how REALbasic works and how powerful it can be, I want to quickly step you through your first REALbasic application. I am averse to "Hello, World" examples, so I've come up with a better idea. Your first REALbasic application will be a web browser. Don't fret. It really is that easy. When you launch REALbasic, it will launch a new untitled project by default (see Figure 2.1). In the Project tab of the main window, you'll see three items listed: App, Window1, and MenuBar1, as shown in Figure 2.1. These are three classes that are part of every REALbasic application. Figure 2.1. The default "Untitled" project Window.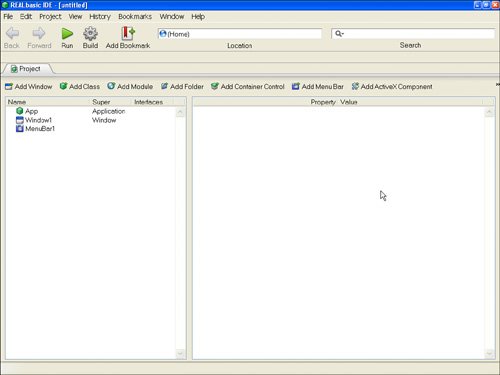 Right now, don't worry too much about what a class is. We'll come back to that later in this chapter and discuss the details of classes and the other object-oriented aspects of REALbasic programming. What's important to understand now is that a class represents a group of code that performs a specific task. The Window1 class is the programming code that manages the primary window in the application. MenuBar1 handles the menu bar and the App class is the basic class that serves as the basis for your application. Select Window1 with your mouse. You will see the Properties pane on the right side of the main window become populated with information (see Figure 2.2). The Properties pane allows you to manipulate the properties of the Window1 class. Later, you'll be creating your own classes and doing more complex manipulations, but for now, we'll use what we've got. Figure 2.2. The Window1 class selected in the REALbasic IDE.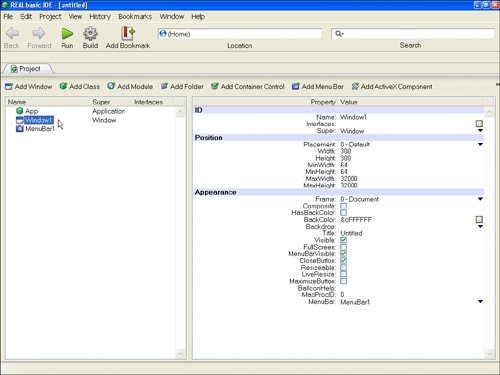 ControlsTo create your web browser, double-click Window1. A new tab will appear called Window1 (see Figure 2.3). This tab will be the front-most tab and you will see the pane that is used for editing windows. There are two Edit Modes you can use in the Window1 Tab: one for editing the layout of the Window and another for editing the code. You can switch between modes by pressing Option=Tab, or clicking the Edit Mode button in the toolbar for Window1. By default we'll be in the Window Editor's Layout Mode. You'll know you're there if the panel is divided into three columns. The column on the far left has a list of controls with names like BevelButton, Canvas, and so on. In the middle, you'll see a visual representation of Window1 and to the right you'll see the Properties pane. Figure 2.3. Window1 ready for editing in the Edit Layout Mode.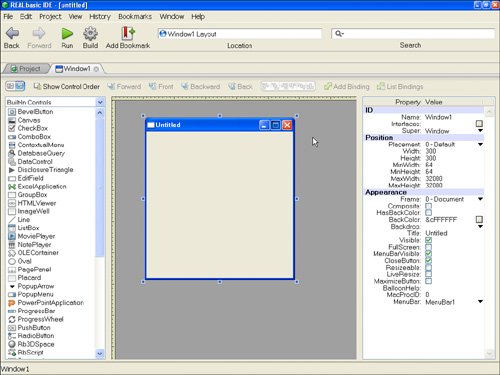 If by chance you are not in the Window Editor, you can press Alt+Tab on Windows/Linux or Option+Tab on a Macintosh and you will toggle to Layout Mode in the Window Editor. Before doing anything else, click the window. When it is selected, look at the Properties pane. It is two columns; in the left is the property and to the right is the value of the property. In the area labeled Appearance, make sure that the following CheckBoxes are checked: Visible, MenubarVisible, CloseButton, Resizable, and Maximize Button. By setting these properties, this will make it possible for you to resize the window of your new web browser. Now that you have a window, you need to place controls on it so that you can actually do something. Controls are user-interface elements that users interact with. For this project, we will need three controls. All three of them will be found in the Controls pane in the left column. The first thing to do is find the PushButton control in the list, which is in alphabetical order. Click it and drag it to the window. Just drop it anywhere for now. You now have a button on your Window with a caption that reads Untitled. To give it a better caption, look in the Properties pane and find the Caption property in the Appearance section. Click where it says Untitled, and the EditField will become highlighted. Type in the word "Go!" or whatever word you want to use and press Return. Your button should now say "Go!" You'll want the button positioned in the upper-right corner of the window, so select it and drag it up and to the right. Keep dragging it until you see green guidelines. You should reach a point where there is a horizontal guide on the top of the button and a vertical guide to the right of the button. These guidelines help you to position your controls consistently, according to design guidelines established by the operating system. It's a good idea to use them and follow their advice. Now that we have a PushButton on the window, we'll need an EditField. Find the EditField in the list of controls and drag it onto the window just like the button. Drag it to the upper-left corner. As you do so, the horizontal guideline will appear that will ensure that the EditField is positioned at the same level as the PushButton and that everything looks nice. There's no caption to change for the EditField, so we're done with it for now. Now, find the HTMLViewer control in the list of controls and drag it to the window. Drop it in the center. Notice that every time a control is selected, it is highlighted, and little white boxes appear in the corners and in the middle of the sides. You can use these selection boxes to make the control bigger by dragging them around. The guides will help you here, too. When it is as big as the guides say it should be, turn to the Properties pane. You will see four CheckBoxes in the Position section of the Properties pane. Check all of them: LockLeft, LockTop, LockRight, and LockBottom. This tells REALbasic that the HTMLViewer should get larger as the window gets larger. Recall that earlier when we were examining the window, we made sure that it was expandable and had a Maximize button. So far, so good. Now for some code. Double-click the PushButton labeled "Go!" and you will be switched to the Code Editor. In the left column you'll see the Code Editor's Browser with a list of all kinds of things. You should see an item called PushButton1, and right beneath it is the word Action, which should be highlighted. EventsThis is the Action event of the PushButton, and we're going to instruct the PushButton on what it is supposed to do when someone clicks it. REALbasic is an event-driven language. This means that much of what your REALbasic program does is in response to a user's interaction with your application. In this case, when a user clicks the PushButton, we want to tell the HTMLViewer to load the web page whose address we have typed into the EditField. When a user clicks the button, it causes the Action event to be executed. Do it by typing the following code into the editor to the right of the browser: HTMLViewer1.LoadURL EditField1.text You have just told the HTMLViewer1 control to execute the method called LoadURL. EditField1.Text is a parameter that you pass to HTMLViewer1 to let it know which page to load. In this case, it takes the content of the EditField1 control and uses that as the URL (web address) of the page to load. Whereas HTMLViewer1.LoadURL refers to a method, EditField1.text refers to something else, called a property. EditField1 is an instance of the class EditField, and EditField1.text is a property of the class instance. Later on in this chapter I'll cover methods and properties in more detail, but for now let it suffice to say that a method is an instruction to a computer to perform some task, and a property represents a value of some sort. In this case, EditField1.Text represents the value of the text that the user will type into EditField1 when the application is running. More information on methods will be covered later in this chapter in the section titled "Methods." Run Your ApplicationNow double-check your spelling, and when you are satisfied that everything is in order, look for the green arrow at the top labeled Run and click it. After a few seconds, your application will be up and running. Click the EditField, and then type in a URL for your favorite website. Be sure to include the "http" portion. If you can't think of one, type in http://realsoftware.com/. Then click the "Go!" button and wait a few seconds. Assuming you are connected to the Internet, you soon should see the front page of REAL Software's website where the HTMLViewer is. Be patient; it may take a few seconds depending on how fast your connection is. After it's loaded, click a link and see where it takes you. Voila! You've created a web browser. If it doesn't work as planned, that's okay. Take a look and make sure that you have typed everything exactly the way I said to type it in. If the program is generating an error, a small window will pop up describing the error. Possible errors might include clicking the "Go!" button when the EditField contains no text, or your program may generate an error if you try to run it and you are not connected to the Internet. Now that you've had a taste of how easy it is to write a REALbasic program, it's time to look at some of the details of the REALbasic programming language and how to create classes and modules of your own. |
|
|
EAN: 2147483647
Pages: 149