Adding Special Effects
| You can add all sorts of interesting visual effects to make your movie look better and even more interesting. Making a Clip Play in ReverseYou can make a clip play in reverse in your movie. Why would you want to do this? There are several possible reasons. One is for comedic effect. Another might be to create an instant replay sort of effect (you will want to increase the speed of the clip to do this, and you learn how later in this section).
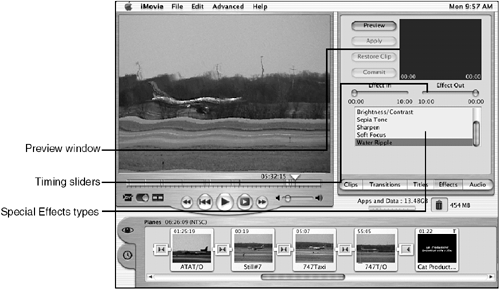
NOTE Reversing a clip also reverses its audio. You can mute the audio of any clip as you will learn later in this chapter. The first scene of the clip becomes the last one in the movie, and the thumbnail view you see becomes the last frame (which is now the first frame). NOTE A transition impacts the clips to which it is attached. If you reverse a clip that has an attached transition, a warning dialog box appears and tells you that reversing the clip invalidates the transition. It then asks whether you want to rerender the transition. If you proceed with the reversal, the affected transitions are rerendered. You can restore a clip to its proper direction by selecting it and using the Reverse Clip Direction command again. Applying Special Effects to Your MovieThe Effects palette contains a number of other special effects you can apply to your clips (see Figure 18.12). Figure 18.12. You can use the Effects palette to apply a variety of special effects to your clips (in this case, the Water Ripple effect is being applied to a clip of a 747 taking off).
The Effects palette is a bit different from the Transitions and Titles tool palettes. The tools on the Effects palette are related to each other only in that they are effects you apply to the video track. This differs from the tools on the Transitions palette, for example, on which all the tools are related to creating transitions. All of these effects work similarly after you use some of them, you can easily use all of them. Table 18.1 lists all the effects on the default Effects palette and provides some examples of when you might want to apply each effect.
NOTE Be careful about using the brightness and contrast controls on your clips. The relative brightness levels of video can vary depending on the device you use to show your movie. For example, you might find that a clip will appear slightly darker in iMovie than it does when you export it to videotape. Thus, if you make it brighter in iMovie, it might appear washed out when you view it on a TV. You should do some testing on your setup and how you will view your movie (such as exporting a sample to videotape) before you make many of these adjustments. The general steps to apply a special effect are the following:
The Effects palette features two buttons you haven't seen before: Restore Clip and Commit. When you apply an effect to a clip, iMovie reworks that clip using the effect you apply. However, it saves the original clip so that you can go back to it if you want to (this is like an undo you can use at any point in the future). If you decide that you don't want an effect any more, select the clip and click Restore Clip. The clip is returned to the condition in which it was before you changed it. That's nice, but saving two versions of a clip (the modified one and the original one) consumes extra disk space that you might not be able to afford. To keep the clip with the effect applied and remove the original (so that it doesn't use disk space), select the clip and click Commit. When you do that, iMovie deletes the original version and you're stuck with the version you have "improved." Avoid using the Commit button as long as you can. Being able to go back to a pristine version of your clip is often desirable in the event you mess a clip up (of course, you can always re-import it from your camcorder). After you are sure that the changed clip is what you want, click Commit to free up some disk space. I'm sure that you have seen a movie or documentary in which there were video clips of something that just couldn't have been filmed. For example, at the opening of the movie Tombstone, there is a "historical" sequence in which you see Wyatt Earp and other Westerners in the late 1800s. There were no film cameras in those days, so how did they get these old-looking clips? The answer is through special effects. One of the effects you can use to achieve this "aged" effect is to apply Sepia Tone to a clip. This makes the clip appear in hues of beige and gray; it has also been described as a wood-grain sort of effect. This effect gives the impression of age, in some ways, even more than black and white does. Use the following steps for a quick example that will help you apply any of the effects to your movie.
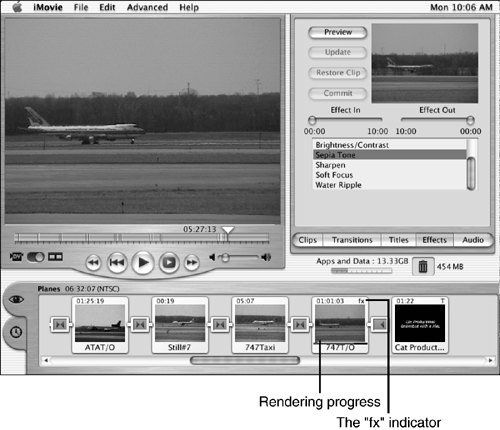
NOTE If you work with particularly long clips, you might not be able to apply an effect over the entire clip. If this happens, split the clip into two shorter segments and apply the effect to each segment. The clip has the letters "fx" in the upper-right corner of its thumbnail to indicate that a special effect has been applied (see Figure 18.13). Figure 18.13. The Sepia Tone effect has been applied to this clip of a 747 taking off.
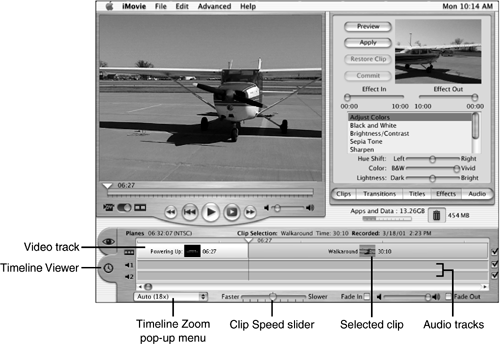
As with other features, such as titles and transitions, these visual effects have to be rendered in your movie. If the clip to which you apply the effect has a transition attached to it, the transition has to be rerendered, as well. Other special effects can be applied in a similar way, although the specific tools that are available when you select the effect to apply are different. Changing the Speed at Which a Clip PlaysTo this point, you have used only one of iMovie's two viewers. The Clip Viewer is a good place to focus on the video track of your movie. But as you get into finer levels of detail in the editing process and when you start working with audio, you switch over to the Timeline Viewer. This view provides a more detailed view of your movie, and you "see" all the tracks that make up your movie. To switch to the Timeline Viewer, click its tab (it has the clock icon) to see the Timeline Viewer (see Figure 18.14). This viewer looks more complicated than the Clip Viewer, and it is. This complexity enables you to do lots of great things, especially with your movie's audio track. Figure 18.14. The Timeline Viewer enables you to see all the tracks in your movie.
In the top bar of the viewer, you see a graphical representation of the video track of the movie. Each clip is in its own section, and you see a thumbnail view of the clips. You also see the clip's name and timecode in its bar. Transition and title clips have the same symbols as they do in the Clip Viewer. You use the Timeline Zoom pop-up menu to choose a magnification level for the view that you see. The larger the magnification level, the larger the clips appear (and the less of a clip that you can see on the viewer without scrolling). Choosing a lower magnification "zooms out" and you see more clips, but less detail for each clip. As you work, you should use this control to change the view to make your tasks easier. For example, when you are synchronizing sound with video, increase the magnification so that you have finer control over the process. When you are moving clips around, choose a lower magnification so that you can see more of the movie at one time. If you choose the Auto setting on the Timeline Viewer Zoom pop-up menu, the Timeline Viewer zooms to a level that iMovie considers to be optimal for editing. This may or may not be optimal for you; if not, choose a specific magnification level. NOTE You can do everything on the Timeline Viewer that you can on the Clip Viewer. You click a clip to select it. The clip is highlighted in yellow, and then you can apply effects, transitions, and titles to it. You can also edit in the Monitor just as you can when you select a clip on the Shelf or in the Clip Viewer. Use the Clip Viewer when you want to make large changes to your movie, such as placing and moving clips, adding transitions, and so on. For finer work, such as adding sound effects, use the Timeline Viewer. There is one special effect located on the Timeline Viewer (which is why I introduced it here). This is the Clip Speed slider, which you can use to make a clip play faster than normal or slower than normal. Using the slider is trivially easy. Select a clip in the Timeline Viewer and drag the slider to change its speed. To make the clip play faster, drag the slider to the left. When you play the clip, it plays at the faster speed. It appears as "compressed" on the Timeline Viewer to show that it requires less time to play than it did originally. To slow the clip down, drag the slider to the right. Now, when you play the clip, it plays more slowly. The clip expands on the Timeline Viewer. Put the slider back in the center to return the clip to its normal speed. When you apply speed effects to a clip, the fast forward or the play slow symbol appear on that clip in the Clip Viewer. TIP You can combine the direction and speed effects to add an "instant replay" to your movie. Select the portion of the clip that you want to replay and copy it. Paste it twice so that you have the three copies of the clip in a row. Choose the middle copy and make it play in reverse. Use the Clip Speed slider to make this "rewind" really quickly. When you play this section, it appears as if the clip were rewound at high speed before replaying, thus looking just like instant replay. |
EAN: 2147483647
Pages: 260


