| When it comes to titles, credits, and other text, your iMovie movies can certainly hold their own. There are many title effects you can add to your movies in almost limitless ways. You will be amazed at how much improvement you can make to your movies with the right title effects. Although adding onscreen text is called titling, this term refers to much more than just the movie's name. Basically, titling is iMovie's term for overlaying all sorts of text on the screen. The titles you might want to use in your movies include the following: Captions As with figure captions, you can use "clip captions" to add information to the image onscreen. You might want to add some explanation of what is happening on the screen, the date on which the clip was captured, or you can even add subtitles if you want to. Captions are the term for basically any informative text relating to a scene that you want the viewer to see. Captions can appear anywhere in your movie. Credits I'm sure that you are quite familiar with credits, because most modern movies have several minutes of credits at the end. Credits are just what the term implies: the opportunity to take, or give, credit for something in the movie. For example, you can list all the people who appear in the movie. Or if someone helps you with the movie, you might want to give him some fame by mentioning his name. Even though you can use credits anywhere in the movie, most credits appear at the end. Titles Titles are introductory text that can introduce a movie, a scene, or anything else you think warrants an introduction. Titles normally appear at the beginning of something, whether it be a movie or scene.
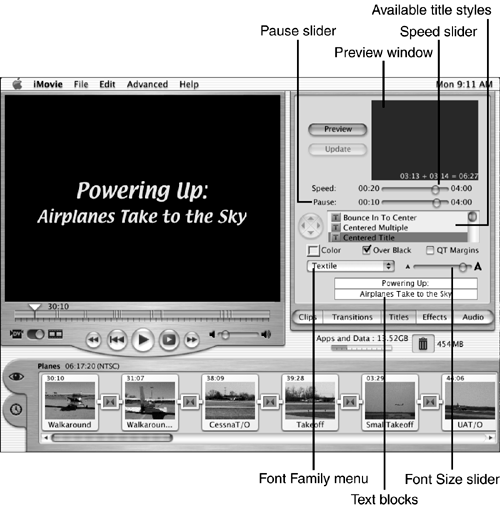
iMovie provides various titling tools you can use to add almost any sort of text to your movie that you want. Titles are added using tools that are similar to the Transitions tools. Understanding Titling Tools You add and manipulate titles using the Titles palette. To see the palette, click the Titles button (see Figure 18.10). Figure 18.10. The Titles palette provides all the tools you need to add great text effects to your movies.
The following tools are included on the Titles palette: -
Preview window This works just as it does on the Transitions palette. When you click a title style, you see a preview of it in the preview window. You also see a preview whenever you make changes to the title. -
Preview button When you click this, you see a preview of your title in the Monitor. -
Update button If you make changes to a title you have already placed in your movie, click this button to update the title to include the changes you have made. -
Speed slider Just like transitions, all titles have a set amount of time that it takes for the title effect to occur. You use the duration slider to set this time. Drag it to the left to make the title faster or to the right to make it slower. -
Pause slider If there is a pause element in a title's motion, use the Pause slider to control how long that pause is. Drag the slider to the right to make the pause last longer or to the left to make it a shorter pause. -
Title style You click a title style to use it. The tools that are active on the palette change, depending on the style you select. -
Direction arrows Some styles involve motion for which you can set the direction. You choose a direction by clicking one of the active direction arrows. -
Color menu Click this to change the color of the text in the title (it also affects the stripe color in Stripe Subtitle). -
Over Black check box By default, when you place a title, it's applied over the clip that is selected or on which you drop the title. When you place the title on a clip, the clip might be split in such a way that there are two clips. One contains the title effect, and the other contains the remainder of the clip. If you want the title to appear in the first part of the clip, drop the title on the left side of the clip. If you want the title to appear on the end of the clip, drop it on the right side of the clip. The adjacent clips slide apart to indicate where the title clip is placed. If you prefer the title to appear over a black background, you can check the "Over Black" check box. Instead of being applied to a clip in your movie, the title appears in a new black clip that is added to your movie wherever you drop the title. -
QT Margins A QuickTime movie has different proportions than a standard TV screen. For title styles that appear on the bottom edge of the screen, this can be a problem because those titles can get cut off when the movie is viewed on a TV. Unchecking the "QT Margins" check box moves the title up on the screen so that it won't be cut off when you show the movie on a TV. Checking it moves the title back down again so that it appears in a better location on the screen when viewing the movie in the QuickTime Player. You should leave this unchecked unless the style you use leaves text at the bottom of the screen. The only styles for which you need to use this are Music Video and Stripe Subtitle. -
Font Family menu You can choose a font family for a title using this pop-up menu. -
Font Size slider This slider enables you to make the selected font larger (drag it to the right) or smaller (drag it to the left). -
Text blocks You type the text for your title in the text blocks that appear on the palette. You see two or more styles of text block, depending on what style you use. Most styles use single lines of text. Others use a larger text block into which you can place a fair amount of text. -
Add/Remove buttons Some styles allow you to add text blocks to the title. When the Add button (the +) is active, click it to add text blocks to your title. Click Remove (the ) to remove text blocks.
You see different tools and options on the palette, depending on the title style you use. Some styles (for example, Centered Multiple) allow you to add more lines or blocks of text. With these styles, the Add button is active. Other styles (for example, Scrolling Block) involve motion of which you can set the direction; the direction arrows are active for these types. Using Titling Tools Following are the general steps you use to add titles to your movies: -
Decide what sort of text you want to add (caption, credit, date, or title) and to which clip you want to apply the text (or whether you want to apply it to a black background). -
Based on the kind of text you add and where you apply it, decide on a title style to use. -
Open the Titles palette and click a title style to select it. -
Type your text in the text boxes for that style. Use the Add button (if available) if you want to add more text blocks to the title. -
Choose a font, color, and size for the title. -
Set the direction of the motion (if applicable). -
Set the speed and pause (if applicable) of the title. -
Preview the title in the Preview window and by clicking the Preview button to preview it in the Monitor. -
Make adjustments to the title until it is "right." -
Place the title in your movie by dragging it to the Clip Viewer. -
View the section of your movie that contains the title to make sure that it works the way you want it to. -
If it doesn't, select the title and make changes to it using the Titles palette; then click Update to update the title.
Even though you do most of these steps, you might choose to do them in a different order than I suggest. Just experiment to find the order that suits you best. Just as the transitions effects have to be rendered before they can be added to your movie, titles must be rendered before they appear onscreen. Rendering can take a while, so use the Preview function to get your titles in great shape before you actually add them to your movie. Just as with transition effects, you see a red progress bar in the title clips as they are rendered. You also see a progress counter that displays the rendering progress frame-by-frame (as in 16 frames complete of 385 total frames in the title). If you update a title, its clip must be rerendered. NOTE Sometimes, existing transitions block you from adding a title clip. If this happens, delete the transition, add the title clip, and after the title has been rendered, add the transition back in. If you are going to use many titles in your movie, it can be easier to add the titles before you add transitions.
A quick example of these steps should make them very clear. In this example, I will create and apply a title over a black screen at the front of a movie to introduce it. -
On the Titles palette, click Centered Title to choose it. -
Click the "Over Black" check box. -
Type the title in the text boxes (with this style, you can have two lines of text). -
Choose a font and the color for the text (leave the color in the default as White because you are using a black background). -
Use the Speed and Pause sliders to set the title's duration. As you make these selections, the title will be shown in the Preview window. -
When you think that the title is getting close to being ready, click Preview to preview it in the Monitor. -
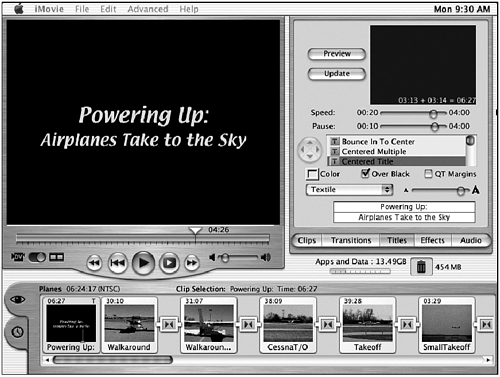
When the title is right, drag the title style from the Titles palette to the Clip Viewer before the first clip in the movie (see Figure 18.11). The title will be rendered. Figure 18.11. This movie now has a title screen at the beginning.
-
Preview the title clip by selecting it and pressing the spacebar. -
If you want to make changes to the title clip, start by selecting the title clip. Make the changes you want to make using the Titling tools and click the Update button. The clip will be rendered again.
You can add other title styles in a similar way, although the specific set of tools you use might be slightly different. |

