| As you work with Windows, it's likely that you'll want to share some of the files you use with Mac OS X. There are a number of ways to do this; in this section, you'll learn about three of these methods. Tip If you have an external hard drive, such as a USB flash drive or USB 2 hard disk that can be mounted on Windows and on the Mac OS, you can use that disk to share files. Just store the files you want to share on that drive. When you boot the Mac under Windows, you'll be able to use the files. When you boot the Mac under Mac OS X, you'll be able to do the same.
Using an iDisk to Share Files If you have a .Mac account, you can easily share files between Windows and the Mac by mounting your iDisk in the Windows environment and storing files you want to share on it. Any files you store on your iDisk will be available in both environments so that you can easily share them. First, you'll need to configure Windows to access your iDisk. Here's how: 1. | Navigate to www.apple.com/dotmac.
| 2. | Log in to your .Mac account.
| 3. | Click the Member Central button. You'll move to the Member Central home page.
| 4. | Download the iDisk Utility for Windows XP application.
| 5. | After it's been downloaded, open the iDisk Utility for Windows folder and launch the iDisk Utility for Windows.msi file. You'll see the iDisk Utility for Windows Setup Wizard.
| 6. | Click Next. You'll see the License screen.
| 7. | Click I Agree and then Next. You'll see the Select Installation Location screen.
| 8. | Leave the default location selected, click the Everyone radio button, and click Next.
| 9. | Click Next. The process will complete and you'll see the Installation Complete screen.
| 10. | Click Close.
|
Now, configure the iDisk Utility to access your iDisk by performing the following steps: 1. | Choose Start menu, All Programs, .Mac Utilities, iDisk Utility for Windows, iDisk Utility for Windows. The application will open (see Figure 5.6).
Figure 5.6. Use the iDisk Utility for Windows application to configure Windows to access your iDisk. 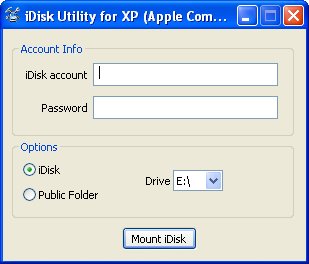
| | | 2. | Enter your .Mac account name in the iDisk Account field (everything before the @mac.com in your .mac email address).
| 3. | Enter your .Mac password in the Password field.
| 4. | Select the iDisk radio button.
| 5. | Choose the Windows drive letter for the iDisk; the default is E. You'll need to choose a drive letter that isn't already used in your Windows environment.
| 6. | Click Mount Disk. Your iDisk will be mounted on the Windows desktop; when the process is complete, you'll see a success message.
Tip If the process doesn't work for some reason, choose a different drive letter (each drive letter under Windows must be unique) and try again. It might take a time or two to get it to mount. | 7. | Click OK to close the success prompt.
| 8. | Open the My Computer folder. You'll see your iDisk under the Network Drives section (see Figure 5.7).
Figure 5.7. You can access your iDisk in the Network Drives section of the My Computer folder. 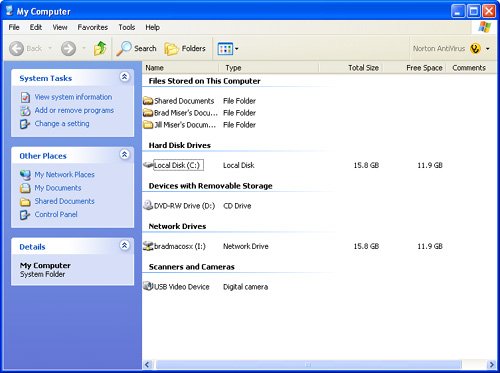
|
After your iDisk is mounted, you can close the iDisk Utility for Windows application. The iDisk will remain mounted. After you've set up your iDisk on Windows, you can easily share files with the Mac. Create a folder on the iDisk and copy any files you create under Windows and will want to use under Mac OS X in that folder. When you start up under Mac OS X, simply choose your iDisk on the Finder Places sidebar and move to your shared folder. Then copy the files onto your Mac. Note If you configure your iDisk on the Mac to synchronize your iDisk automatically (use the iDisk tab of the .Mac pane of the System Preferences application), you can work with a local copy of the iDisk on your Mac; its files will be copied to the online version of the iDisk automatically.
Likewise, to share files from the Mac OS to Windows, place them in the same folder and copy them onto a Windows drive when the Mac is booted up in Windows. You can also work on files stored on an iDisk if you prefer, but an iDisk's performance can sometimes be relatively slow. It is often better to copy the files you want to work on from the iDisk to the OS under which you are going to work on them and then copy the updated file back to the iDisk. Sharing Data by Burning a CD This method might be obvious to you, or it might not be. While you are working in Windows, you can burn files you want to share onto a CD or DVD. Then, boot up your computer under Mac OS X, insert the disc you burned, and you'll be able to use its files under Mac OS X. Although this method isn't particularly elegant, it does work and is easy. To burn files onto a disc under Windows, do the following: 1. | Insert a blank disc into your Mac's drive. Windows will recognize the disk and present the CD Drive dialog (see Figure 5.8).
Figure 5.8. When you insert a blank disc, Windows will prompt you to choose an action. 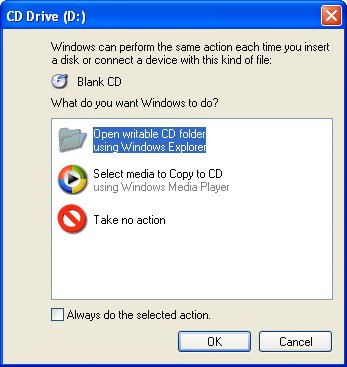
| 2. | Select the Open Writable CD Folder Using Windows Explorer option and click OK. A folder window showing the contents of the CD will open.
| | | 3. | Open a new window, move to the files you want to copy, and drag them onto the CD into the CD's window. Copies of the files will be made in the CD window.
| 4. | When you are ready to burn the disc, click the Write These Files to CD link in the CD Writing Tasks box. The CD Writing Wizard will open.
| 5. | Name the disc you are burning by entering a name in the CD name field; the default will be the current date.
| 6. | Click Next. The files will be copied onto the disc. When the process is complete, the disc will be ejected and the wizard will show the completion screen.
| 7. | Click Finish to close the wizard.
|
After the disc is burned, restart your Mac under Mac OS X and insert the disc. You'll be able to copy the files from the disc to Mac OS X so you can work with them there. By the way, the reverse process works, too. To share Mac OS X files with Windows, burn them onto a disc under Mac OS X, restart your Mac under Windows, insert the disc, and copy the files you want to share to a Windows location. Using File Sharing to Share Data on a Local Network If you have access to a local network, you can store files on a networked computer or server and then access those files from your Mac while it is running Windows and while it is running Mac OS X. Note Because you can't run Windows and Mac OS X at the same time on one computer using Boot Camp, you can't use file sharing to share files on the same computer. However, using a virtualization approach, you can run both operating systems at the same time and use file sharing to share files between the two operating systems on the same Mac. You'll learn about this in Chapter 8.
First, you'll need to access a network location under Windows. Then copy files to that location. After that's done, you can access those files from Mac OS X by restarting your computer and accessing the networked location in which you saved the Windows files. To prepare a Mac OS X computer to share its files with a Windows computer, perform the following steps: | | 1. | Open the System Preferences application.
| 2. | Open the Sharing pane and then the Services sub-tab.
| 3. | Click the On check box for the Windows Sharing service.
| 4. | If you've not previously enabled your account to share with Windows, select your account in the resulting sheet and click Done. If you have done this previously, you won't need to do it again.
The Windows Sharing service will start. After it has, you'll see the network address just below the service list (see Figure 5.9).
Figure 5.9. Use the Sharing pane of the System Preferences application to configure a Mac to share its files with Windows computers. 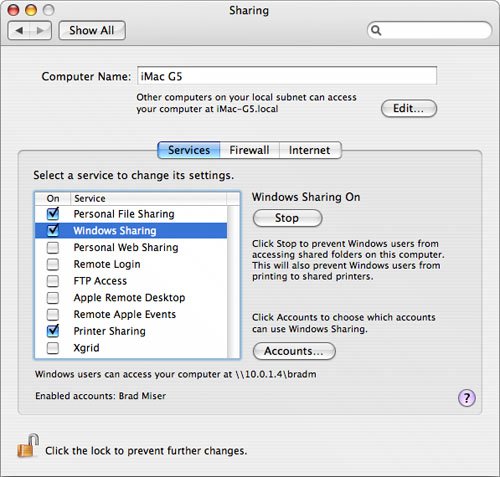
|
After you've configured a Mac to share its files, use the following steps to access those files on the Windows computer: 1. | Choose Start menu, My Network Places. The My Network Places folder will open.
| 2. | Click the Add a Network Place link in the Network Tasks box. The Add Network Place Wizard will open.
| 3. | Click Next. You'll see the select service provider screen.
| 4. | Select Choose Another Network Location and click Next. You'll see the network address screen.
| | | 5. | Enter the network address of the computer sharing its files. For example, if that is a Mac using file sharing, the address will look something like \\10.0.x.x\username, where username is the short name of the user account sharing files (see Figure 5.10). Remember that this address is shown on the Services sub-tab of the Sharing pane of the System Preferences application.
Figure 5.10. Here, you enter the address of the machine sharing files. 
| 6. | Click Next. Windows will connect to the shared space. You'll be prompted to enter the account's login information to connect to it.
| 7. | Enter the Mac user account's short name (same as username in step 5) and password and click OK. The wizard will present a screen you can use to name the shared network place.
| 8. | Enter the name you want to use for the shared place; the default will be a combination of user and machine names, but you can use almost anything you'd like.
| 9. | Click Next. You'll see the completion screen.
| | | 10. | Click Finish. The shared space will open and you'll be able to use it just like disk space on the machine on which you are running Windows (see Figure 5.11).
Figure 5.11. Using file sharing, you can easily share documents between the virtual Windows environment, the host Mac, or other computers on the network. 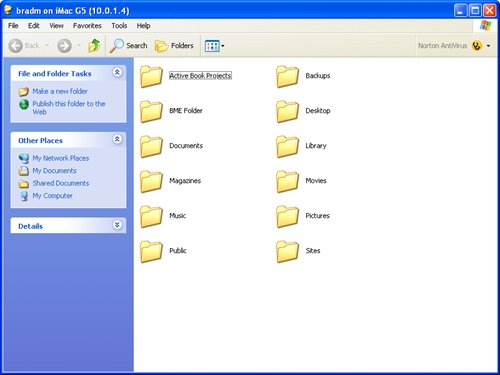
|
You can move files from the Windows environment onto the shared space. To share them with the same machine when it is running Mac OS X, use the Finder's Go, Connect to Server command to access it. You can then copy files from the shared source into the Mac OS X environment. Note To share files among Macs, you need to turn the Personal File Sharing service on. This is similar to turning the Windows Sharing service on.
|