| You can move any music between computers, but usually it is just as easy to import music from audio CDs to each computer on which you want to create a Library. However, if you have more than one computer, you might want to move music you purchased from the iTunes Music Store to the other computers so you can play it from there. Note  | You can purchase music on a machine that isn't authorized to play it. If you do this, you will see a warning dialog box that will explain that you won't be able to play the music on the machine you are using to purchase it until you authorize that computer. You can also store music purchased under different iTunes Music Store accounts on the same computer. To authorize the computer to play that music, you must authorize it for the iTunes Music Store account under which the music you want to play was purchased. |
Understanding the Ways You Can Move Your Tunes First, you need to move the song files from the computer on which they are stored (the machine from which you purchased the music) onto the machine you want to be able to play that music on. In order to move files to another computer, you need to know where those files are located. From Part II, "iTunes," you know that iTunes keeps all the files in the Library organized in the iTunes Music folder (assuming you followed my recommendations and set the preferences to allow this). You can move to this folder to find the files you want to move. You can also find the location of song files by selecting them and choosing File, Show Song File or pressing Ctrl+R (Windows) or  +R (Mac). iTunes will open a window showing the location of the files for the songs you have selected (see Figure 24.6). +R (Mac). iTunes will open a window showing the location of the files for the songs you have selected (see Figure 24.6). Figure 24.6. When you use the Show Song File command, iTunes opens a window to show you where the song's file is located on your computer. 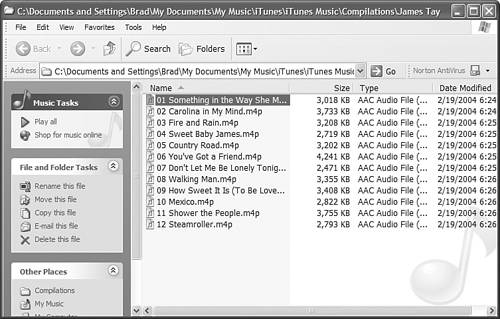
After you have located the song files, you need to make them available to the computer to which you want to move them. There are many ways to do this, including the following: Create a data CD or DVD containing the music you want to move. You can do this from within iTunes by changing the Burning preferences to use the Data CD or Data DVD format and then burning a disc. This process is very easy to do and works regardless of there being a network connection between the computers. The primary limitation is the size of the discs you use and the time it takes to burn the discs. Tip  | You can share music you have purchased with other computers on your network. However, for other machines to be able to play your purchased music, they must be authorized to do so and therefore count against the five-computer limit. Fortunately, as you have seen, it is simple to authorize and deauthorize computers, so you can keep up to five authorized quite easily. |
Use a network to share files on the computer from which you bought music with the one to which you want to move the files. This method is simple and doesn't place a limit on the sizes of the files you move. You also don't need to spend time or money to burn discs. The downside is that you have to have the computers connected via a network. Create an audio CD of purchased music and import that into the other computer's iTunes Library. This is also an easy process, but you are limited to the amount of music that can fit onto an Audio CD. Tip | In Part I, "The iPod," you learned how to use an iPod as a portable drive. So, you can use an iPod to move music among computers. |
Move the song files onto a networked drive, such as a server. For example, if you use a .Mac account, you can use your iDisk to transfer files by copying them to your iDisk. This has the same pros and cons as moving files directly across a network. Copy the files onto a portable hard drive, such as a FireWire or USB drive. This is faster than and doesn't have the same space limitations as using a CD or DVD. Of course, the con is that you have to have such a drive available to you.
Lastly, you need to add the files that you are moving into the Library. This involves using the Add to Library command and then moving to and selecting the files you want to add. Moving Purchased Music Files over a Network The following steps provide an example of how to move files that are shared over a network and add them to the Library: 1. | Share the files on the original machine with the network.
Note | On Windows PCs, you can choose the Add to Folder command, which enables you to select a folder to add. This works in the same way as adding files. |
| 2. | From within iTunes on the computer to which you want to move the songs, choose File, Add to Library. You will see the Add to Library dialog box.
| 3. | Move to and select the files or the folder containing the files you want to add to the Library (see Figure 24.7).
Figure 24.7. Here, I am accessing song files that are stored on a computer on the network. 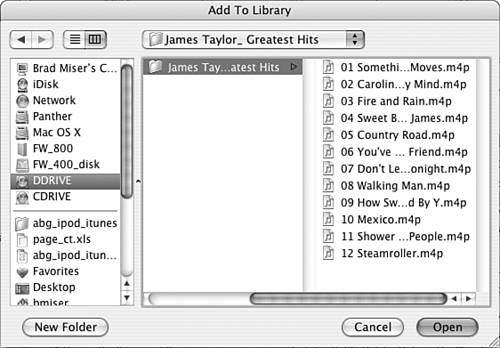
| 4. | Click Open. The songs you selected will be copied into your Library (see Figure 24.8). If the music you moved into the Library was purchased on a different computer, you need to authorize the current computer to play that music (see the next section).
Figure 24.8. You can see that the files I selected in the previous figure are now in the Library. 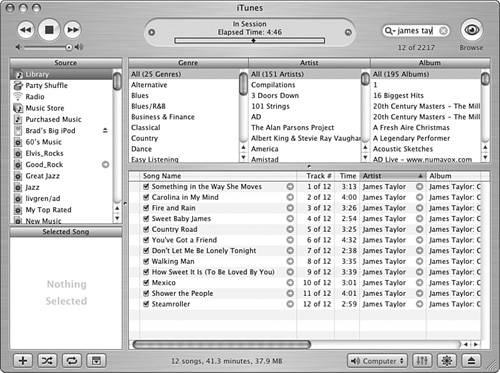
Tip | The keyboard shortcut for the Add to Library command is Ctrl+O (Windows) or +O (Mac). |
|
You can create an audio CD from music you purchase from the iTunes Music Store and then import that music into a Library on another computer. Because the music is converted into the Audio CD format when you do this, it doesn't count against the five-computer limit for music you purchase from the iTunes Music Store. However, if you use this technique to play music you have purchased on more than five computers at the same time, you will violate the spirit and letter of the license agreement that you accept when you purchase music from the store. I recommend that you only use this method if this won't result in more than five computers playing this music at the same time. This can be particularly useful if one of the machines on which you will be playing music can't connect to the Internet, which is required for authorization to take place. Tip | Purchased songs that you move to a different computer won't be added to the Purchased Music playlist automatically. You can drag them onto that playlist from the Library if you want to put them there. |
|