| Many Unix commands are available, and there is no way you can do more than scratch the surface in this small chapter. However, you can learn how Unix commands work in general by trying some specific examples of useful Unix commands.  For references in which you can learn more Unix commands, p. 316. For references in which you can learn more Unix commands, p. 316.
Each of the following sections provides information about specific commands. For each command, you will see four areas of information about that command. First, you will read a general description of what the command does. Second, you will see the command's syntax and some of the useful options for that command. Third, you will see a more specific description of the command's effect. Fourth, you will see the steps you can take to use the command. NOTE For the commands in this section, you won't see all or even many of the options that are possible for each command. You will need to access a more detailed reference for that type of information, such as the command's manual pages.
Learning About the Environment When you are troubleshooting, it can be helpful to understand the environment in which you are running Unix. You can use the uname command to get information about the computer on which you execute the command. Or, you might need to check this information to make sure some software or hardware is compatible with your system: Command: uname Options: -a provides all the information about your machine; -s shows the operating system name; -n lists the machine name What it does: Provides information about various aspects of the machine on which you are running Unix
1. | Launch the Terminal application and at the command prompt, type uname -a; then press Return. You will see various items of information about your machine, such as the core operating system (Darwin), the version of the kernel you are running, and so on (see Figure 11.3).
Figure 11.3. The uname command provides information about the machine on which you are running Unix. 
| 2. | Type uname -s and press Return. You will see only the core operating system (Darwin).
| 3. | Type uname -n and press Return. You will see the name of the machine hosting the Unix session.
Command: env What it does: Provides extensive information about your Unix session (your Unix environment)
Type env and press Return. You will see information including your Home directory, the shell you are running, the username you are using, the language being used, the application you are using to enter Unix commands, and so on.
|
TIP At the top of the scrollbar in the Terminal window is a broken square. If you click this, the Terminal window splits into two panes, and you can work within each pane independently. You can drag the bar that separates the two parts of the window to change their relative size. This is useful when you want to view two areas of the window at the same time but can't expand the window large enough to be able to do so.
Viewing the Contents of Directories You will frequently need to move up and down the directory structure to work with specific files or other directories. Unix has many commands that enable you to do so, including Command: pwd What it does: Shows you the full path to your current location
Use the pwd command when you aren't sure about the directory in which you are currently located. When you use the command, you will see the full path in which you are working. This can be helpful if you become confused about where you are as you move around the directories. Command: cd pathname What it does: Changes your directory location to the one in the path pathname
NOTE When a specific command is listed in a step, you should ignore the period at the end of the command. For example, in the following steps, don't type the period after the command cd Music in step 1.
1. | Type cd Music. The prompt will change to [computername:~/Music] to indicate you are in the Music directory in your Home directory.
TIP Remember that the ~ represents your Home directory, so ~/Music means you are in the Music directory that is within your Home directory. This can help you take some shortcuts when entering paths, as you will see in the next step. Also remember that the forward slash (/) in a path indicates a change in level in the hierarchy. If you are in your Home directory and type cd /Music, you will get a message telling you that no such directory exists. When you enter the forward slash, Unix looks back to the highest level in the structure and there is not a directory called Music in that directory. Leaving the / out indicates that Unix should look in the current directory, which is where the directory is actually located. | 2. | Type cd /Users/shortusername, where shortusername is the short username for your account. This moves you back into your Home directory. You include /User/ because you are moving above the Music directory and so need to include the full pathname.
|
NOTE In a pathname, the tilde character (~) indicates that you are in your Home directory. In step 2, you could have just entered cd ~ to move back into your Home directory.
Command: ls Options: -F differentiates between files and directories; -l shows full information for all the files in the directory What it does: Lists the contents of a directory in various formats and with various information
NOTE Although most commands and options are in lowercase, they aren't always. For example, the -F option is different from the -f option (both are valid for the ls command).
1. | Use the cd command to move into the directory of which you want to see the contents.
| 2. | Type ls. You will see a multiple-column view of the directory; files and directories are listed by name.
| 3. | Type ls -F. You will see the same list as before except that now directories are indicated by a / after their names.
| 4. | Type ls -l. You will see the contents of the directory listed along with lots of information about each file and directory within the current directory (see Figure 11.4). If there are many items, the information will scroll so quickly that you might not be able to see all of it. This is a good opportunity to see an example of piping two commands together.
Figure 11.4. Listing a directory using the ls -l command provides detailed information about each item in that directory. 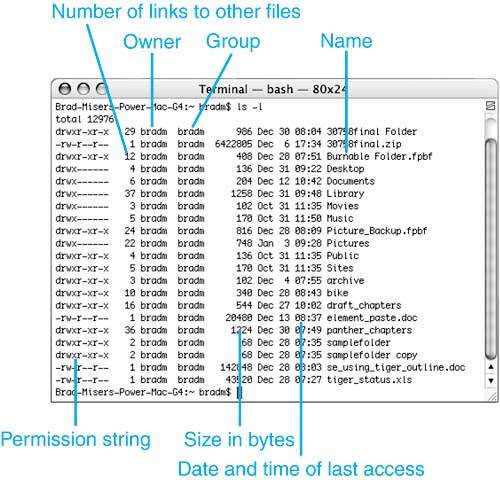
| 5. | Type ls -l | more. This time, the same list will appear, but the display will stop when the screen is full and you will see the more prompt at the bottom of the window. Press the spacebar to see the next screenful of information. You can also scroll the window using the scrollbars to see all the items in the window.
|
TIP If you type the command ls la, you will also see the invisible files in a directory.
The permissions string you see at the start of each item in the full listing indicates how the item can be accessed. The first character indicates whether the item is a file (-) or a directory (d). The next three characters indicate what the owner of the file can do; r is for read, w is for write, and x is for execute. If any of these characters is the hyphen (-), that action can't be taken. The next three characters indicate the permission that the group has to the file. For example, if these characters are r-x, other members of the group can read, not write, and execute the file. The last three characters indicate what everyone else can do. The execute permission applies to a directory. To access a directory, you must have both read and execute permission. If you also have w permission, you can change the contents of the directory as well. Command: file filename What it does: Indicates what type of file filename is
Type file, followed by the filename you would like information about, and press Return. Information about the file is displayed. Changing the Contents of Directories You can use Unix commands to change the contents of directories as well. For example, you can delete files using the rm command. This can sometimes be faster than using the Trash. Once in a while, you might not be able to use the Trash to get rid of a file; you can often use the Unix commands to accomplish the task when other means fail. Command: rm Options: -i prompts you before deleting each file; -r removes the entire directory What it does: Deletes everything that you indicate should be deleted
1. | Use the cd and ls commands to find a file you want to delete.
| 2. | Type rm filename, where filename is the name of the file you want to delete, and press Return. The file is deleted.
| 3. | Type rm -i filename and press Return. You are prompted about removing the file; type Y to remove the file or N to cancel.
| 4. | Type rm -r directoryname, where directoryname is the name of a directory you want to delete, and press Return. The directory and all its contents are deleted.
|
NOTE You can't remove the current directory unless you enter the full path to it.
TIP The asterisk (*) is a wildcard character. For example, to delete all the files in a directory that have the file extension .tiff, you can type rm *.tiff.
Command: cp What it does: Copies a file
1. | Type cp filename filenamecopy, where filename is the name of the file you want to copy and filenamecopy is the name of the file to which it will be copied; then press Return. The first file is copied into a new file that has the second name you typed.
| 2. | Type cp filename path, where filename is the name of the file you want to copy and path is the location in which you want the copy to be created; then press Return. A copy of the file is placed into the location you specified.
|
Command: mv What it does: Moves a file or directory
Type mv filename path and press Return. The file or directory filename is moved to the location path. Command: mkdir What it does: Creates a directory
1. | Use the cd command to move into the directory in which you want to create a new directory.
| 2. | Type mkdir directoryname and press Return. A new directory with the name directoryname is created in the current directory.
|
Using the Manual All Unix commands have a manual associated with them. This manual lists the syntax for the command and defines its options; manuals can be a good reference when you are using a specific command but can't remember an option or the command's exact syntax. Many manual pages also provide some explanation about how the command works. Command: man What it does: Brings up the manual pages for the command you enter
1. | Type man ls and press Return. The manual pages for the ls command appear (see Figure 11.5).
Figure 11.5. You can get extensive information about any command by using the man command. 
| 2. | Press the spacebar to move to the next page.
| 3. | Continue reading the manual pages until you have the information you need.
| 4. | Press Q to return to the command prompt.
|
It is a good idea to take a look at the manual pages for any Unix commands you use. Pay special attention to the list of options that are available for the command. NOTE Some Unix applications provide manual pages using the help argument. For example, perl --help brings up information about the Perl application.
TIP Pressing the spacebar moves you down the manual page one screen's worth at a time; you can move down a manual page one line at a time by pressing the Return key instead.
Using Superuser Commands As you learned earlier in the book, the root account is the fundamental user account that can do anything under Mac OS X. The root account has more access to the system than even an administrator account does. Using this account can be hazardous to your system because, when you are under root, the OS assumes that you know what you are doing and doesn't provide any checks on your activities. You can easily delete things you don't mean to or mess up the system itself. CAUTION By entering the root account, you can do damage to your system. You should use this only when you really have to, and even then, you need to be very careful about the commands you enter while you are working on the root prompt.
However, when you need to use a specific command at a specific time that you can't do under another user account, it can be helpful to enter commands as root. Command: sudo Option: -s, which runs the command in the default shell What it does: Gets you into the root account so you can enter a command that you can't enter under another account
For help activating the root account and creating a password for it, p. 253.
1. | Open a new shell window. The prompt shows the short name of the user account you are logged in under.
| 2. | Type sudo -s and press Return. If you are using the sudo command for the first time in a session, you will see a warning regarding what you are about to do and will be prompted to enter your password; enter your root password and press Return. If you have logged in as root previously, you won't have to enter the password again. When the sudo command is successful, the prompt shows that you are logged in as root (see Figure 11.6).
Figure 11.6. The root# prompt indicates that you are logged in under the root account; be careful when you see this prompt. 
|
TIP To return to the previous account, type exit and press Return.
Killing a Process When a process goes wrong, it can cause problems, such as hanging, or it might start consuming tremendous amounts of processing power, thus bringing your system's performance to a crawl. You can tell that a process has gone out of control by monitoring its percentage of CPU usage. If this number gets high and stays there, the process is likely hung. Because the information in the top window is dynamic, you should open it in a Terminal window and then open another window to enter commands. Under Mac OS X, there are several ways to stop an out-of-control process. For applications, you can use the Force Quit command. At the process level, you can use the Process Viewer to force a process to quit. You can also use the powerful Unix command kill to stop a running process. Command: kill ProcessID Options: -9 kills the process no matter what; -3 quits the process What it does: Stops the process with the ID number ProcessID
1. | Launch the Terminal.
| 2. | Type top. You will see a listing of all the processes currently running on your Mac (see Figure 11.7). Use the information in the table to identify the problematic process, such as one that is consuming an unreasonable amount of processing power. In this example, assume that Safari has gone out of control (although, as you can see in the figure, it is using only 47% of the CPU so it really doesn't have a problem at this point). In the figure, Safari's process ID number is 403.
Figure 11.7. This top window shows all the processes running on your Mac; you can use the process ID with the kill command to stop any running process. 
| 3. | Open a new shell by selecting File, New Shell ( -N). -N).
| 4. | Type kill -9 403. (Of course, you would actually type the process number for the process you want to kill.)
| 5. | Switch back to the Terminal window showing top. You will no longer see Safari listed in the process list. You can use the same steps to kill any process by using the process ID of that process.
You can stop the top process by pressing Ctrl+C.
|
NOTE If the process you are trying to kill is an Administrator process, you will have to use the sudo -s command to get into the root account before you use the kill command.
|