Opening Documents in Mac OS X
| Using most applications involves opening documents; Mac OS X offers several features that applications can use to make opening documents fast and easy. There are several ways in which you can open documents:
NOTE If you see the document's icon on the Dock, an alias to that document has been placed there. If you see a thumbnail of the document's window on the Dock, that document is open and its window has been minimized. In either case, single-clicking the icon causes the document to open so you can work on it. Most of these techniques are simple. The Mac OS X Open dialog box is a good model of all the file selection dialog boxes you will encounter, so you should get very familiar with the way in which it works. Also, you need to understand how you can associate documents with specific applications so you can determine which application opens when you open a document. Using the Mac OS X Open Dialog BoxUnder Mac OS X version 10.4, Open dialog boxes are harmonized with Finder windows so behavior of these windows, which serve a similar purpose (that being to enable you to access files and folders), is similar. As under previous versions of Mac OS X, different applications can add features to the Open dialog box for specific purposes, but most Open dialog boxes offer a similar set of features. NOTE Many dialog boxes, although not called Open, are actually the Open dialog box with the name modified to suit the specific purpose at hand. These dialog boxes have names such as Choose a Picture, Choose a File, and so on. However, they all work in basically the same way and offer similar features as the Open dialog box. A typical Open dialog box is shown in Figure 7.14. Figure 7.14. This Open dialog box, from TextEdit, is typical of those offered by Mac OS X applications. The similarity to Finder windows is more than skin deep.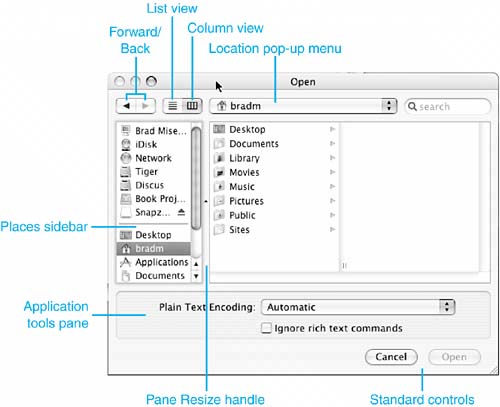 If you read through earlier chapters in this book, you are quite knowledgeable of Finder windows, and Open dialog boxes work like Finder windows in many ways. For example, the Places sidebar enables you to choose the location from which you want to open a file. When you select a place, its contents appear in the center pane of the window. You can choose to view this pane in the List view or the Columns view; again, these views are the same as when you are viewing Finder windows. You can use the List View or Columns view button to change the view used in the dialog box. You can use the Forward and Back buttons to move back to locations you viewed previously.
The location shown in the Location pop-up menu is the currently selected folder whose contents are displayed in the pane. For example, if Documents is shown in the Location pop-up menu, the Documents folder is selected and its contents are displayed. If you have selected the Columns view, the contents of the location selection on the Location pop-up menu appears in the leftmost column. You can also use the Location pop-up menu to quickly access many areas of your Mac, from your current location up to the volume on which Mac OS X is installed (see Figure 7.15). Figure 7.15. The Location pop-up menu in the Open dialog box enables you to move "up" from your current location.
If you use the List view, to open a file or folder, simply move to it, select it, and click Open or double-click the file or folder you want to open. If you use the Columns view and select a folder, that folder becomes selected and you see its contents in the pane to the right of the folder. You can then select a folder or document it contains. In either view, you can select a document and double-click it or click Open. You can change the Open dialog box in several ways, including the following:
The Open dialog box might contain application-specific controls. For example, in Figure 7.15, you saw the Plain Text Encoding pop-up menu that lets you choose the type of encoding you want to use. In the Application Tools pane, you will also see different tools depending on the application in which you are working. As you locate and open files or documents, you should be aware of these additional options and apply them as needed. Determining the Application That Opens When You Open a DocumentWhen you open a document, the system determines which application should be used to open that file (other than when you open a document from within an application using its Open command, of course). Typically, the document's creator opens if it is installed on your Mac, such as Microsoft Word opening a .doc file. When opening a file from outside an application, several factors determine which application opens when you open a document, including the document's file type and creator information, as well as the file's filename extension. Mac OS X does a good job evaluating these properties to ensure that the correct application opens. However, there might be situations in which you want to use a different application than the one the system selects, or you might not have the application that was used to create the document. In such cases, you can choose the application in which a document opens. You can also change the association for all files of a specific type to determine which application opens when you open any file of that type. There are two ways to associate document types with the applications used to open them. One is by using the Get Info window; the other is by using a document's contextual menu. Using the Get Info Window to Associate Documents with an ApplicationYou can use the Open with section of the Info window to determine which application is used to open a file:
TIP If you want to permanently change the application used to open the document, check the "Always Open With" box. CAUTION Just because you told Mac OS X to use a specific application, even if it is the one that Mac OS X recommended, that doesn't mean you will actually be able to open the document with the application you select. If you try to open the document and generate error messages, you need to go back and select an application that can handle the type of file you are working with. If you choose an application that Mac OS X isn't sure can open files of the selected type, you see a warning saying so in the dialog box after you select the application. You can proceed even when you see the warning, but you might get unexpected results. TIP Even though Mac OS X tries to recommend applications that are appropriate for the selected document, it doesn't always do a great job. For example, it doesn't usually list a Classic application even when that application is the best choice for the selected document. In those situations, use the All Applications command on the Enable pop-up menu to add the application you want to use for the document. You can also use the Info window to associate all files of a specific type with an application. Here's how:
Using a Contextual Menu to Open a Document with a Specific ApplicationYou can also use a file's contextual menu to determine which application is used to open it by doing the following:
When you use this technique, the document is associated with the application only if you save the document from within that application. If you simply open it and view it, the previous application continues to be associated with the document. If you want the file to always be opened with a different application, even if you don't make any changes to it, open the contextual menu and then press the Option key. The Open With command becomes the Always Open With command. After you choose an application, the file is associated with that application and always opens in it. NOTE Note that setting an application for all files with a specific type and creator combination does not override any documents for which you have set a specific application. For example, suppose you set the application to use for a specific document. Then, using another document, you change the application used for documents of that type and creator to be a different application. The first document would still open with the specific application you selected previously. TIP You can also access the same Open, Open With, and Always Open With commands on the Action pop-up menu in the Finder window's toolbar. Using Filename Extensions to Associate Documents with ApplicationsYou can also try to change the application associated with a specific document by changing the document's filename extension. For example, to associate QuickTime Player with a document, you would change its extension to .mov. When you do so, the file's icon might change to reflect that extension and the document opens with the application that extension is associated with. But this doesn't always happen. Do the following:
Changing the filename extension does not override a selection you have made with the Info window. If you associate an application with a document by using the Info window tools and then subsequently change the filename extension, the choice you made with the Info window overrides the filename extension and determines the application used to open that document. |
 To learn how to work with Finder windows,

EAN: 2147483647
Pages: 317