| One of the easiest ways to build a track in GarageBand is to use its loops. These loops make it easy to create great sounding music, especially for rhythm, percussion, and other "texture" elements. There is a huge variety of loops you can use in GarageBand so even though you are using music someone else has created, your personal creativity isn't limited at all because you can configure and mix these loops in an endless variety of ways. Finding Loops to Use There are a number of different ways to find loops that you might want to use in your project. Finding Loops Using the Loop Browser in Button View As you can probably guess from its name, the Loop Browser enables you to browse available loops. To use the Loop Browser to find a loop, perform the following steps: 1. | Click the Loop Browser button (the third button from the left along the bottom of the GarageBand window, refer to Figure 20.2). The Loop Browser will slide open and you will see the collections of loops available to you (see Figure 20.3). By default, the Loop Browser will open in the Button view.
Figure 20.3. The Loop Browser lives up to its name; you can browse lots of loops quickly and easily. 
| 2. | Click one of the buttons shown in the left pane of the browser to view the loops that group contains. There are a variety of groups, some are by instrument (such as All Drums) while others are by musical style (such as Rock/Blues). When you choose a group, you'll see the loops it contains in the right pane of the browser (see Figure 20.4).
Figure 20.4. I've clicked the Rock/Blues button so the browser is showing all of the loops associated with that music type. 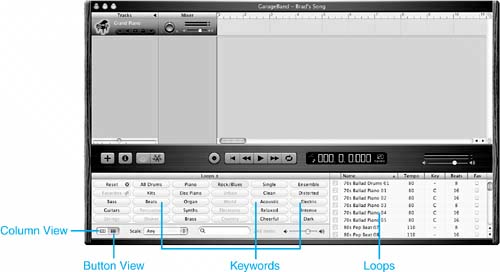
NOTE Currently selected keywords are highlighted in blue. Available keywords remain as selectable buttons. When a group becomes unavailable because it no longer fits in your search, it becomes inactive and is grayed out. | 3. | Continue clicking buttons (more accurately called Keywords in GarageBand lingo) to further refine your search until you find loops that you might want to use in your song. For example, if you click Rock/Blues and Electric, you'll see Rock/Blues loops that included electric instruments. If you then click Bass, you'll see Rock/Blues loops that feature electric bass guitars. As you refine your search, the loops that match the currently selected keywords are shown in the right pane of the Browser. The number of loops matching your keyword selection is listed just to the right of the Search tool.
|
TIP You can add even more loops to GarageBand by purchasing and installing a GarageBand Jam Pack. These collections of additional loops and other musical goodies are available from Apple and other sources.
Finding Loops Using the Loop Browser in Column View The Browser in Column view works similarly to how it does in Button view. Try it out with the following steps: 1. | Click the Loop Browser button. The Loop Browser will slide open and you will see the collections of loops available to you.
| 2. | Click the Column View button (refer to Figure 20.4). The buttons will be replaced by three columns; the first column shows the top-level categories of the loops available to you.
| 3. | Select the top-level category by which you want to view loops. For example choose By Instruments to view loops by the instruments used in those loops. The second column will be filled in; what you see depends on the category you selected. For example, if you selected By Instruments, the second column will be labeled "Instruments" and you will see a list of all instruments used in all the loops.
| 4. | Select the category in the second column for the group of loops you want to see. The third column will be filled in with loops that meet your selection. For example, if you are browsing by instrument and click on Bass, you'll see the list of all loops that feature bass instruments.
| 5. | In the third column, select the category of loops you want to see. The loops in that category will appear in the right pane of the Browser (see Figure 20.5).
Figure 20.5. Here I have selected the Elec Bass category; the loops in this category appear in the right pane of the Browser. 
|
TIP You can refine the loops you are browsing so that you see only those that are in a specific scale (such as one that matches your song) by choosing a scale on the Scale pop-up menu.
Searching for Loops You can also search for loops by name: 1. | Type some text associated with loops for which you want to search in the Search box. For example, to search for bass loops, type bass in the Search box.
| 2. | Press Return. The search will be performed and you will see the loops that meet your search criterion in the right pane of the Browser.
|
TIP You can combine methods of searching. For example, you can search for loops by text only in specific groups by selecting the categories in which you want to search (by button or by column) and then performing a text search. Then use the Scale pop-up menu to further refine the search.
Previewing and Understanding Loops After you have found a set of loops, you can view information about and listen to them by using the following steps: 1. | In the right-most pane of the Browser, examine the list of loops for data about those loops; you'll see the Name, Tempo, Key, and Beats for each loop.
TIP In addition to a loop's data, you'll also see the Fav column. You can click the check box in this column to mark the loop as a favorite. You can access the loops you mark as favorites by using the Favorites button or choosing the Favorites category. | 2. | Sort the list of loops by clicking the column heading by which you want to sort them. You can reverse the order by clicking on the Sort Order arrow that appears in the column by which the list is currently sorted.
| 3. | To listen to a loop, click its icon or anywhere else in the loop's row. Its icon will become the speaker icon and the loop will start to play. You can see relative volume information for the loop just above the Volume slider.
| 4. | Use the volume slider to set the playback volume for the loop.
NOTE When you add a loop to a song, the relative volume you set for it while browsing it will be set for the track in which you place it too. You can change this later. | 5. | To stop playing the loop, click it again or click another loop.
| 6. | Continue previewing loops until you find one you want to use in your song.
|
Adding a Loop to a Track After you have selected and previewed a loop, you can add it to your project (in a track) by performing the following steps: 1. | Select the default Grand Piano track and press  -Delete to remove it from the song (this step is optional, it won't hurt anything to leave the track if you prefer it that way). -Delete to remove it from the song (this step is optional, it won't hurt anything to leave the track if you prefer it that way).
| 2. | Drag the loop from the Browser and drop it in the timeline at which point you want the loop to start playing. For example, if you want the loop to start at the beginning of the song, place it at the far left of the Timeline pane. While you drag the track, the cursor will contain a "+"" sign and pointer (see Figure 20.6). When you get to the place at which you want to position the track, release the mouse button. A track will be created for the loop and you will see the information about the instrument that is used in the loop. The Mixer tool will also appear.
Figure 20.6. I've added the Southern Rock Bass 06 loop to my song. 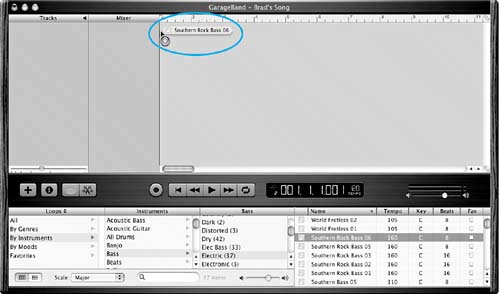
| 3. | Repeat steps 1 and 2 until you have added all the loops to the song that you want to use. You can have loops start at different points in the song by dropping them in different locations.
| 4. | As you add loops, click the Play button to hear the song play, click it again to stop the song. As the song plays, you'll see the Playhead move along the Timeline.
NOTE When you first add tracks to your song, you haven't defined an end point for the song so it will continue to play until you click the Stop button. | 5. | Build the loop content of your song by adding, removing, or moving tracks in the Timeline until you have the sound you are going for. Don't worry about editing the tracks by setting lengths, for example. You can do that later in the process. For now, you just want to get all of your loops into the song (see Figure 20.7).
Figure 20.7. At this point, my song has five loops. 
|
|